Ruby Scoo’s epic build, ten years and counting...
Moderator: El_Freddo
- ScubyRoo
- Junior Member
- Posts: 584
- Joined: Thu Oct 09, 2008 2:55 pm
- Location: Templestowe, Vic (When in Aus)
Nice work Bennie! That clutch disc is DESTROYED!!! Top work!
That road from omeo to Joker's is one of my favourites... I stay up at jokers or angler's rest several times during the spring as we kayak/raft the mitta regularly. That last pick of ruby and the river, when we paddle it at high flows the water is lapping at the dirt, so another meter or so at least.
Great to see her on the road again, you must be stoked!
The Green Machine is up for sale . Lifted, bars, exhausts... View Gumtree ad
- El_Freddo
- Master Member
- Posts: 12506
- Joined: Tue Oct 04, 2005 10:00 am
- Location: Bridgewater Vic
- Contact:
Thanks mate! That means a lot! Not meaning to go soft on anyone but I've not thought about it like this. I will be the first to say that I'm not the first to modify an L series!Venom wrote:Hey Bennie i'm glad you've got Ruby Scoo back on the road! This thread is like the ultimate DIY for a custom L series, very inspirational. The black rims look really good with the colour of the car.
Which is what makes me think this was starting a LOOONNNNGGGG time ago!ScubyRoo wrote:Nice work Bennie! That clutch disc is DESTROYED!!! Top work!
I too love the drive after Bruthen up to Joker's flat. One day... just one day I might do it in a WRX I reckon Rhy's H6 would wet it's pant up there if it had pants!
Cheers
Bennie
- El_Freddo
- Master Member
- Posts: 12506
- Joined: Tue Oct 04, 2005 10:00 am
- Location: Bridgewater Vic
- Contact:
A BIG weekend for Ruby Scoo!
Probably not Dane, but I did shit my pants when it was completely different to what I was expecting!GOD wrote:Surely your Foz seats aren't that different to what everyone has done before?
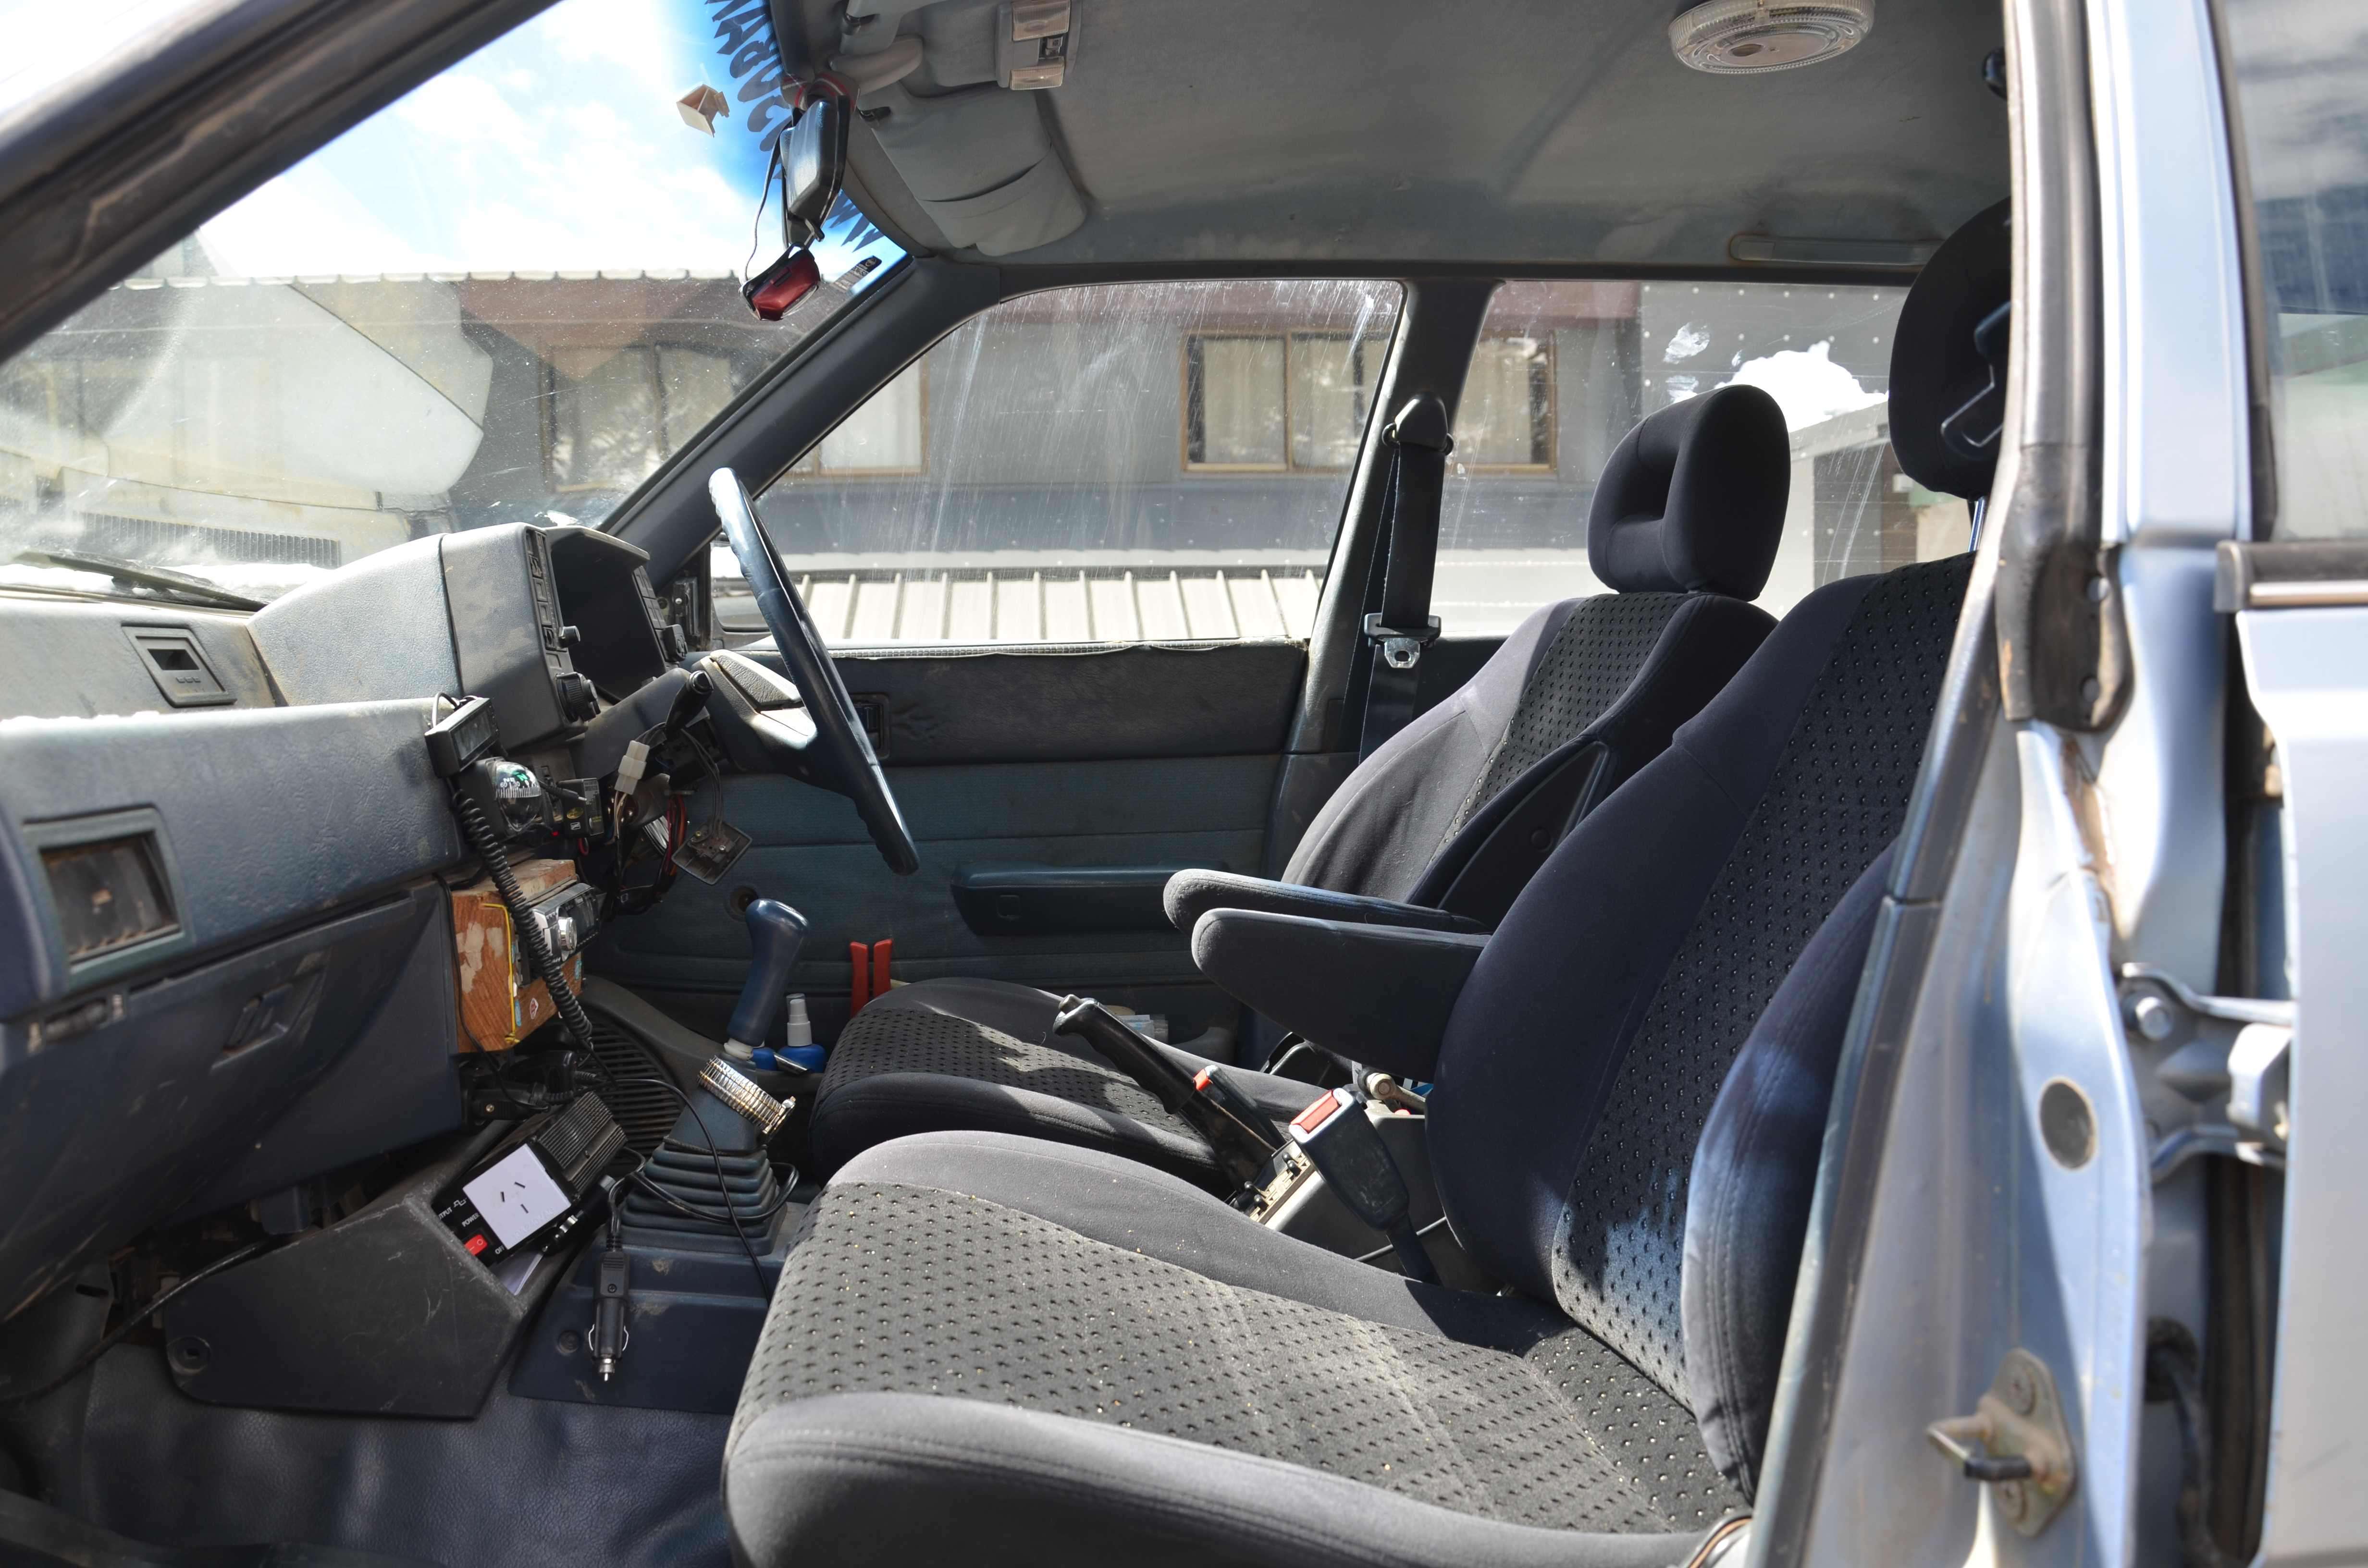
They're done now, but I need to get some more photos of what I've done to really show the work that went into them. They're awesome but I initially wasn't happy with how high they sat even though I'd cut 15mm out of the L series brackets! But after the drive back up the mount yesterday I'm very happy with them and I'm now just waiting on Kez's verdict as she hasn't seen them yet. I'm hoping she likes them, the original seats were not good for her
The other BIG news is that I found some substantial damage under Ruby Scoo. It had me quite worried about her future. It started out when Matt (nachaluva) fount some cracks when checking out Ruby's undercarriage on our Walhalla 4wd trip:
I wasn't happy and thought it may have been a large pot hole or two that did the damage but really had no idea. So we watched these cracks and continued on our way. They didn't move which was great.
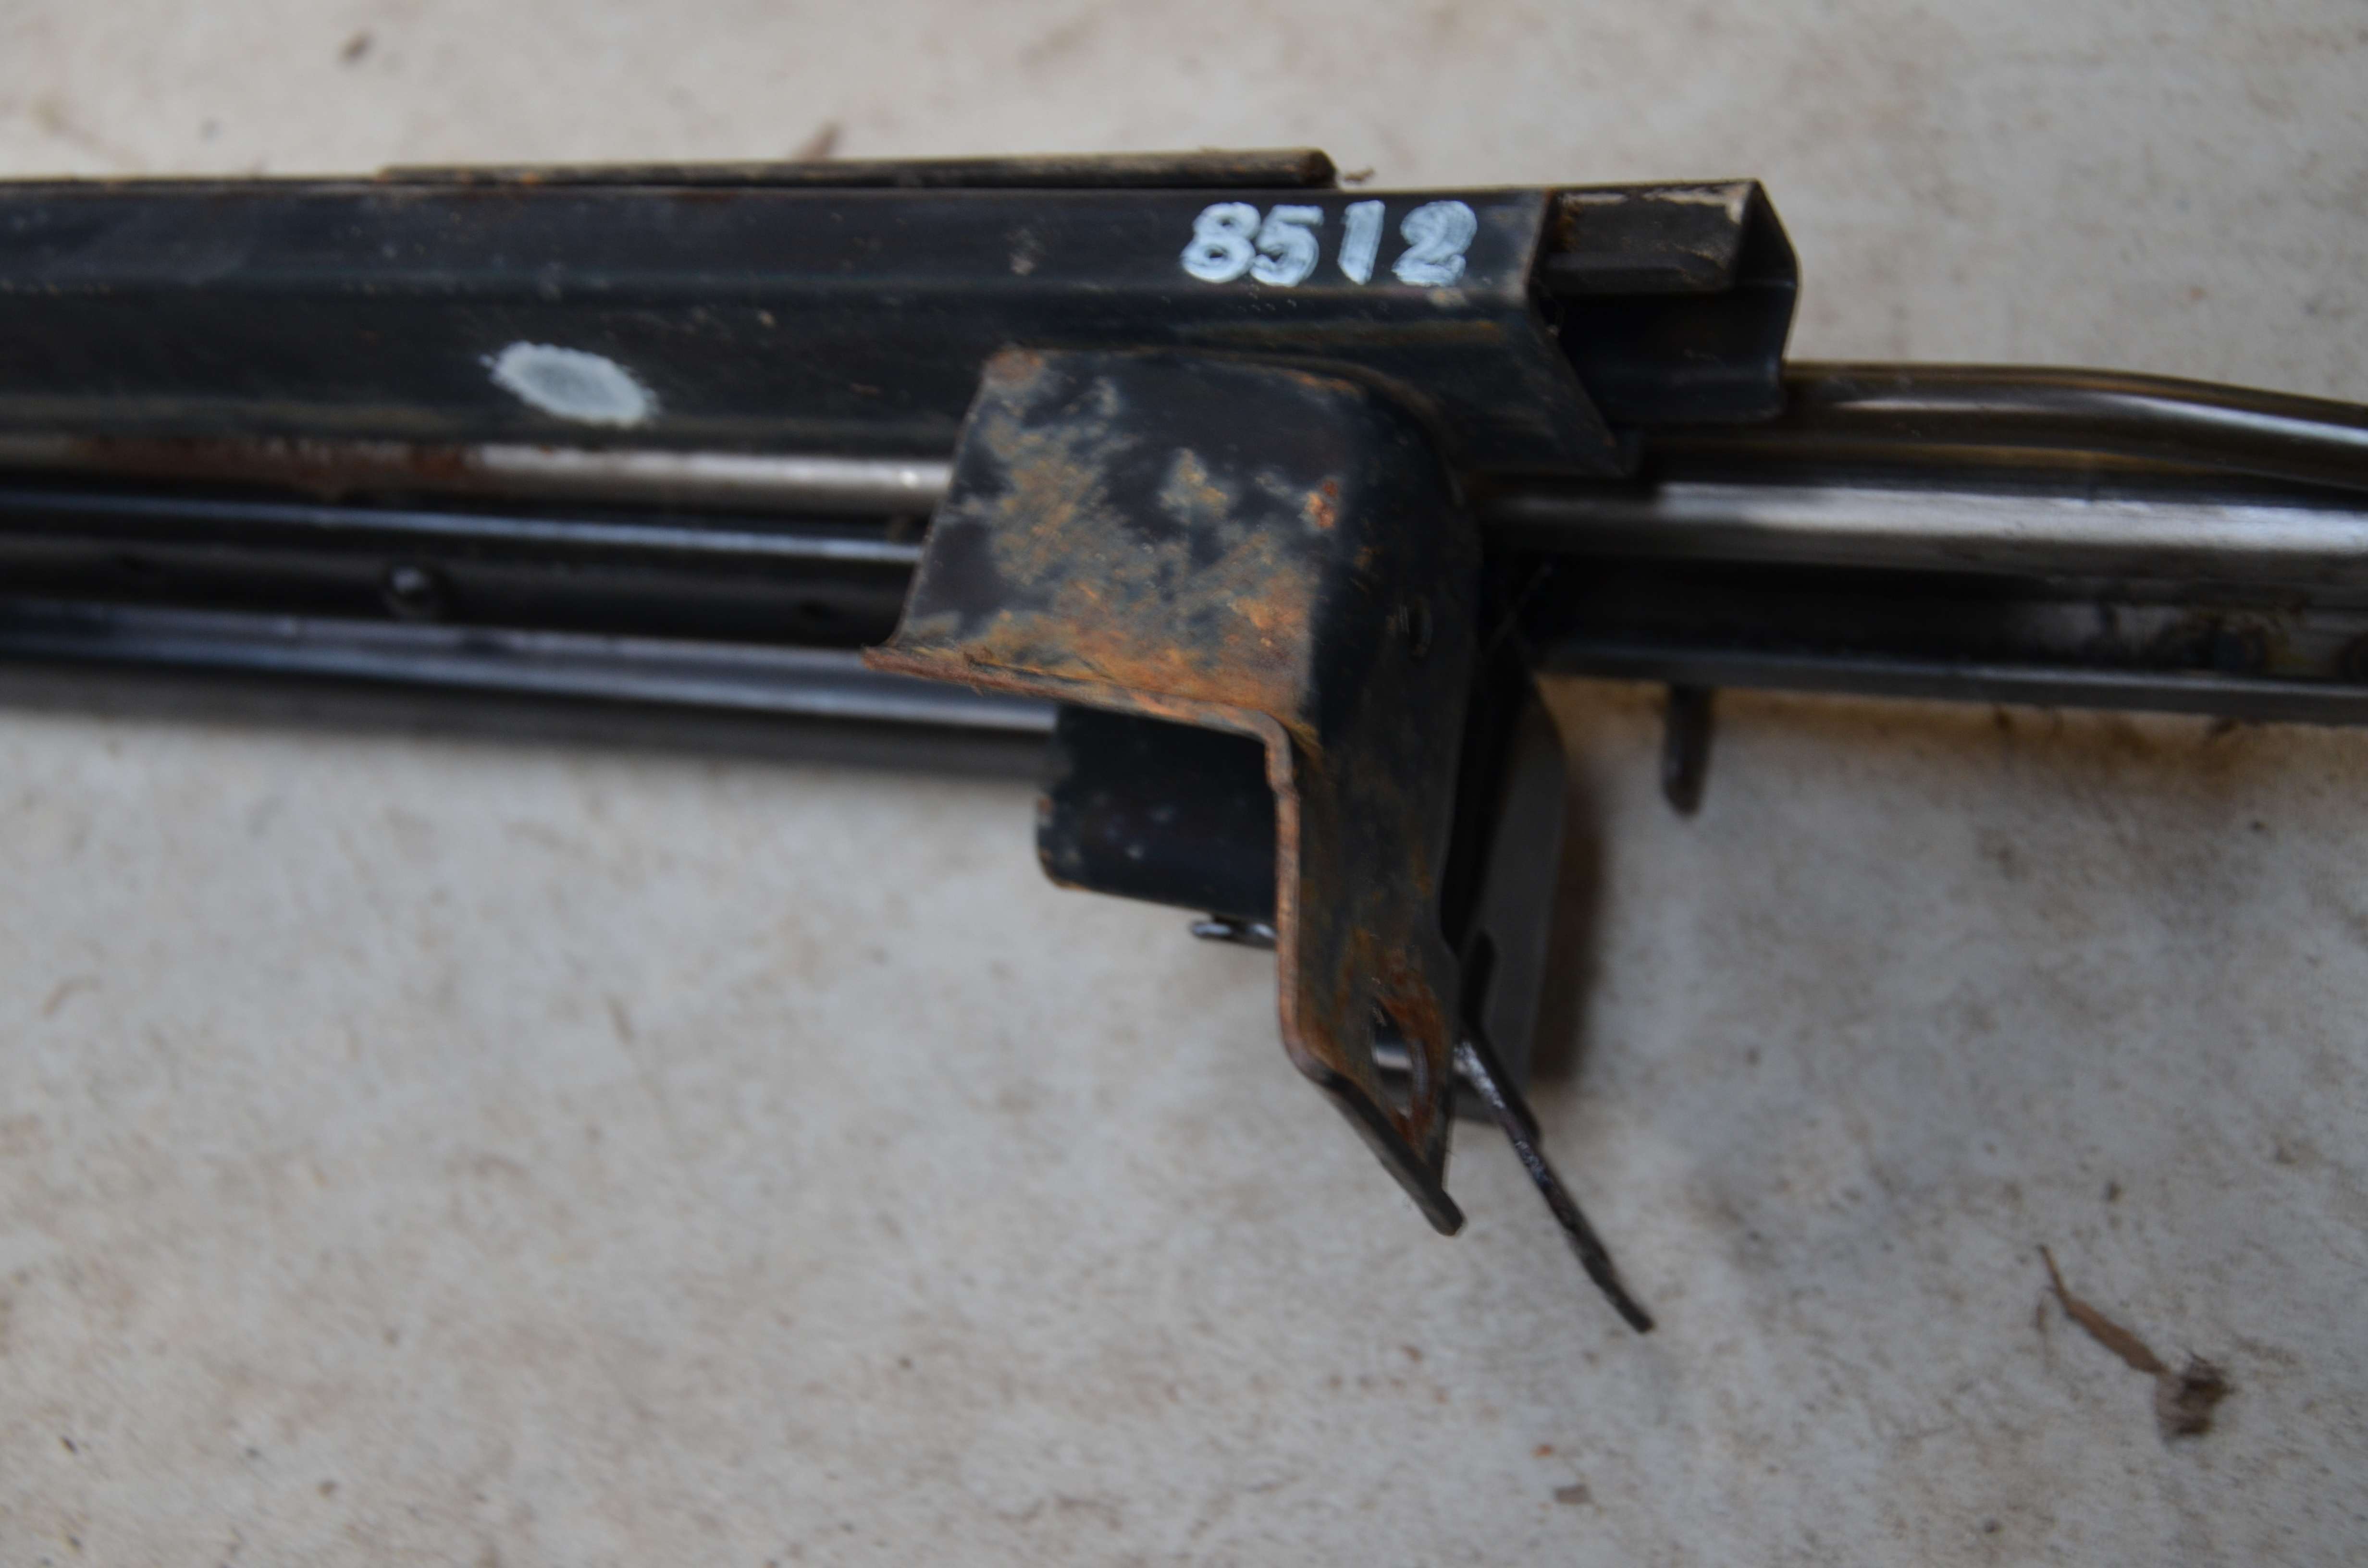
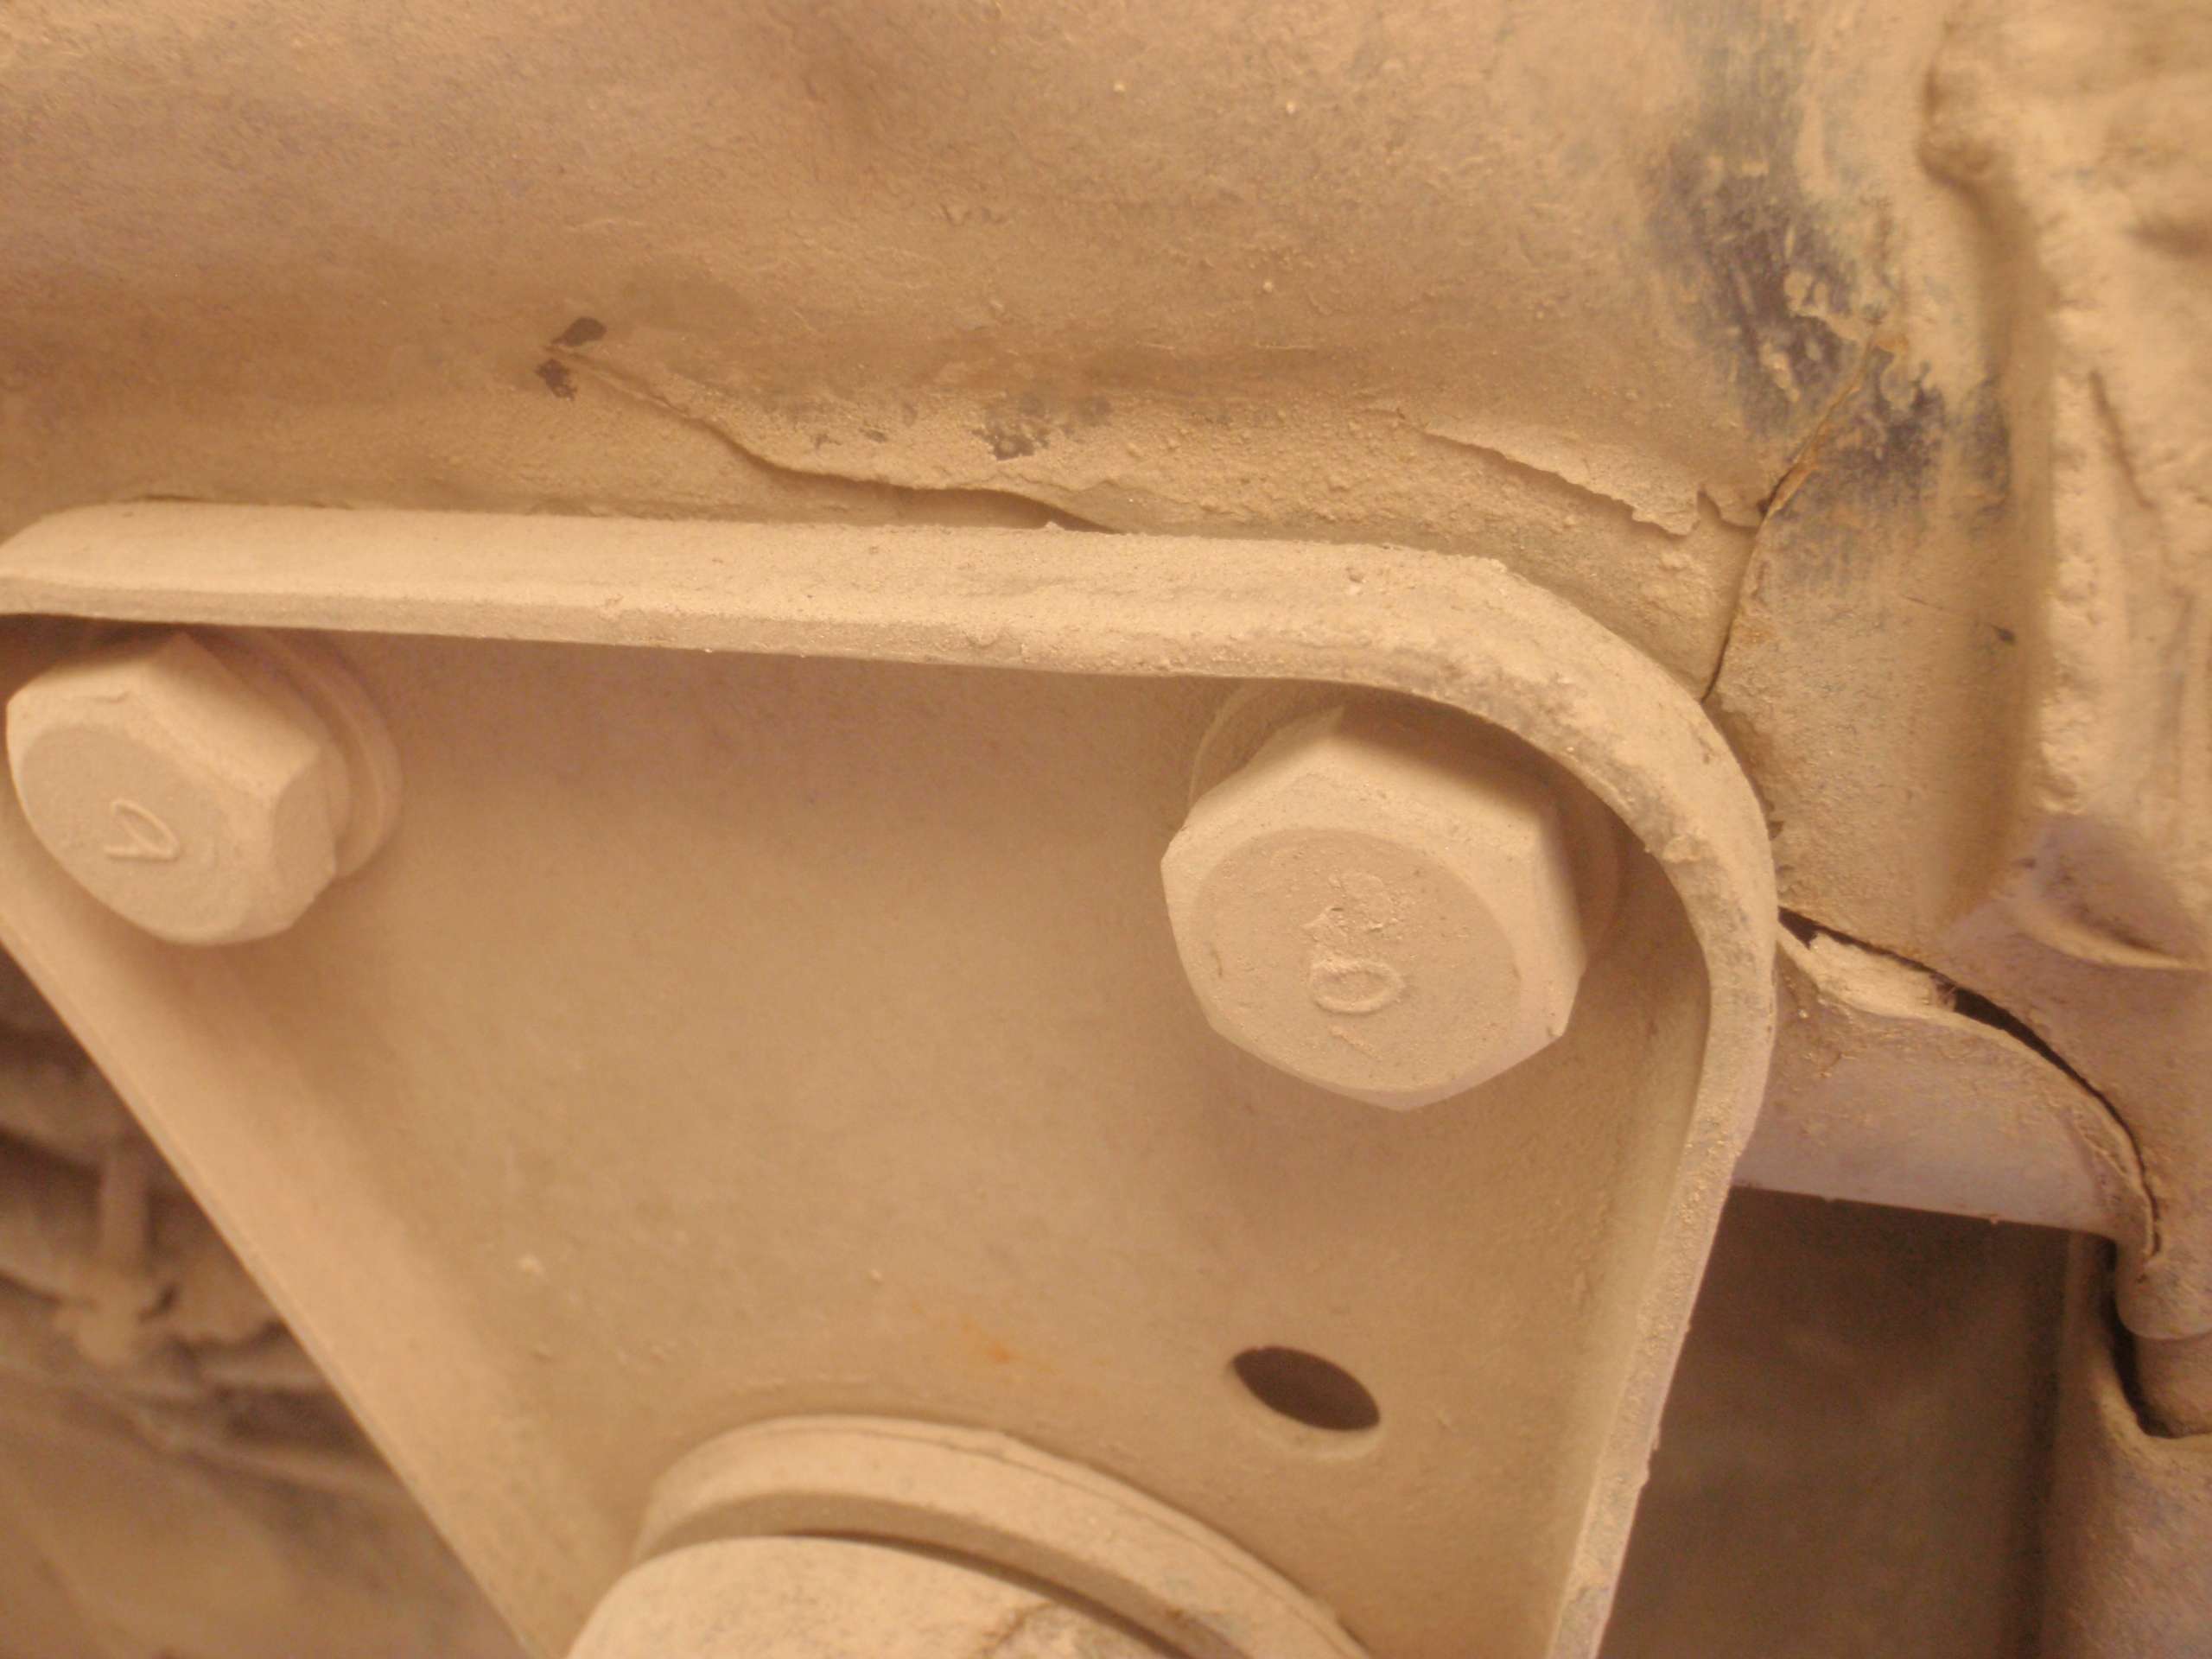
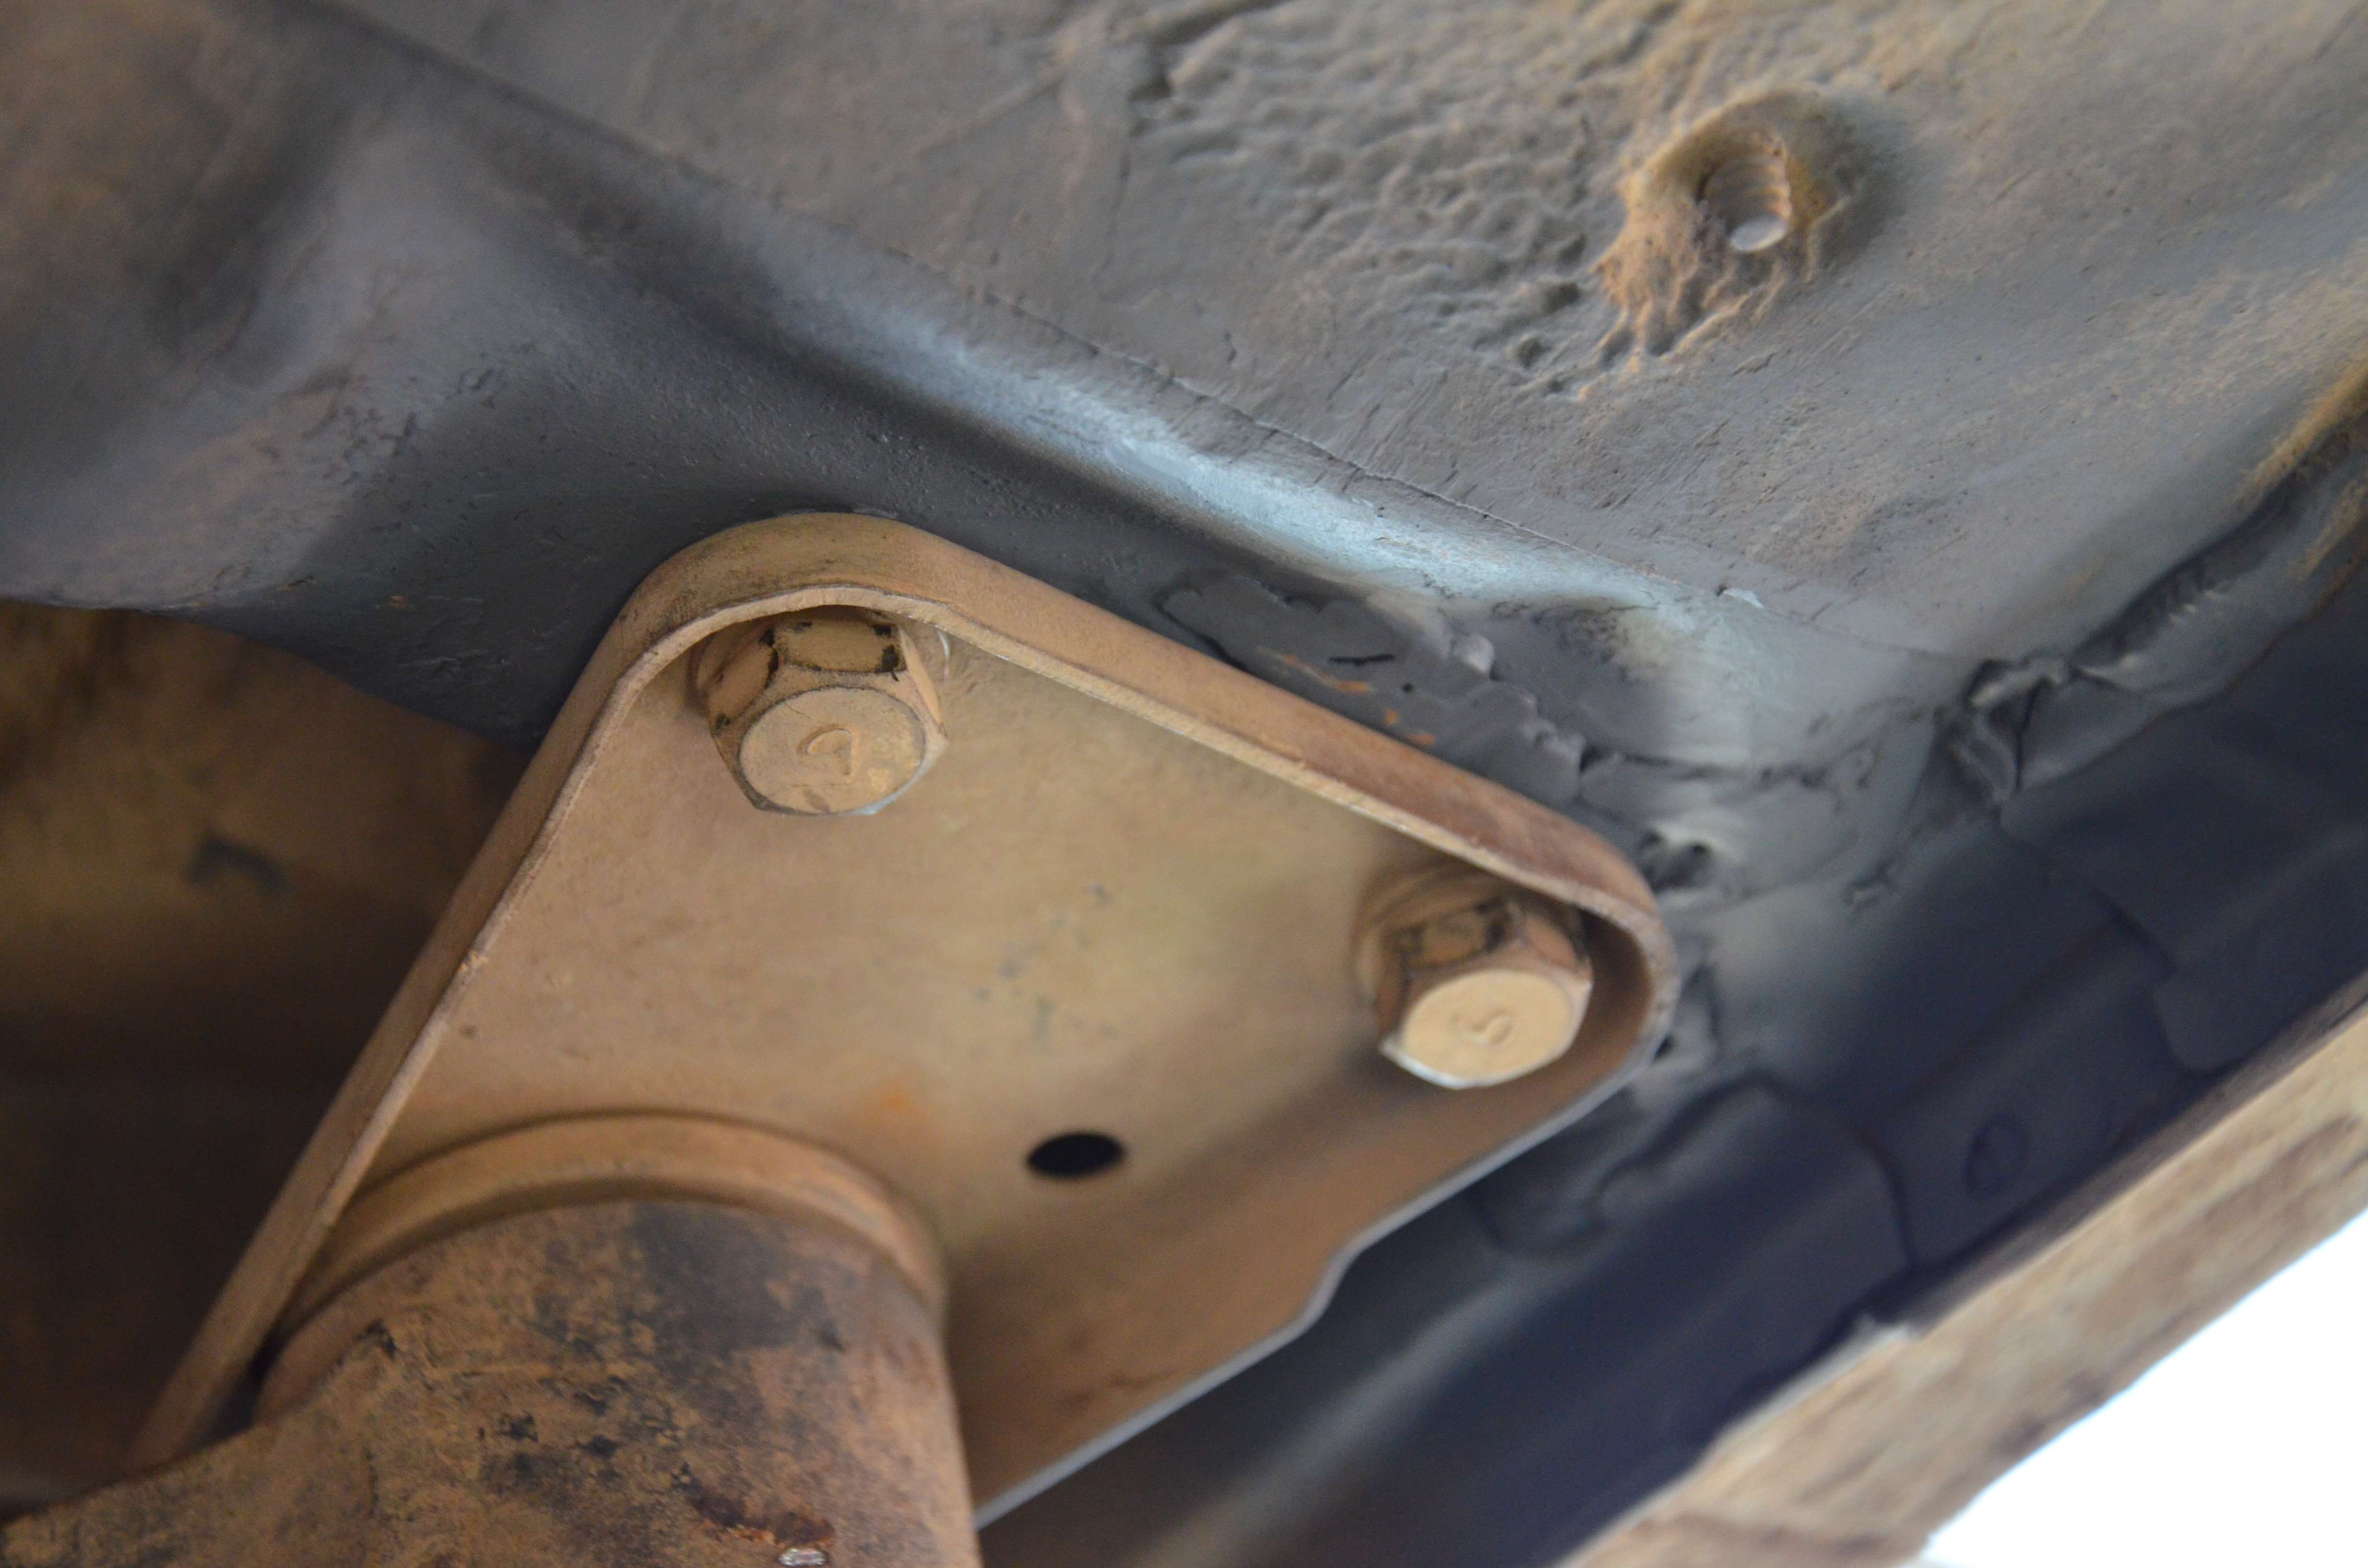
Then when I was putting the little boots back on after enjoying a week of 27 inch rolling goodness I found that there were identical cracks on the left hand side. Not good. Then I thought I'd check out the repair my uncle and I did on the LHS radius rod/gearbox x member mounting bracket, specifically that plate that is welded to the firewall that has two of the three captive nuts for the RR/GCM mounting plate. It had developed a crack so we put a bolt on it to hold it back on the firewall. All good.
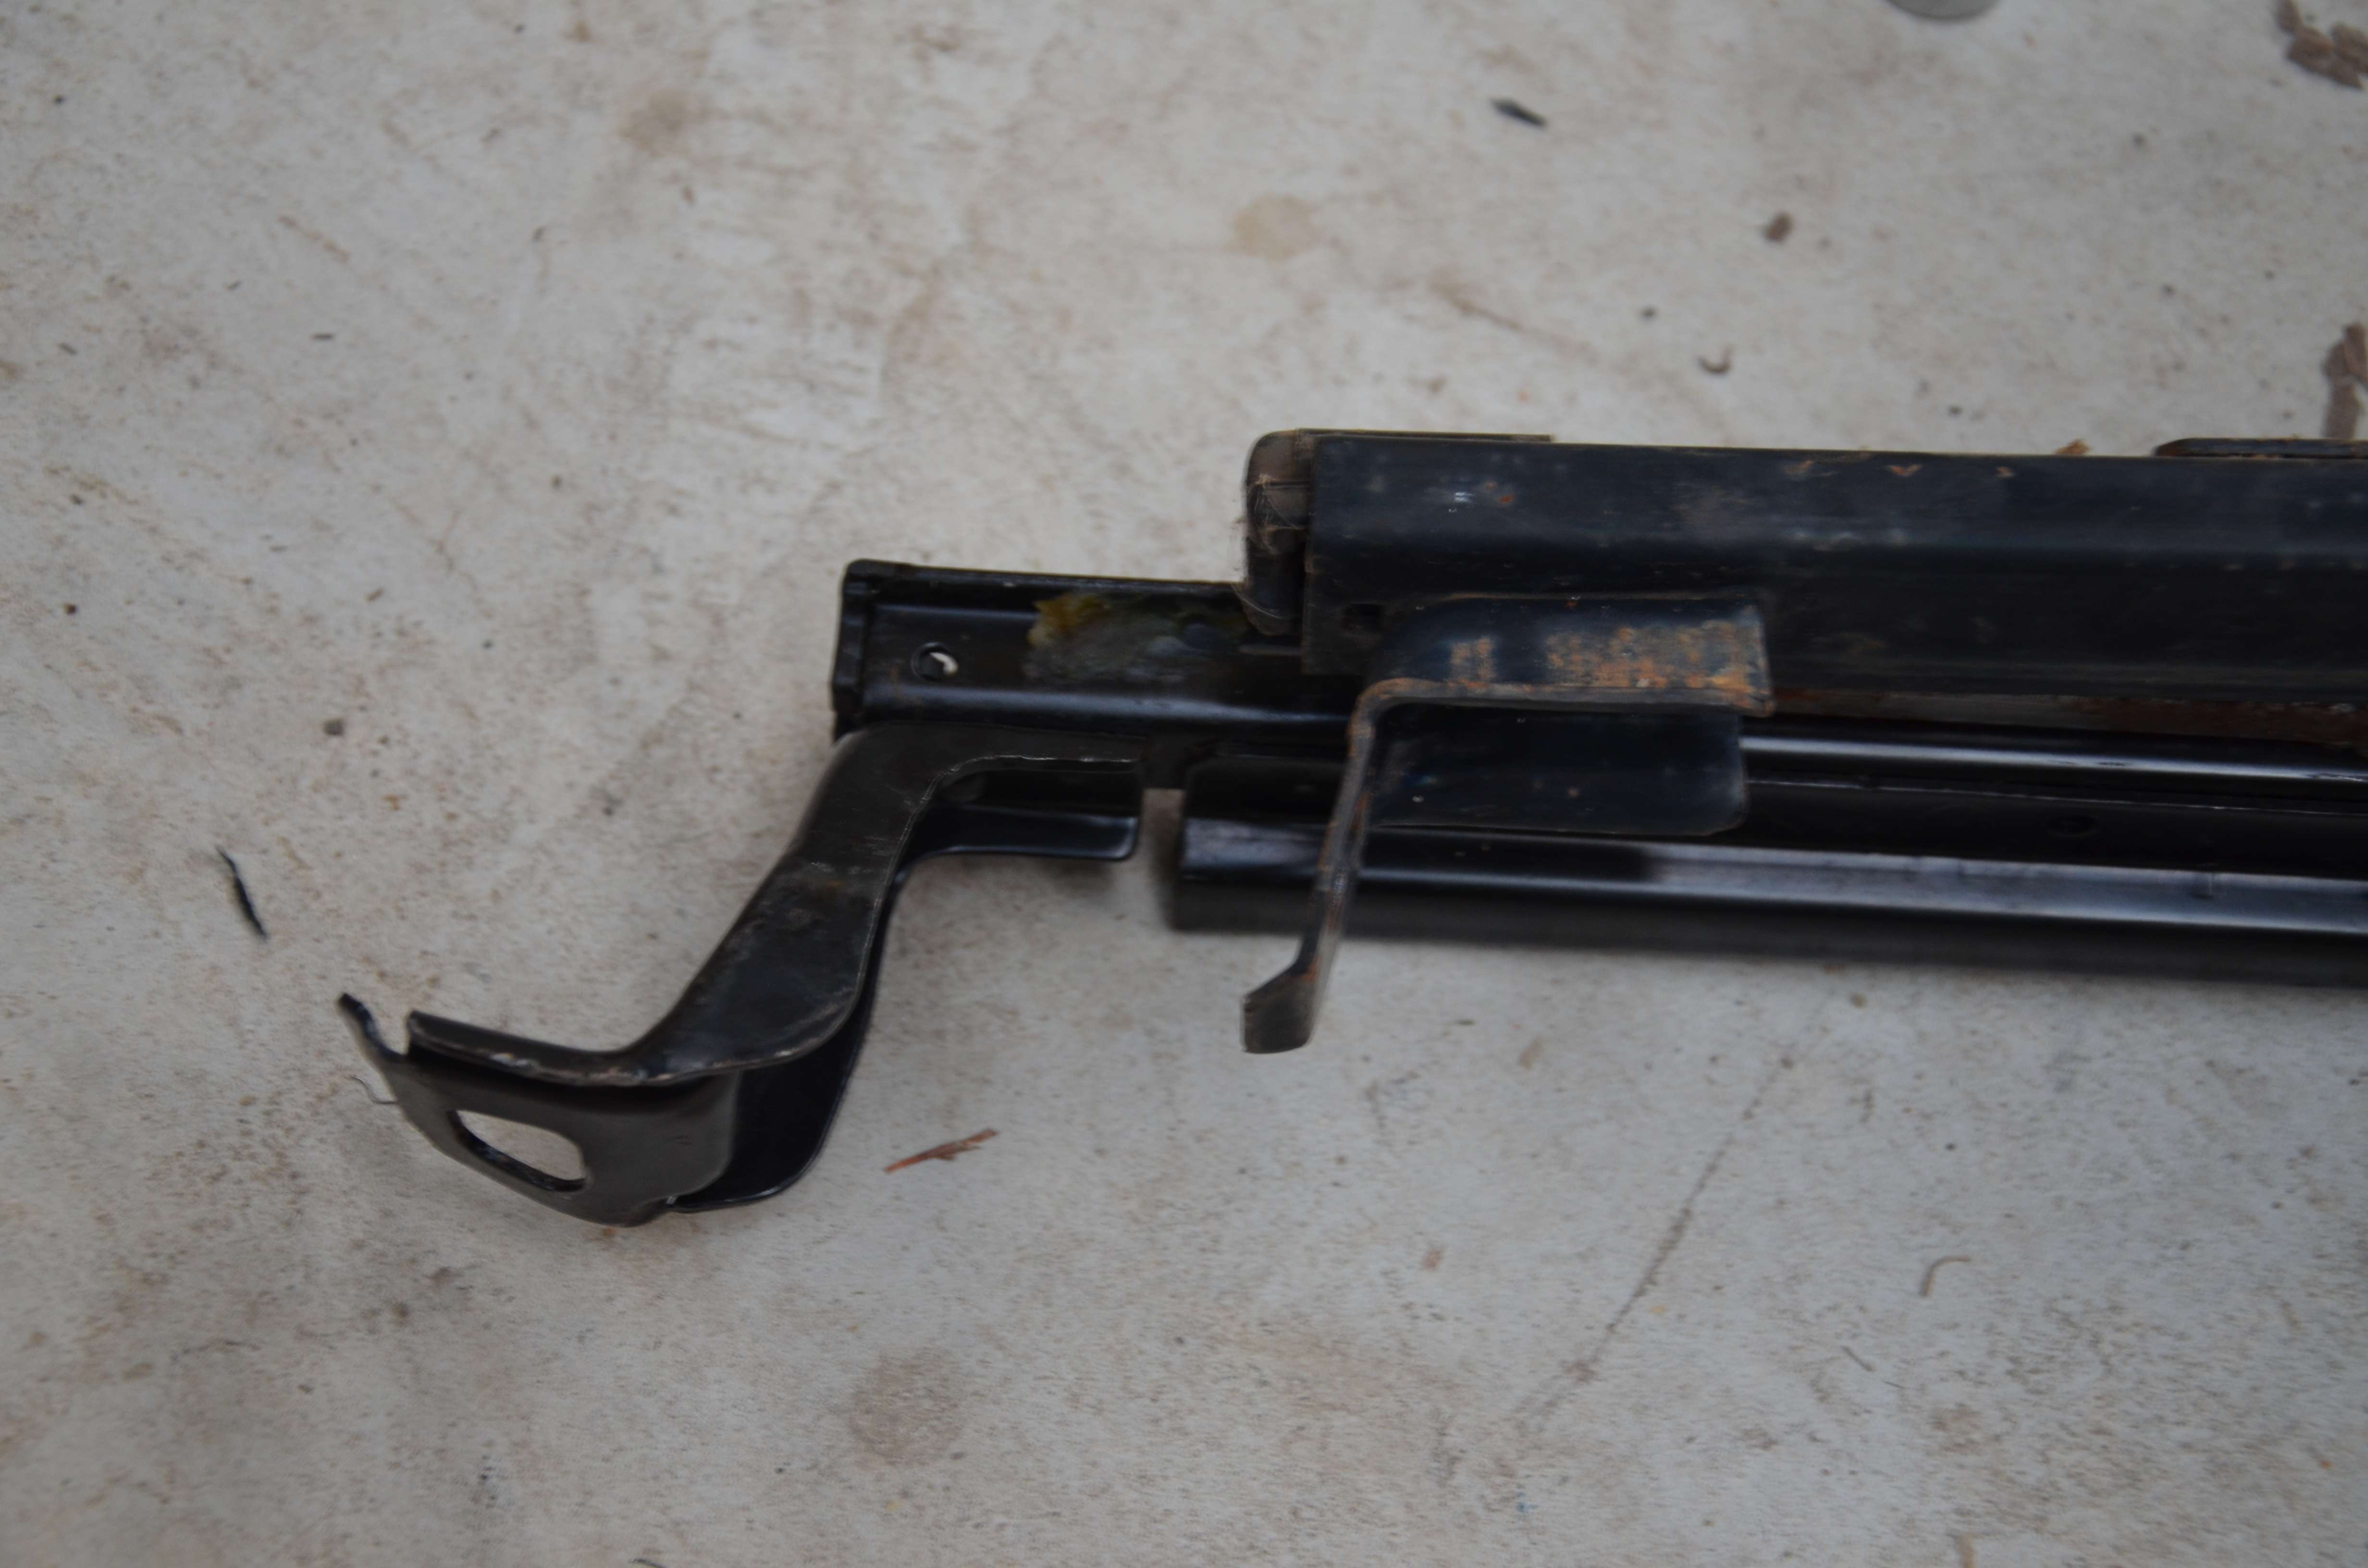
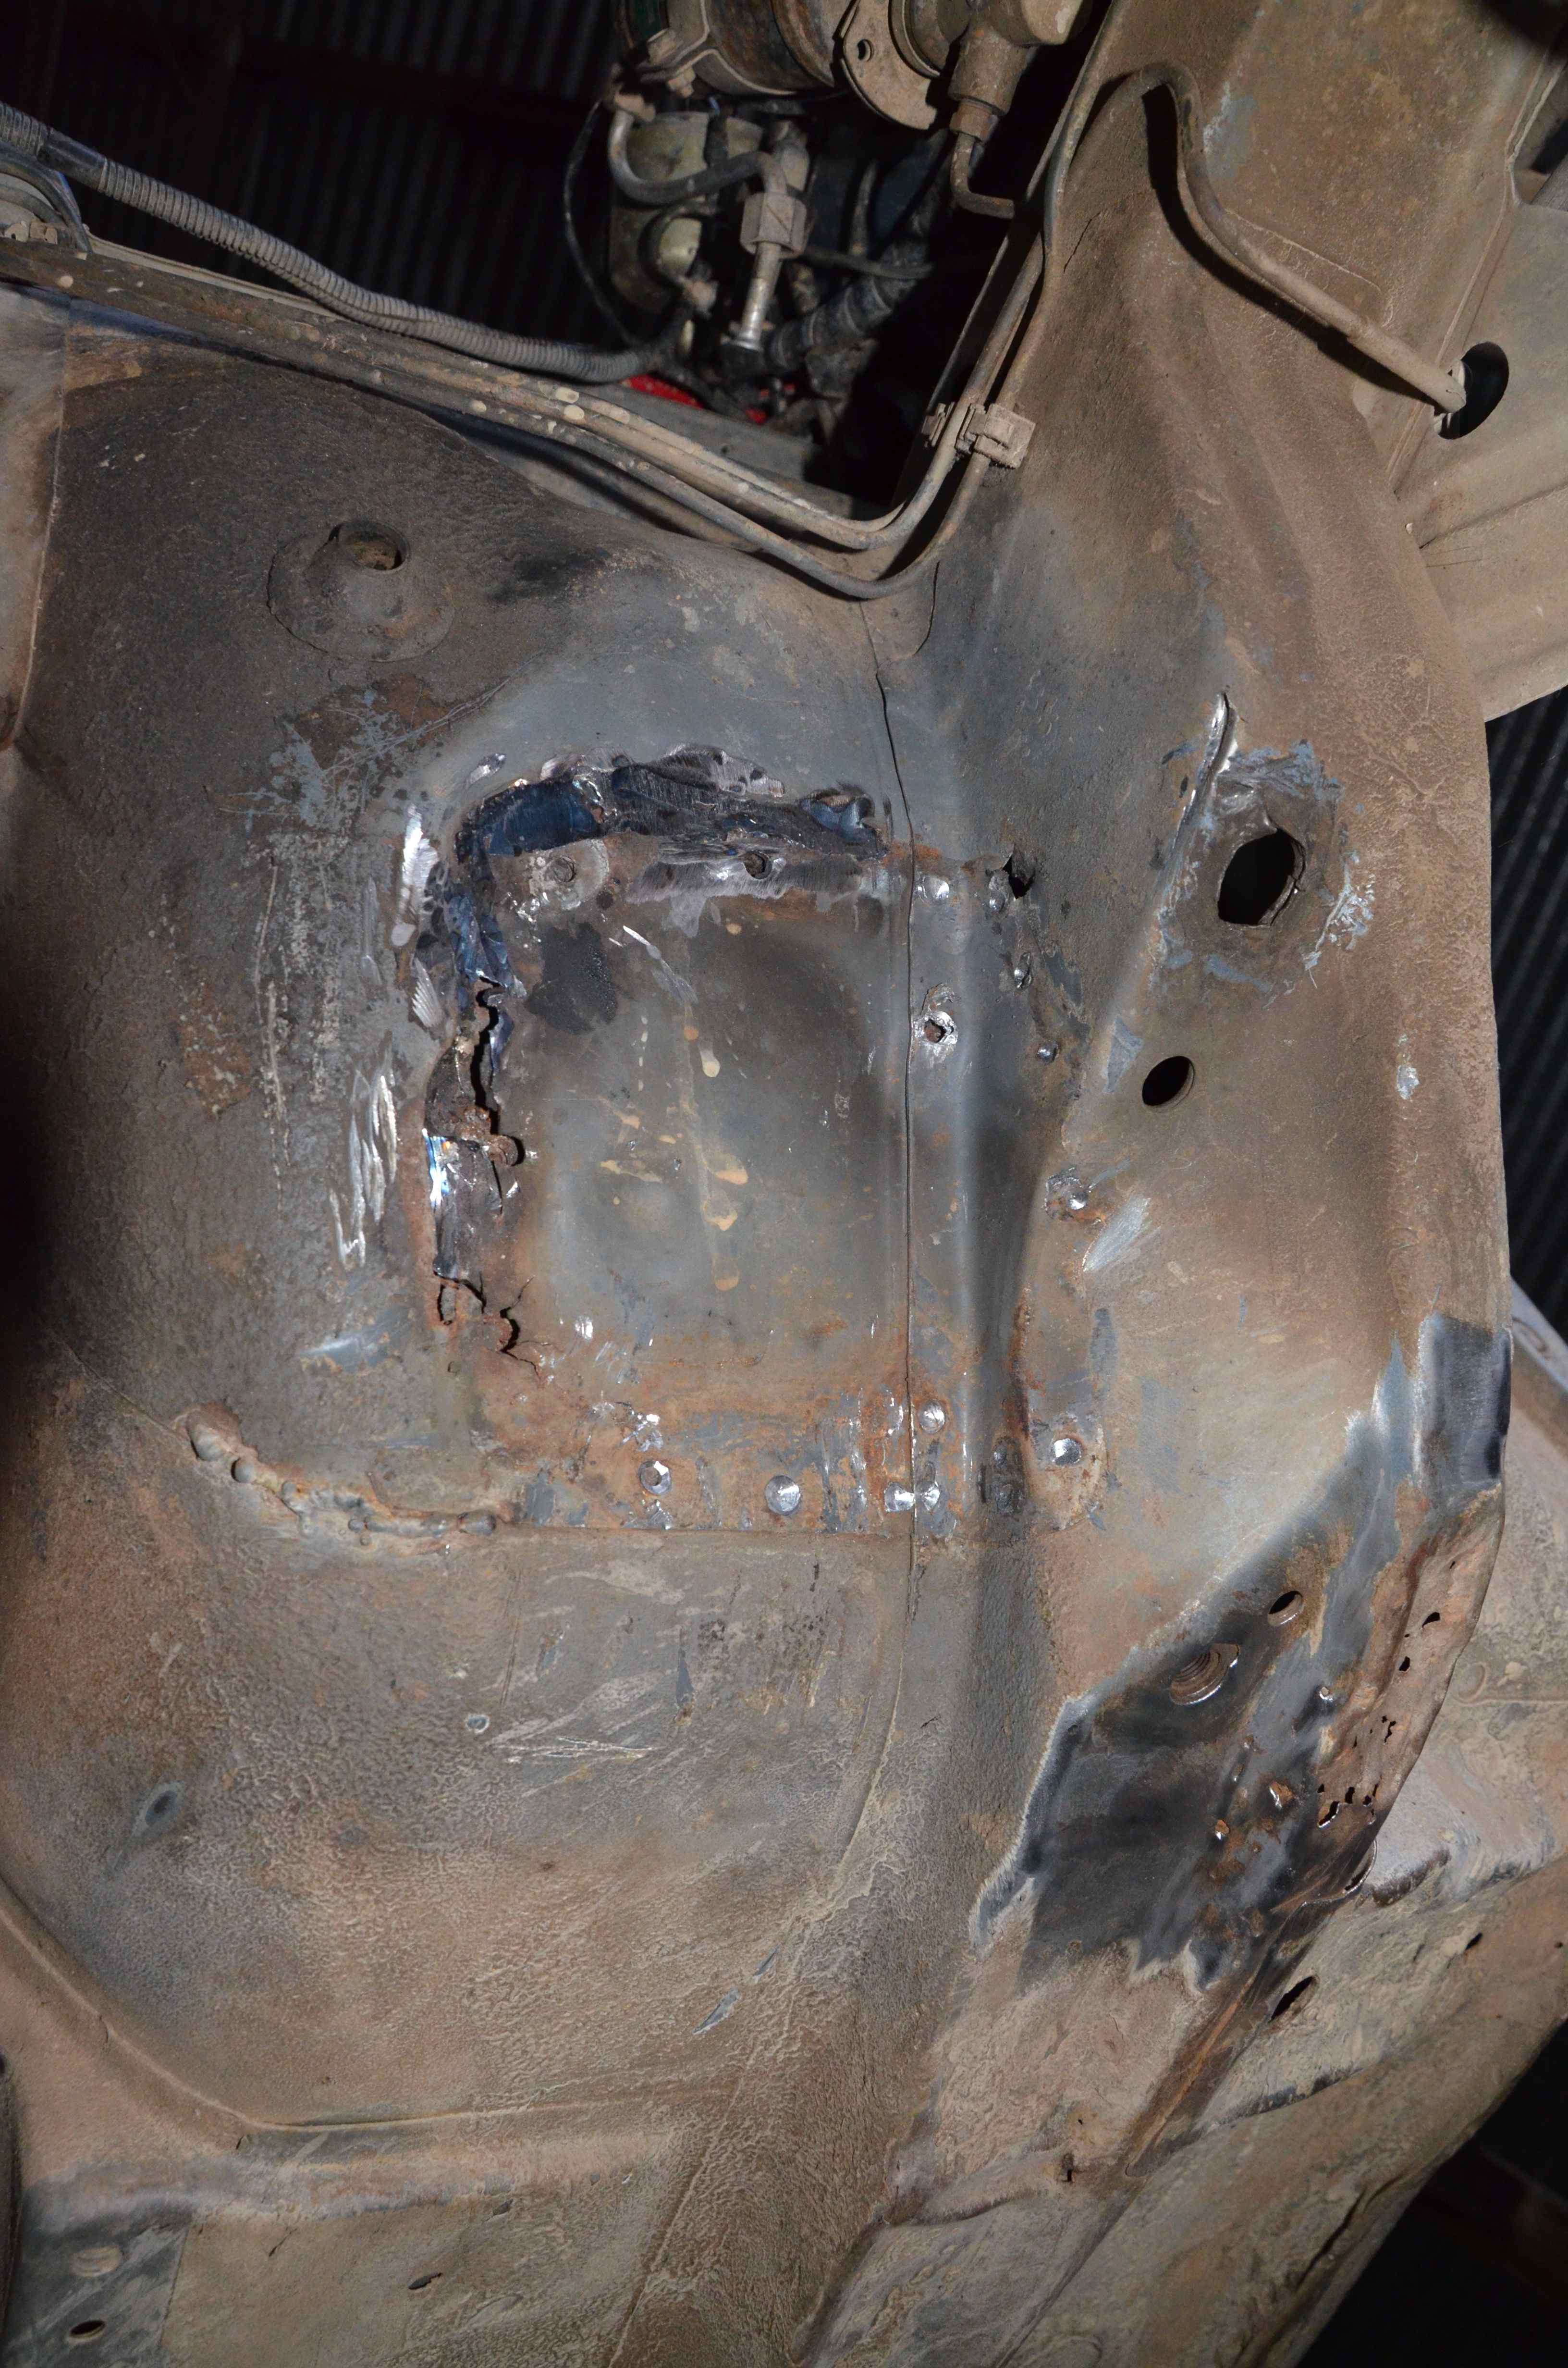
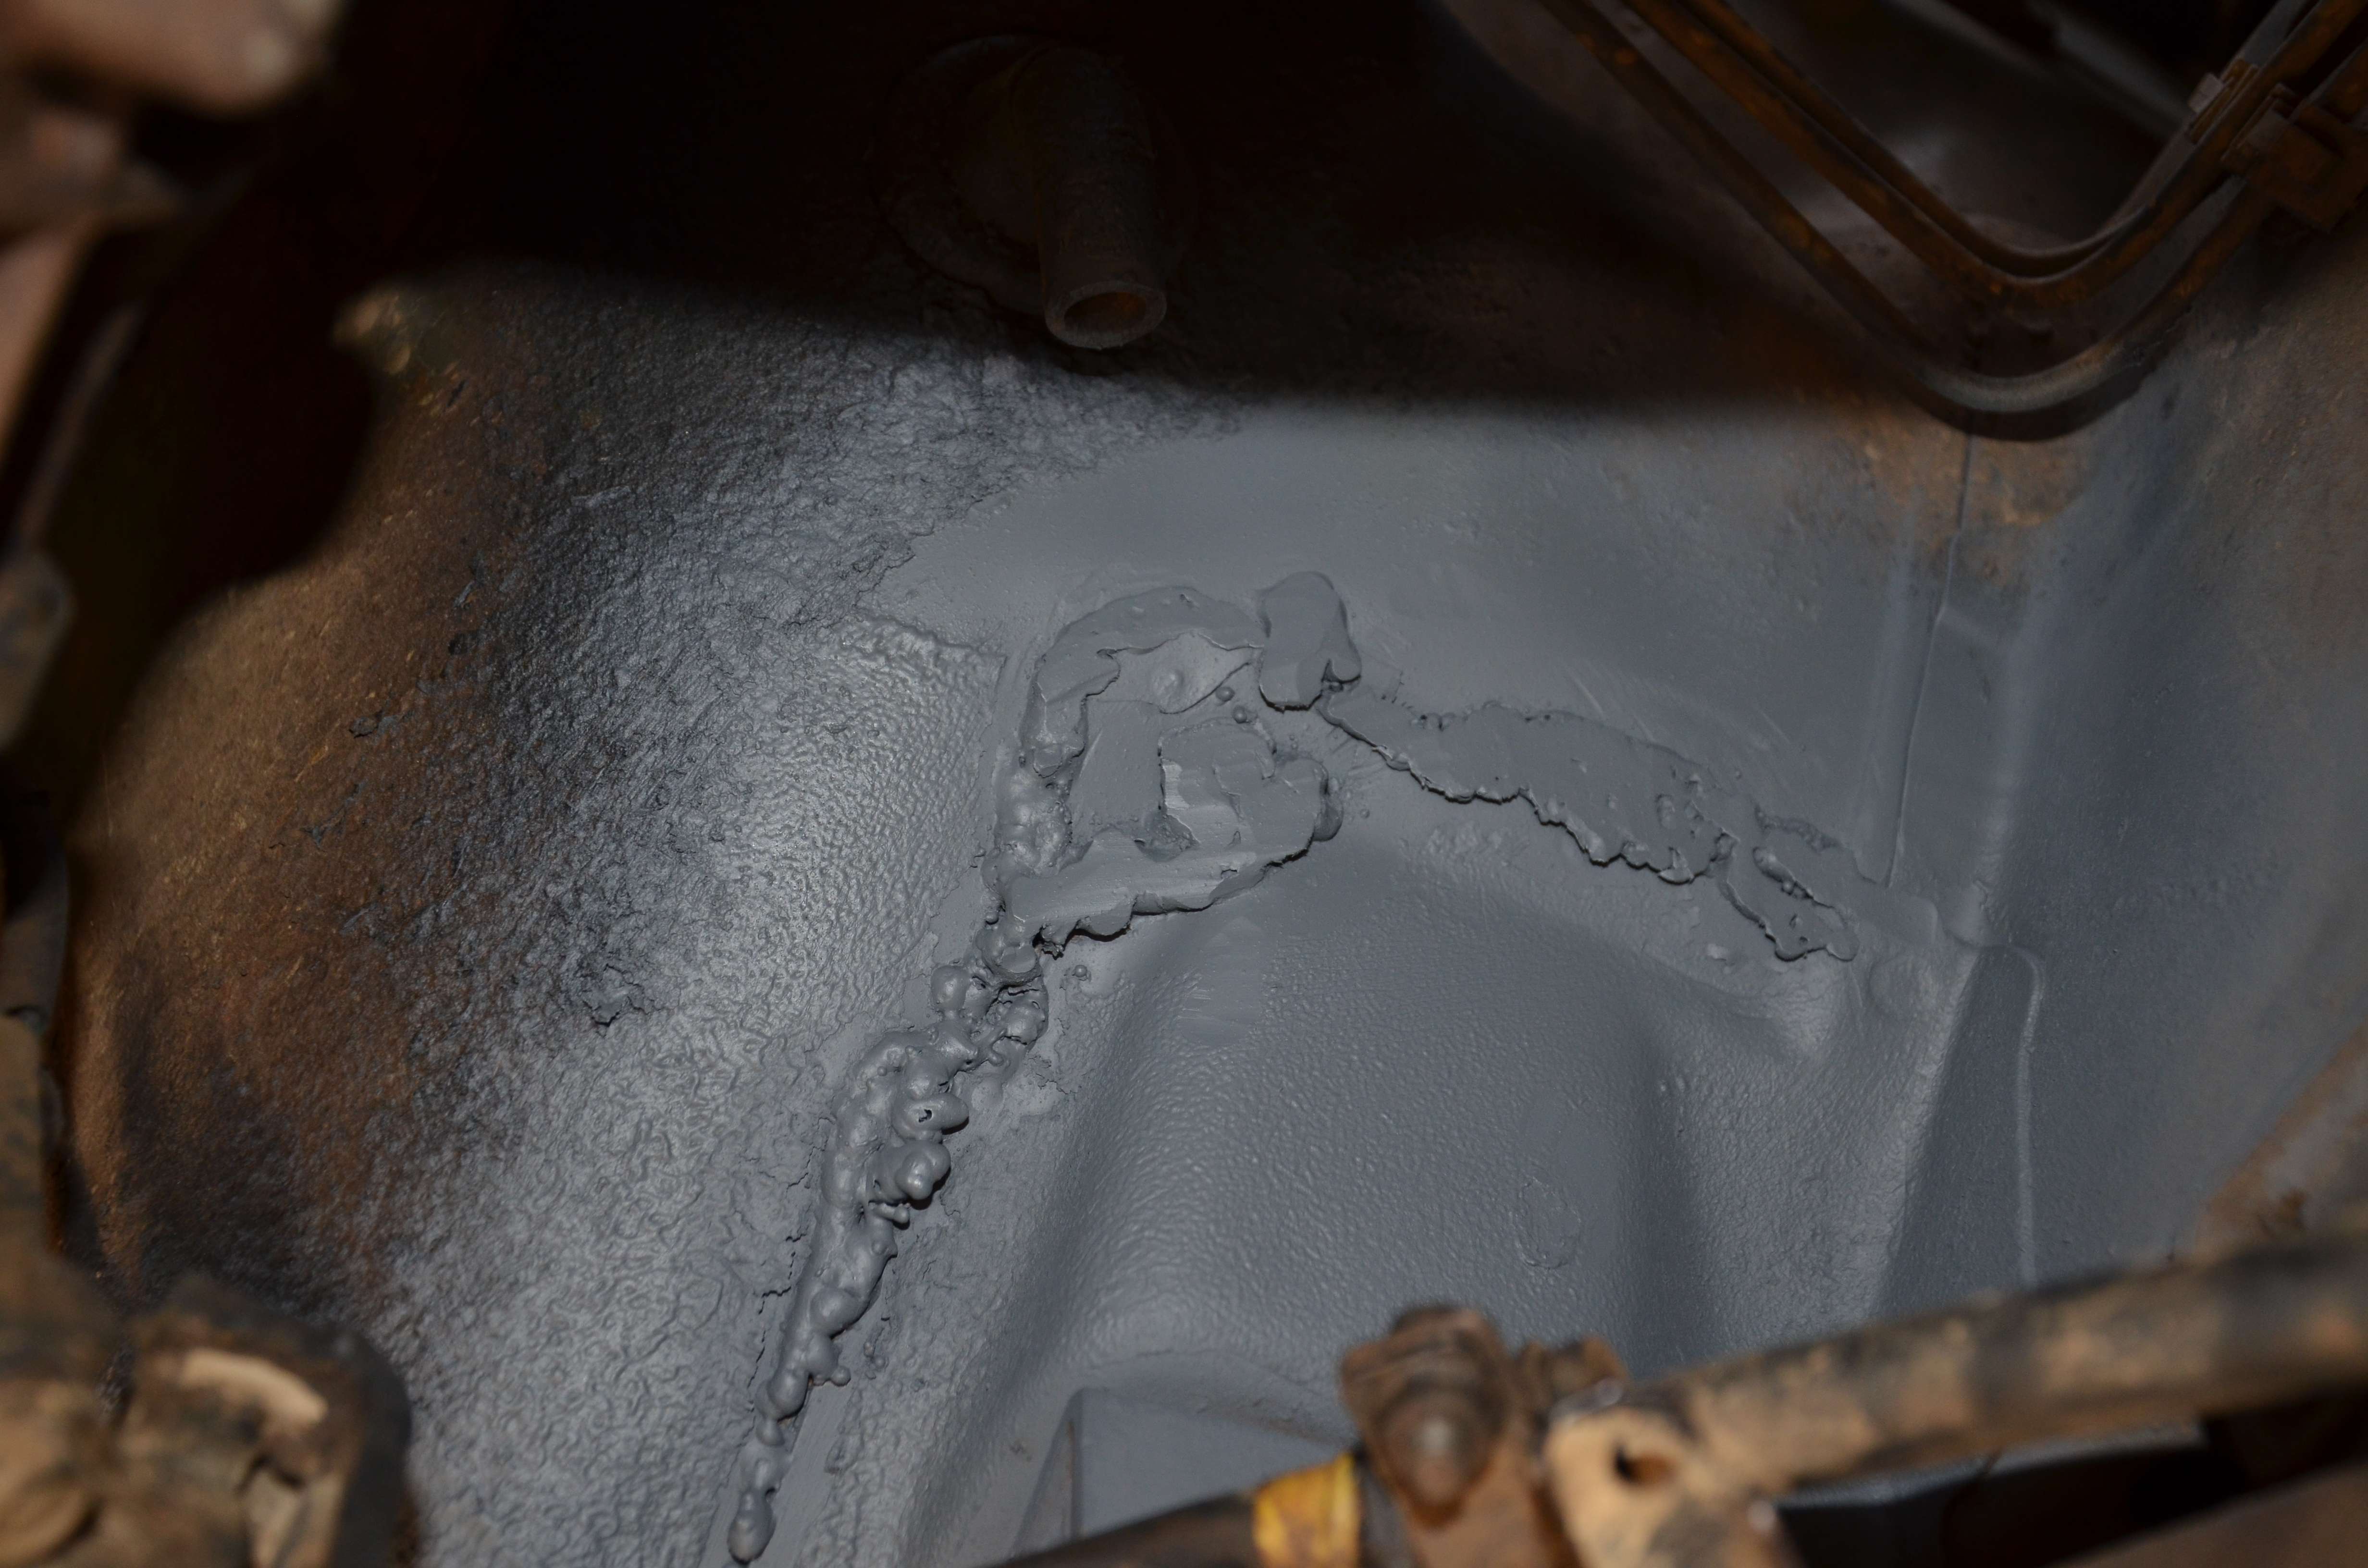
Then I found this to my horror:
I went a bit funny shortly after this. So I organised to drive it home ~400km off a large mountain with a twisty road and get it welded up at my best mate's joint. We had a closer look and what I found out was that it wasn't the plate moving away from the fire wall, it was the firewall that had moved from the plate, and to balance things up the plate then pulled all the spot welds to be where it naturally was from the factory. Crazy I know.
I had previously thought that the torque twisting of the EJ in low range with the 27's and some tough 4wd'n was responsible for the plate moving away from the firewall. But once I found out it was the other way around it was clear to me that this was done pre-season when I was 4wd'n with Richie and Roger below dinner plane area. We had a "rally section" where we gave our 4wds a fair flogging, Ruby Scoo out front being the lighter unit. I've been driving all season with this un-ware of what hideous mess was lurking under the bonnet.
A freshly graded road sometimes gives large ripples that bounces the front then the rear of the car. I was coming over a hill on the throttle, noticed the road started to curve to the left so I started braking with the hill dropping away quickly - too fast on a road I didn't know. I then hit one of these ripple sections which put the car airborne, nothing spectacular, just enough for me to slow the wheel speed down lower than the airborne vehicle speed which had the front end landing with an almighty BANG! It really felt like my captive nuts were cactus on the radius rod plate and that everything there had moved about an inch backwards. This is where I think the firewall was moved, captive nuts still look good and are holding up well.
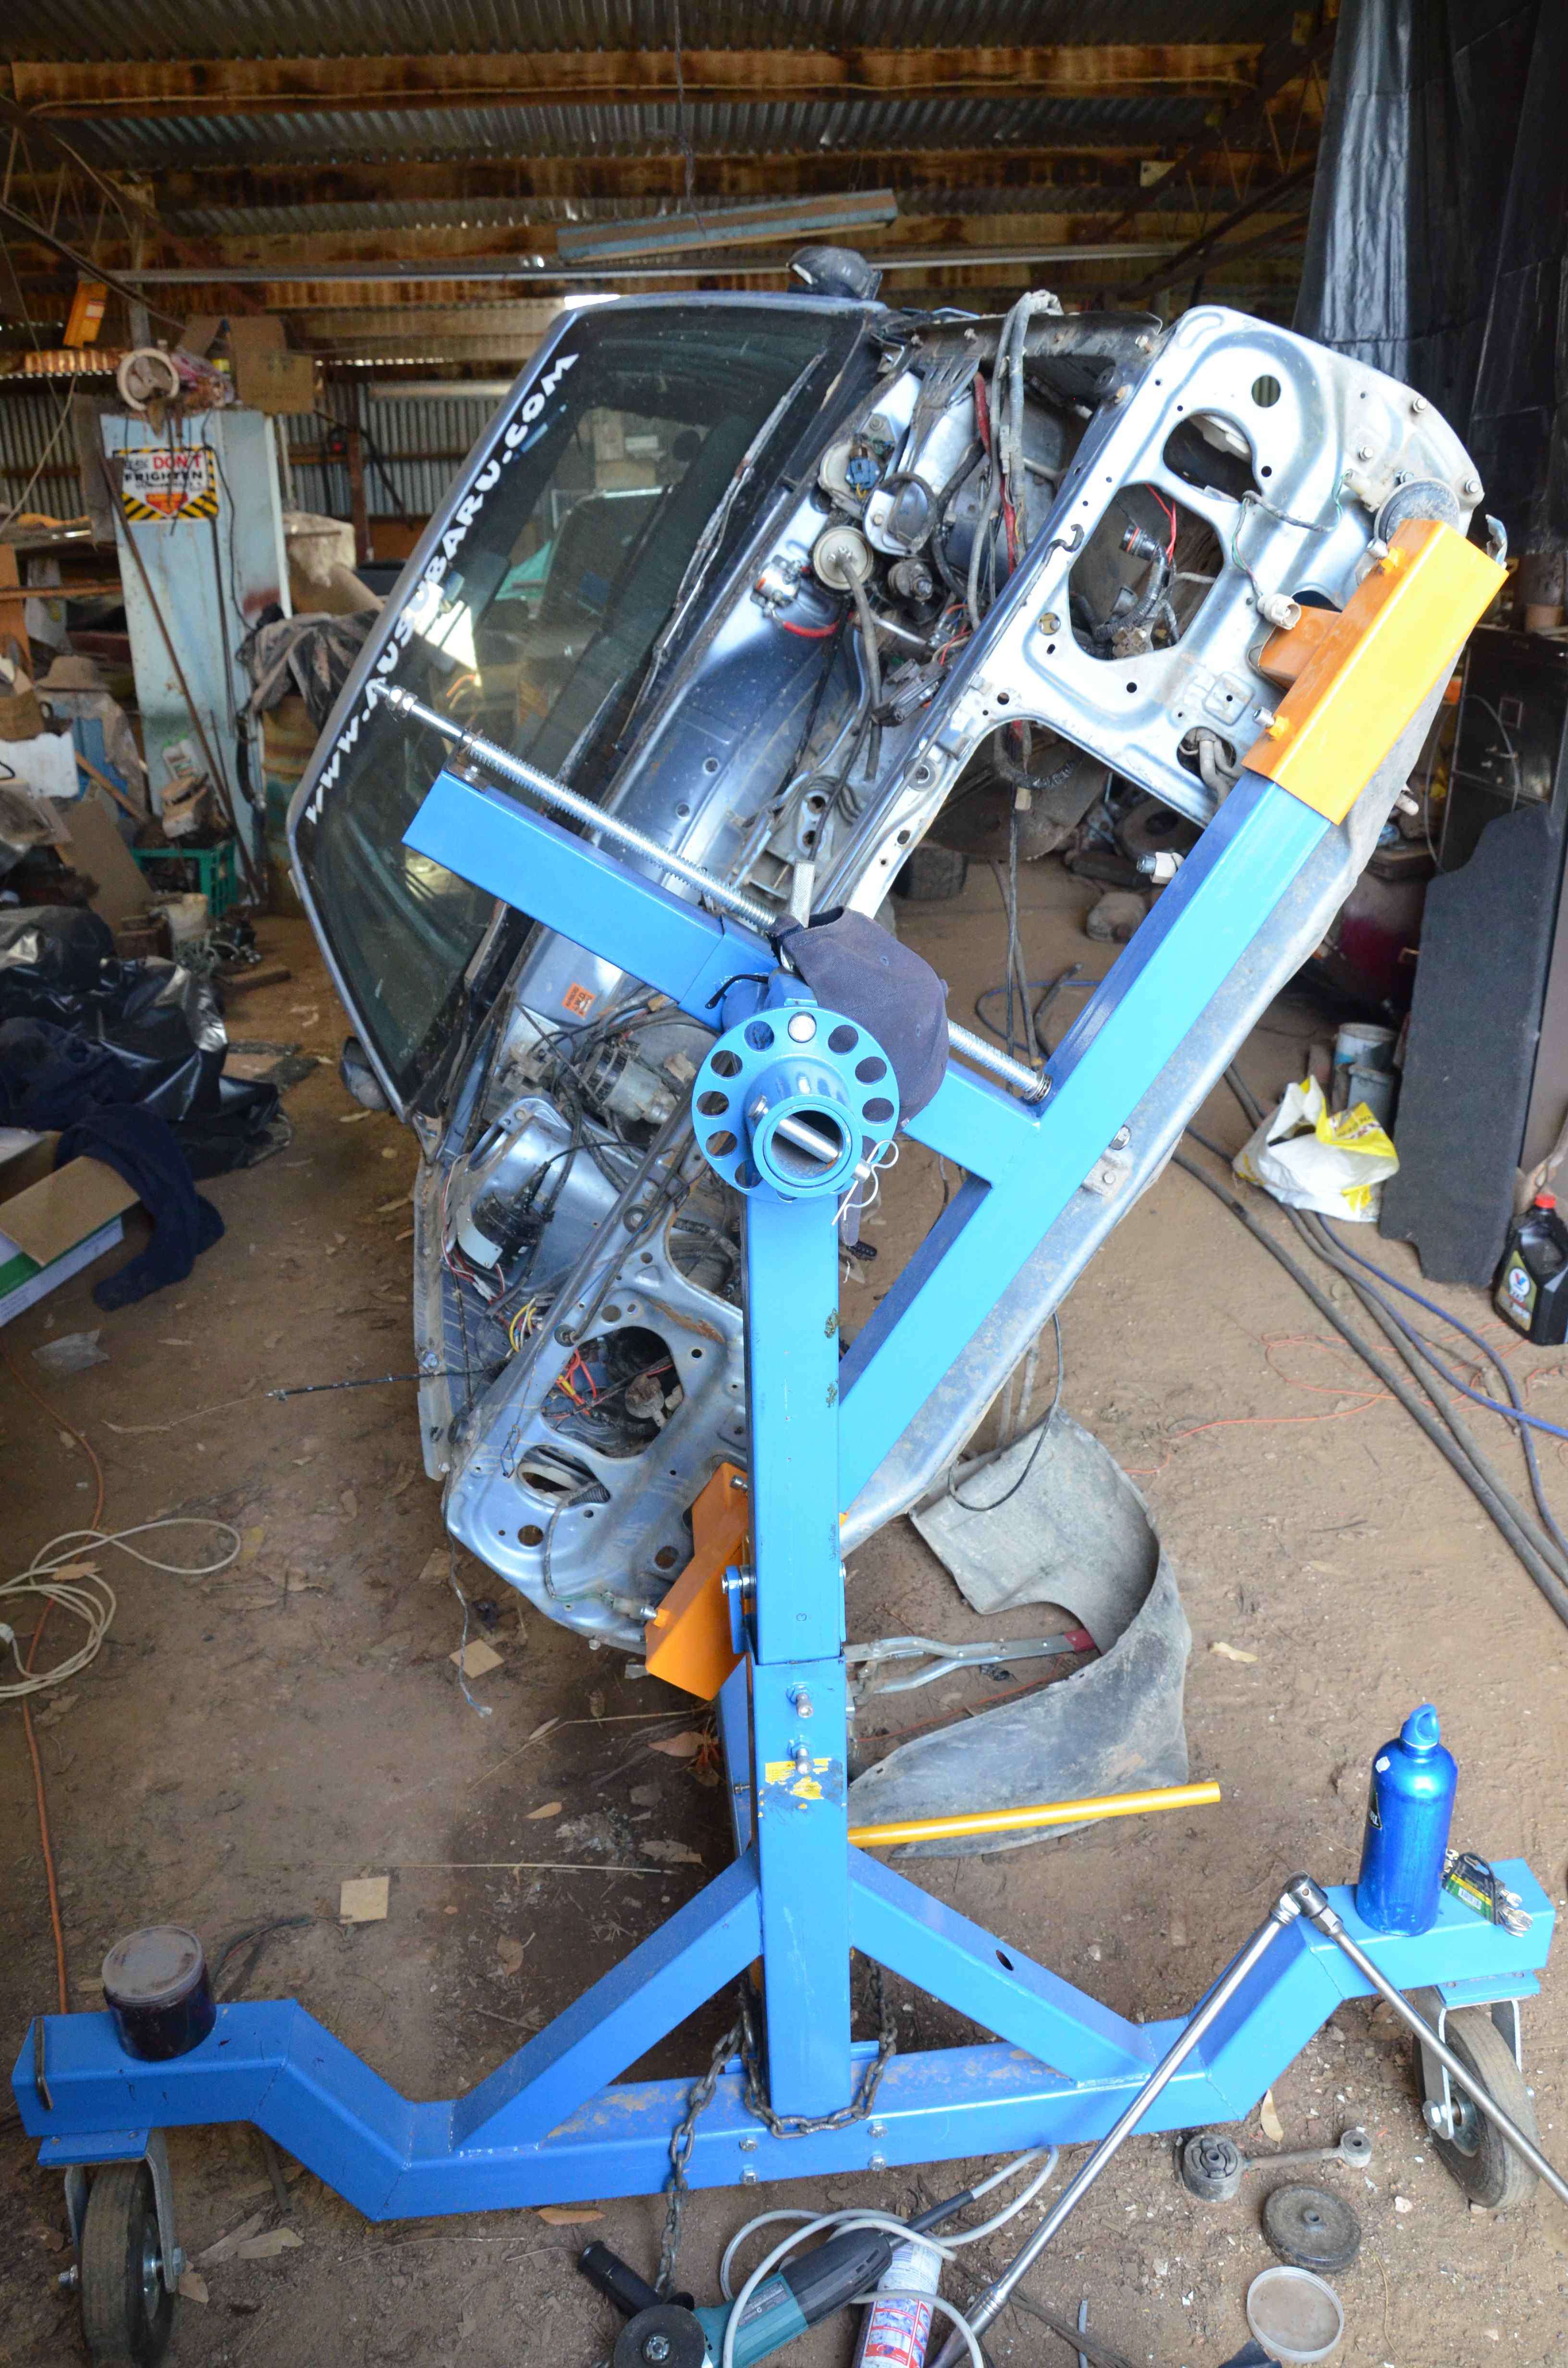
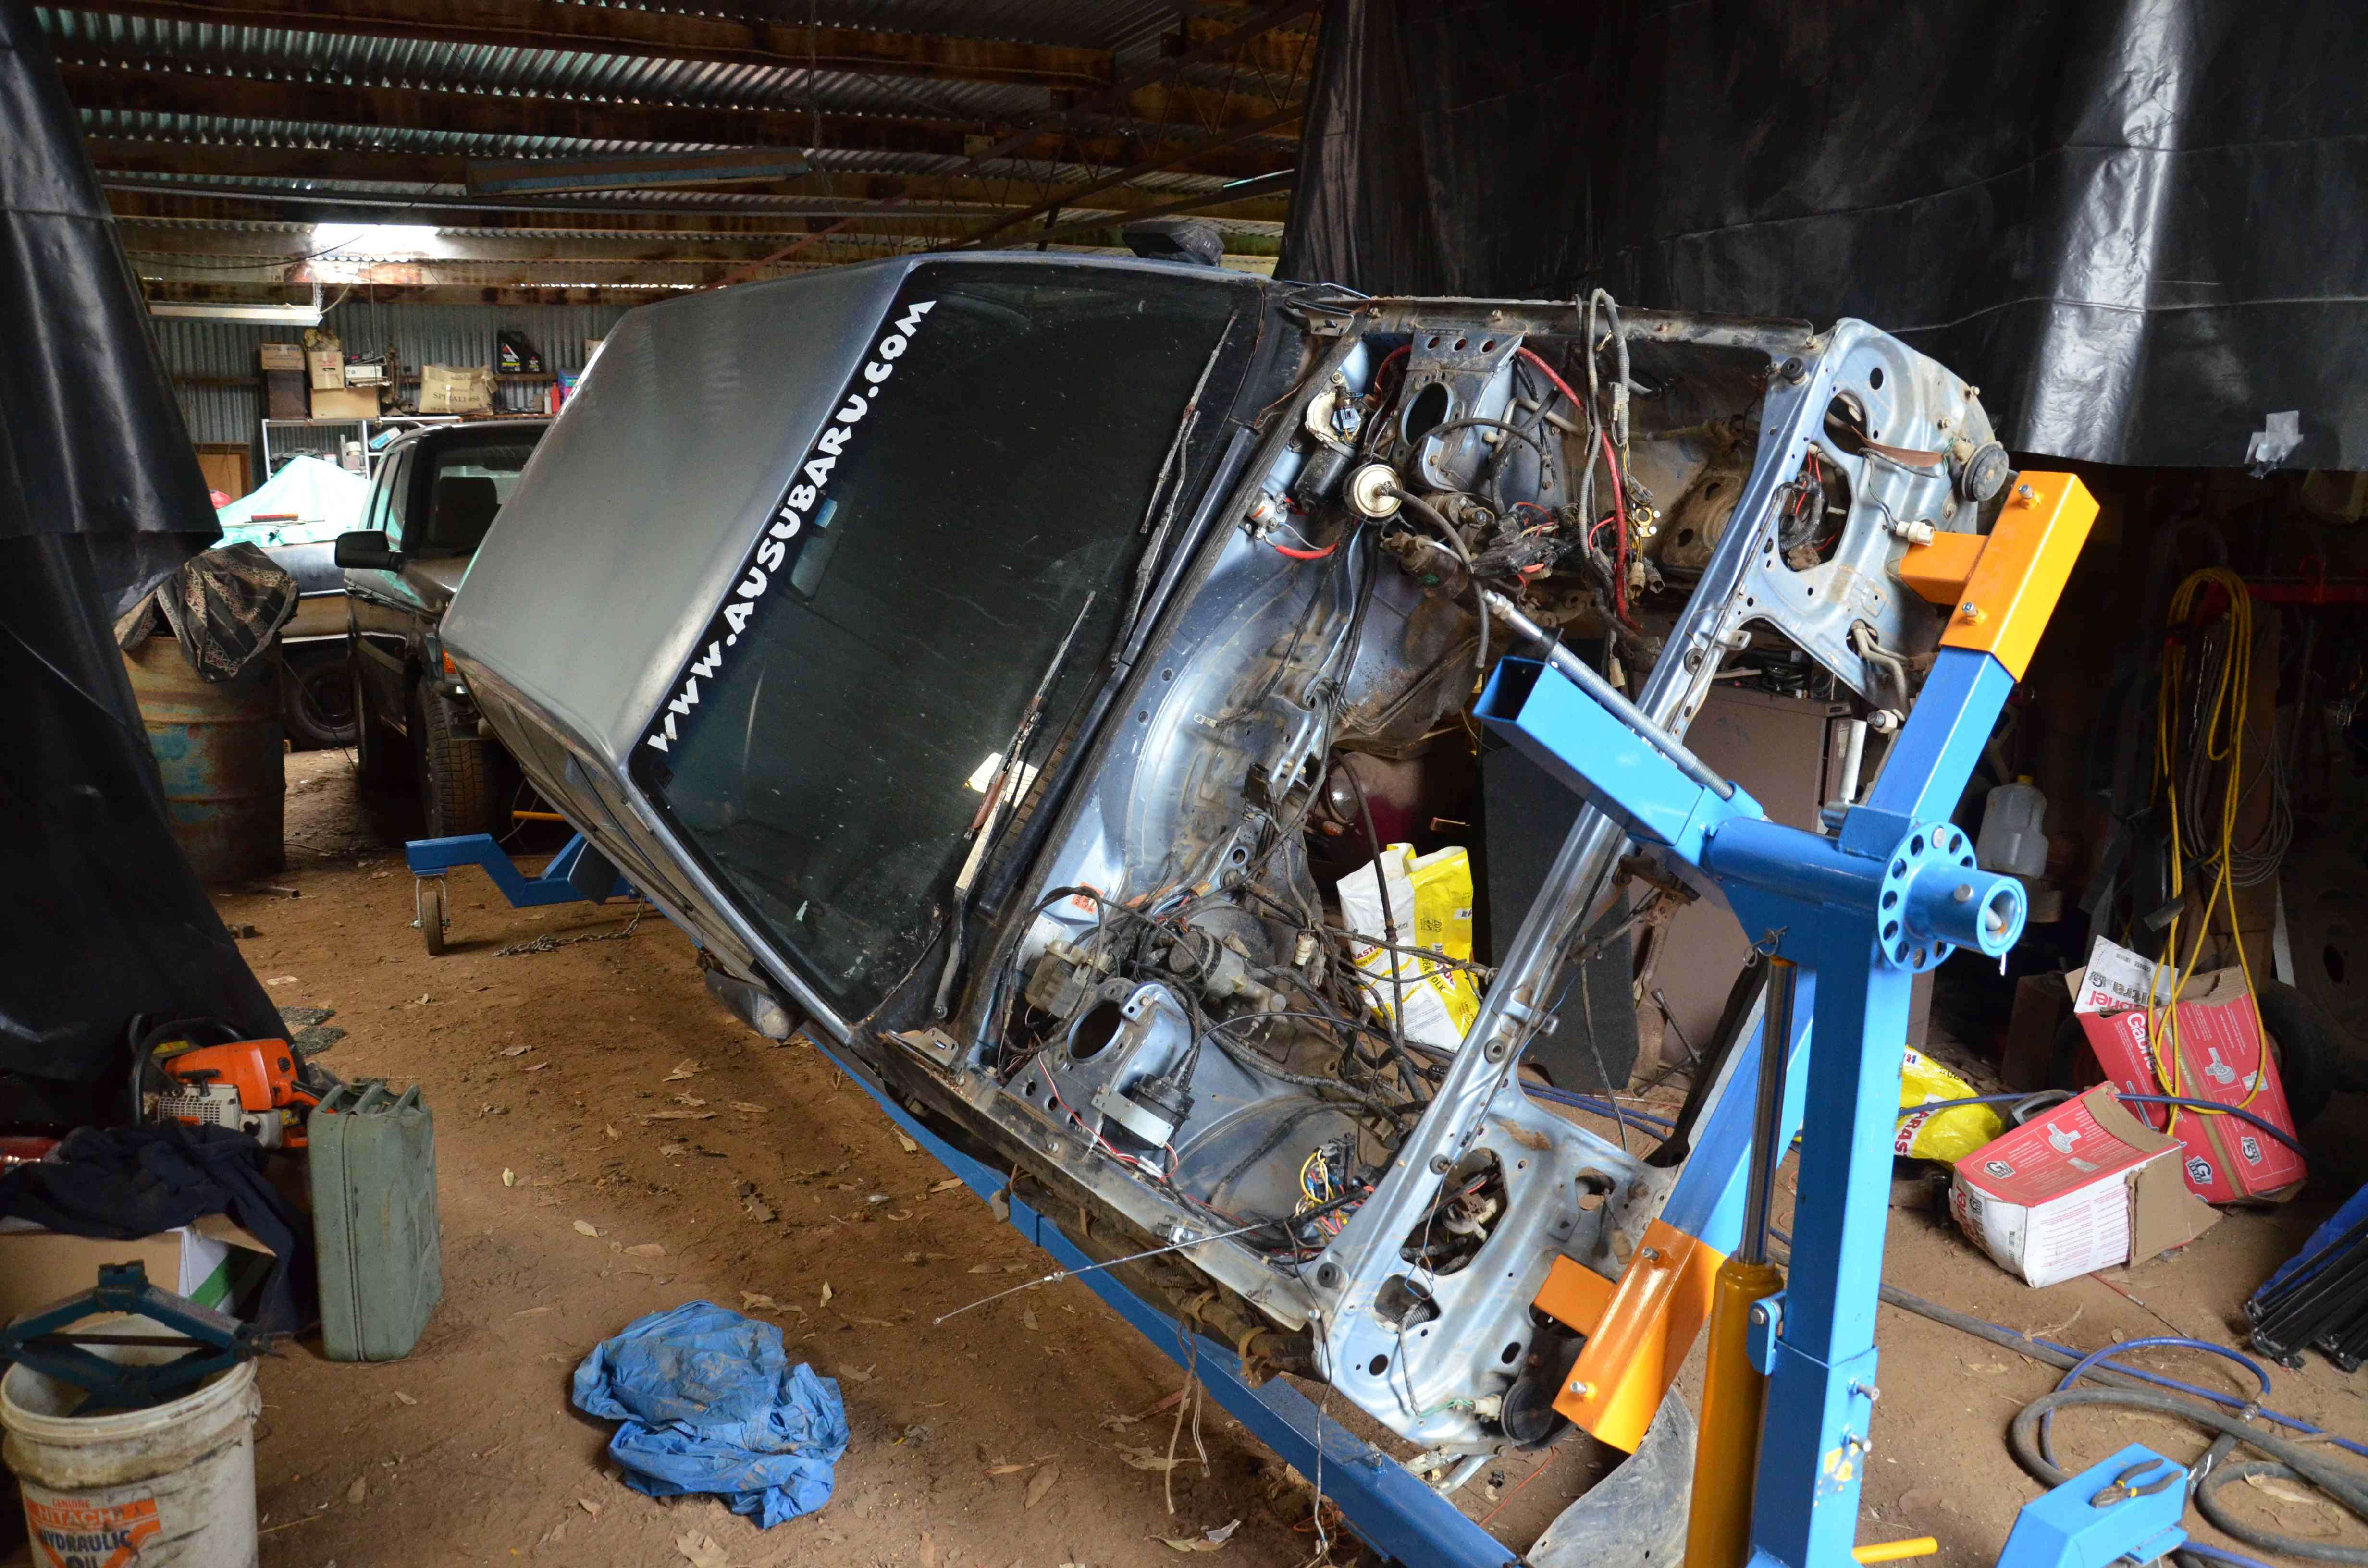
So after a couple of rums, a few hours and some photos of Jimmy doing his best upside down Ruby Scoo now has a new lease on life and a few scars. Here's some pics of the progress of work:
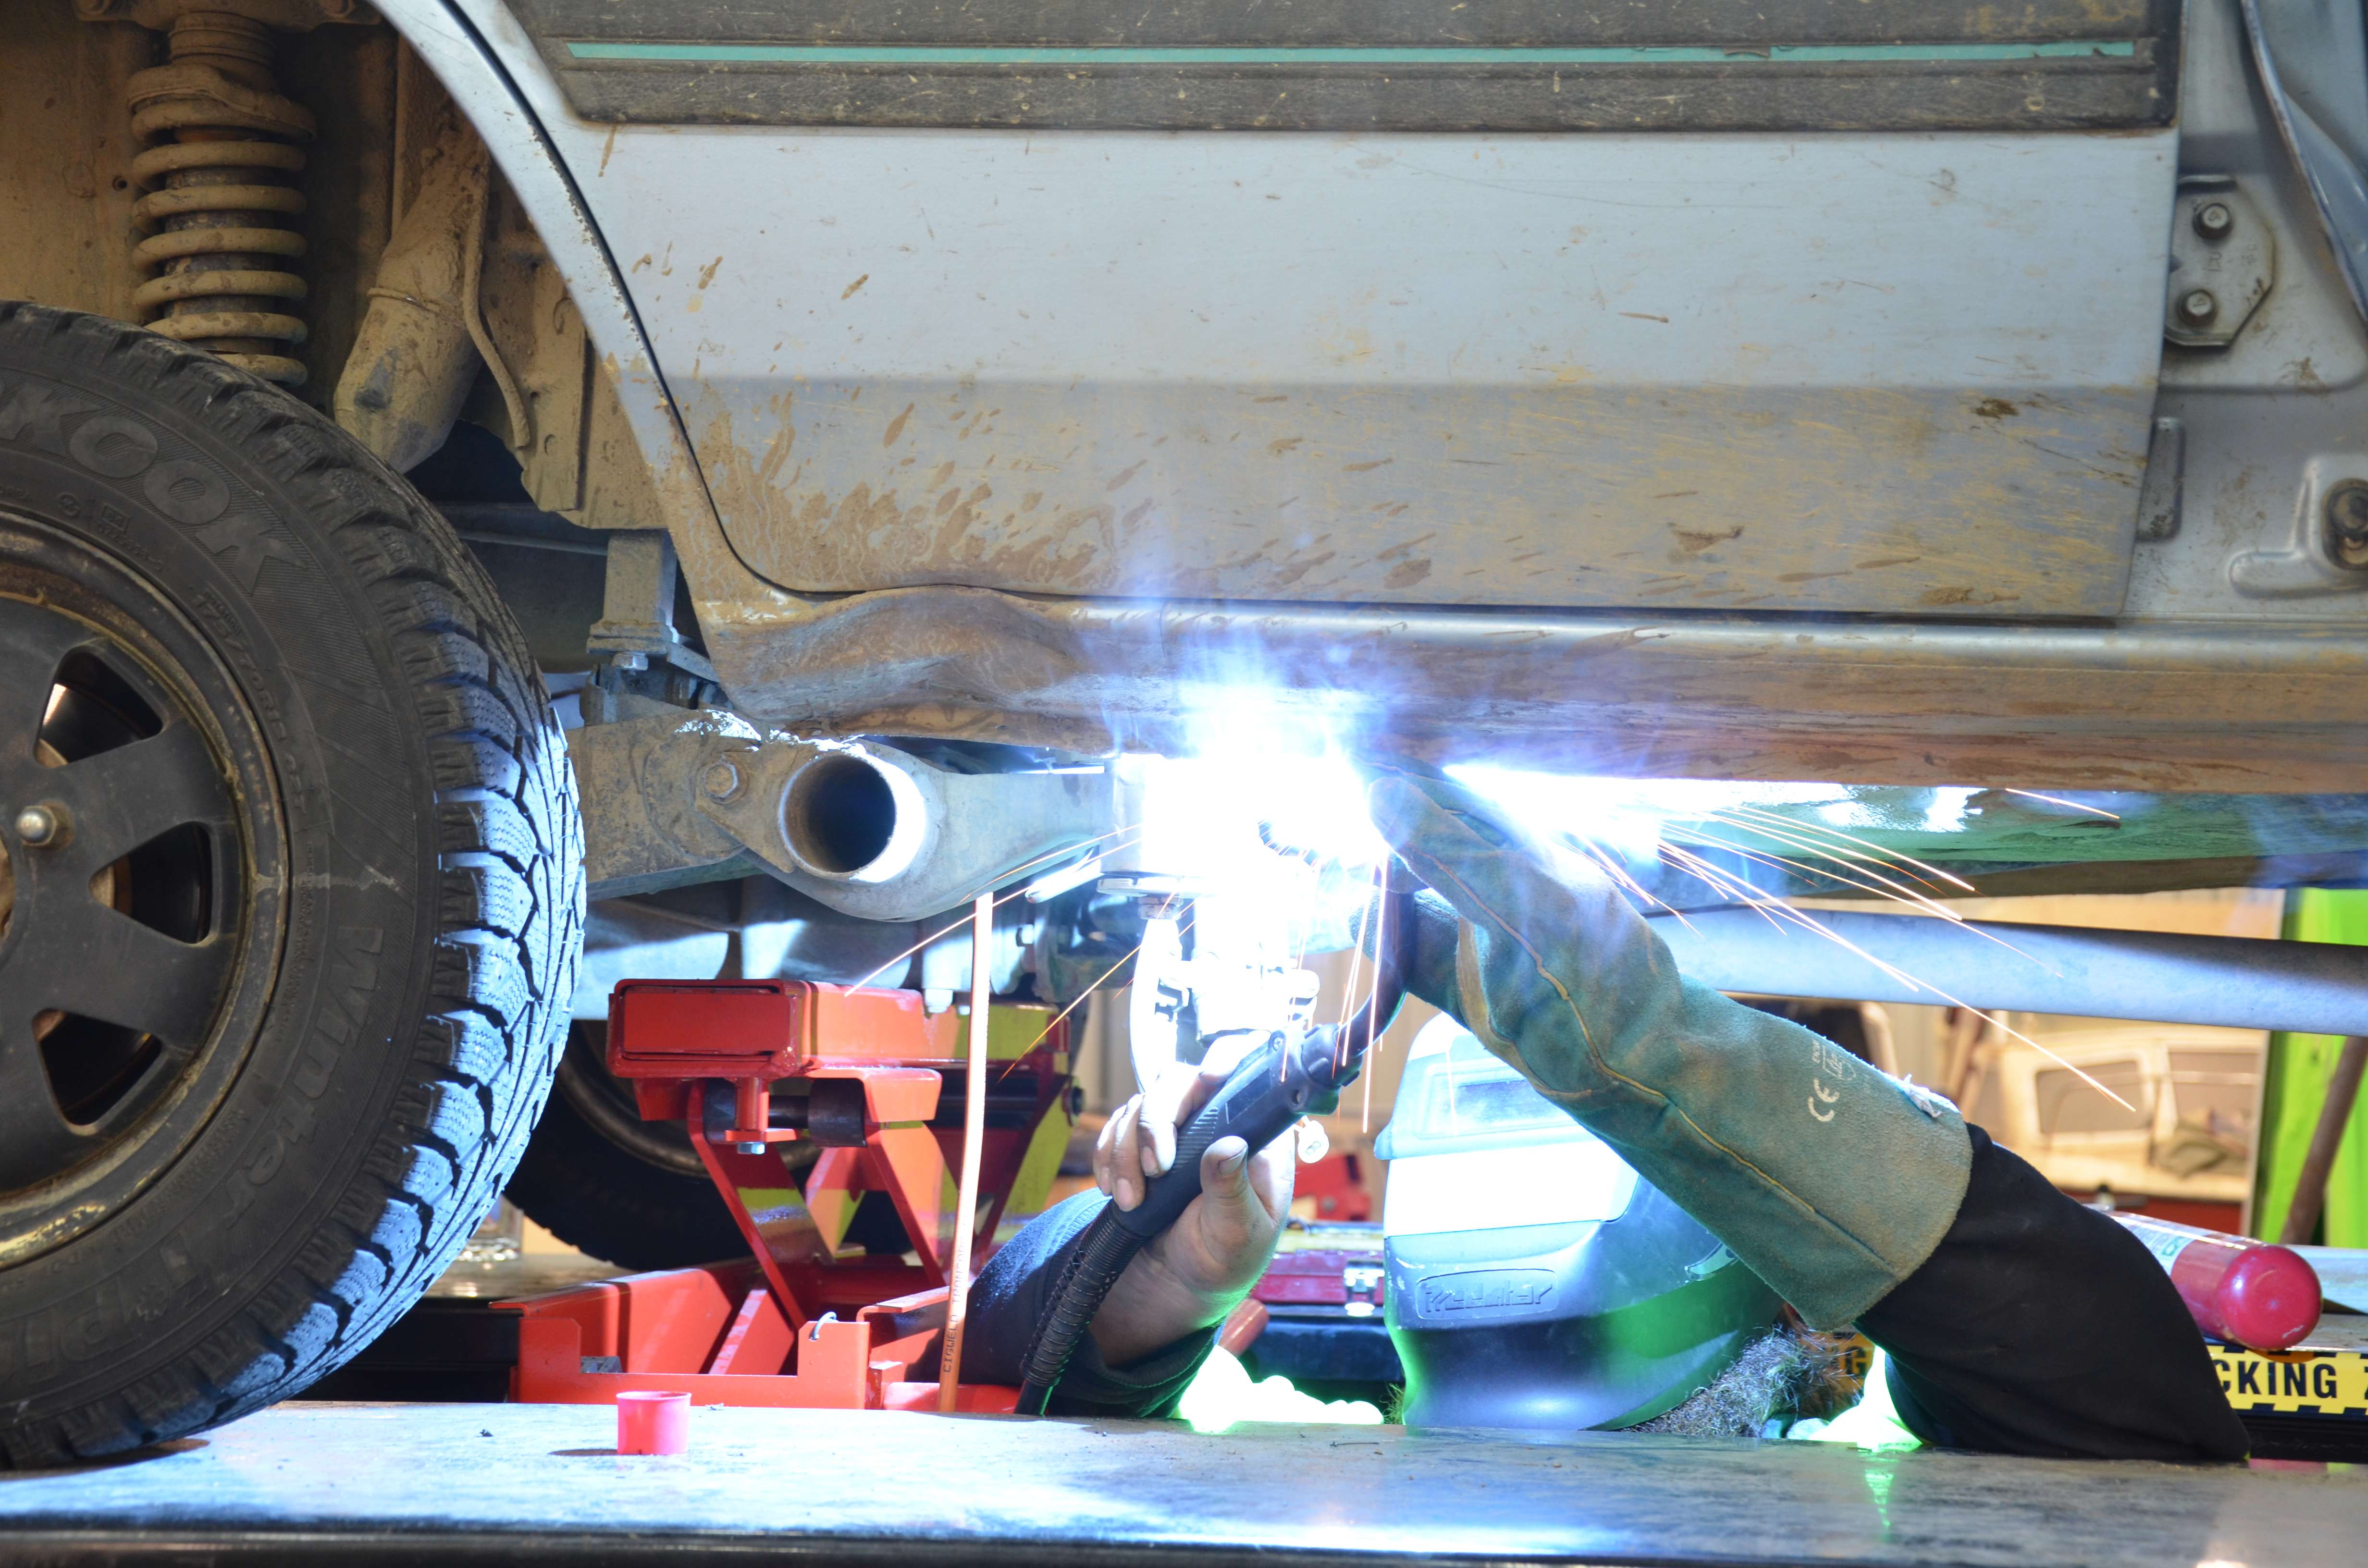
Rear right being welded:
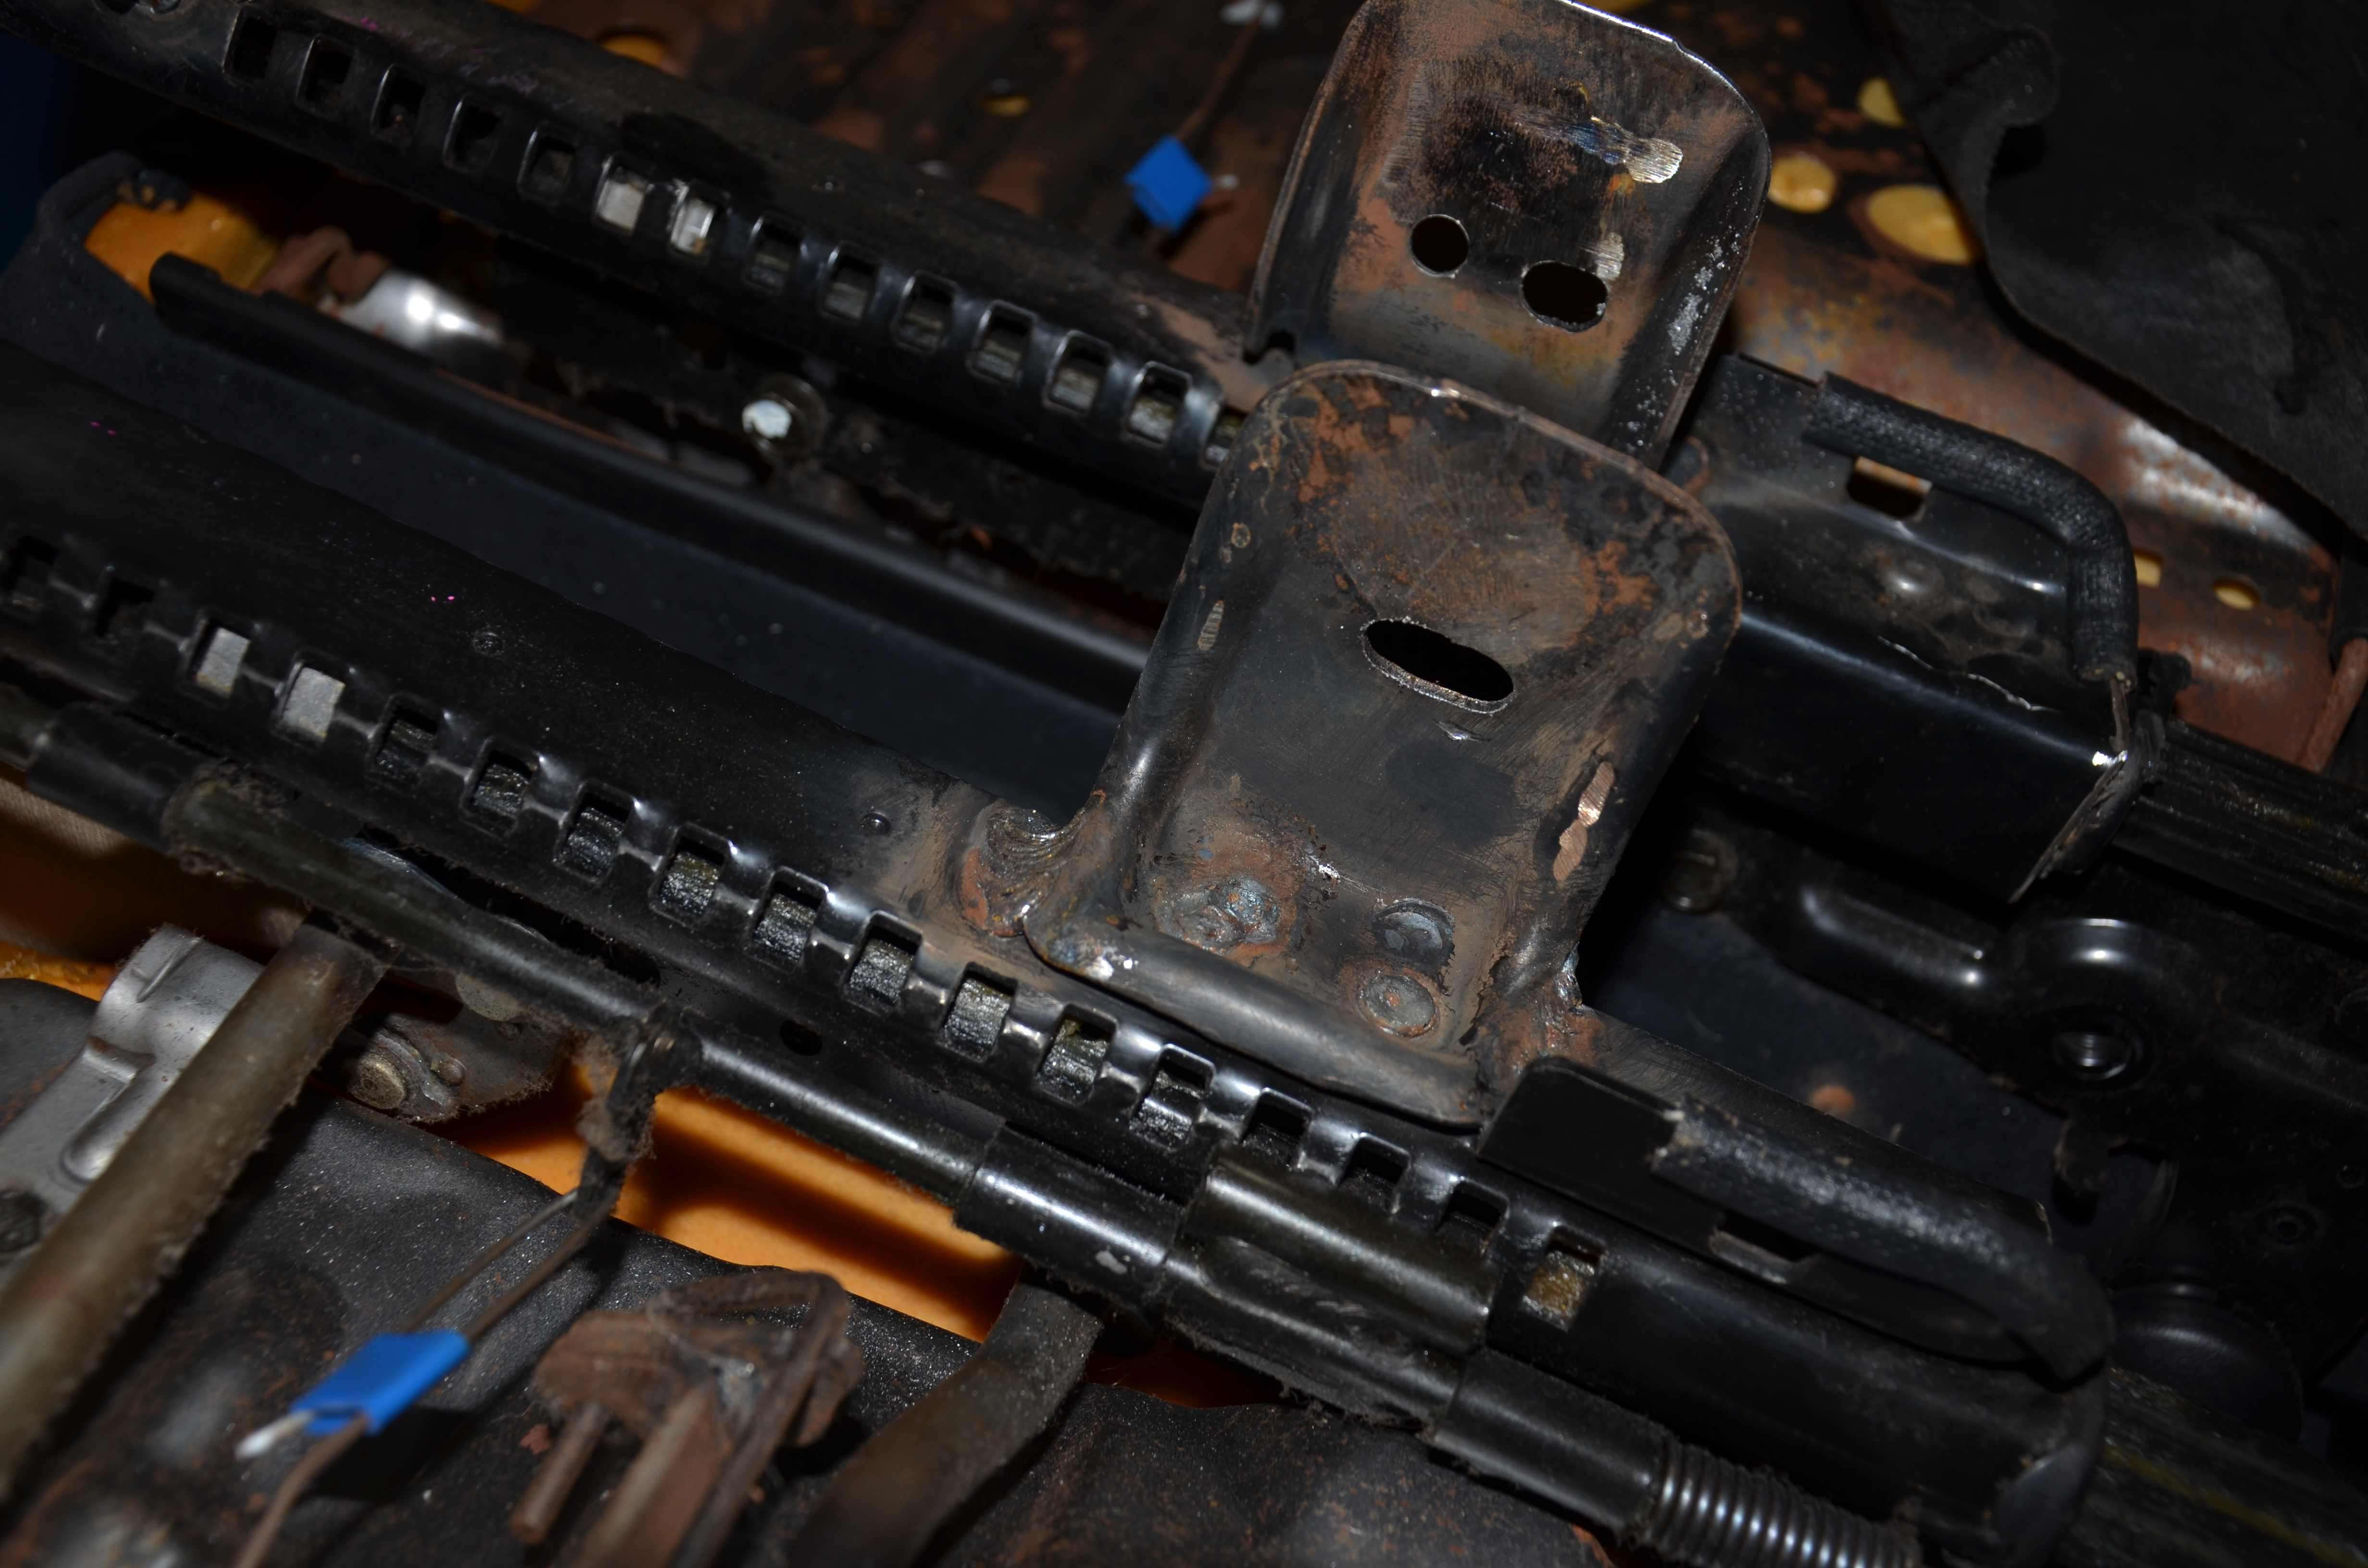
This is the LHS floor that I hammered out with a block of wood and BFH, once that was done everything lined up perfect under the bonnet. I was on fire watch while we welded this section from below. The holes (3) are the spot welds that were pulled out, you can clearly see one in this pic, the dark little circle:
The front LHS being welded:
Not the prettiest welding, but being upside down while doing it using a Mig I wasn't expecting a great looking weld:
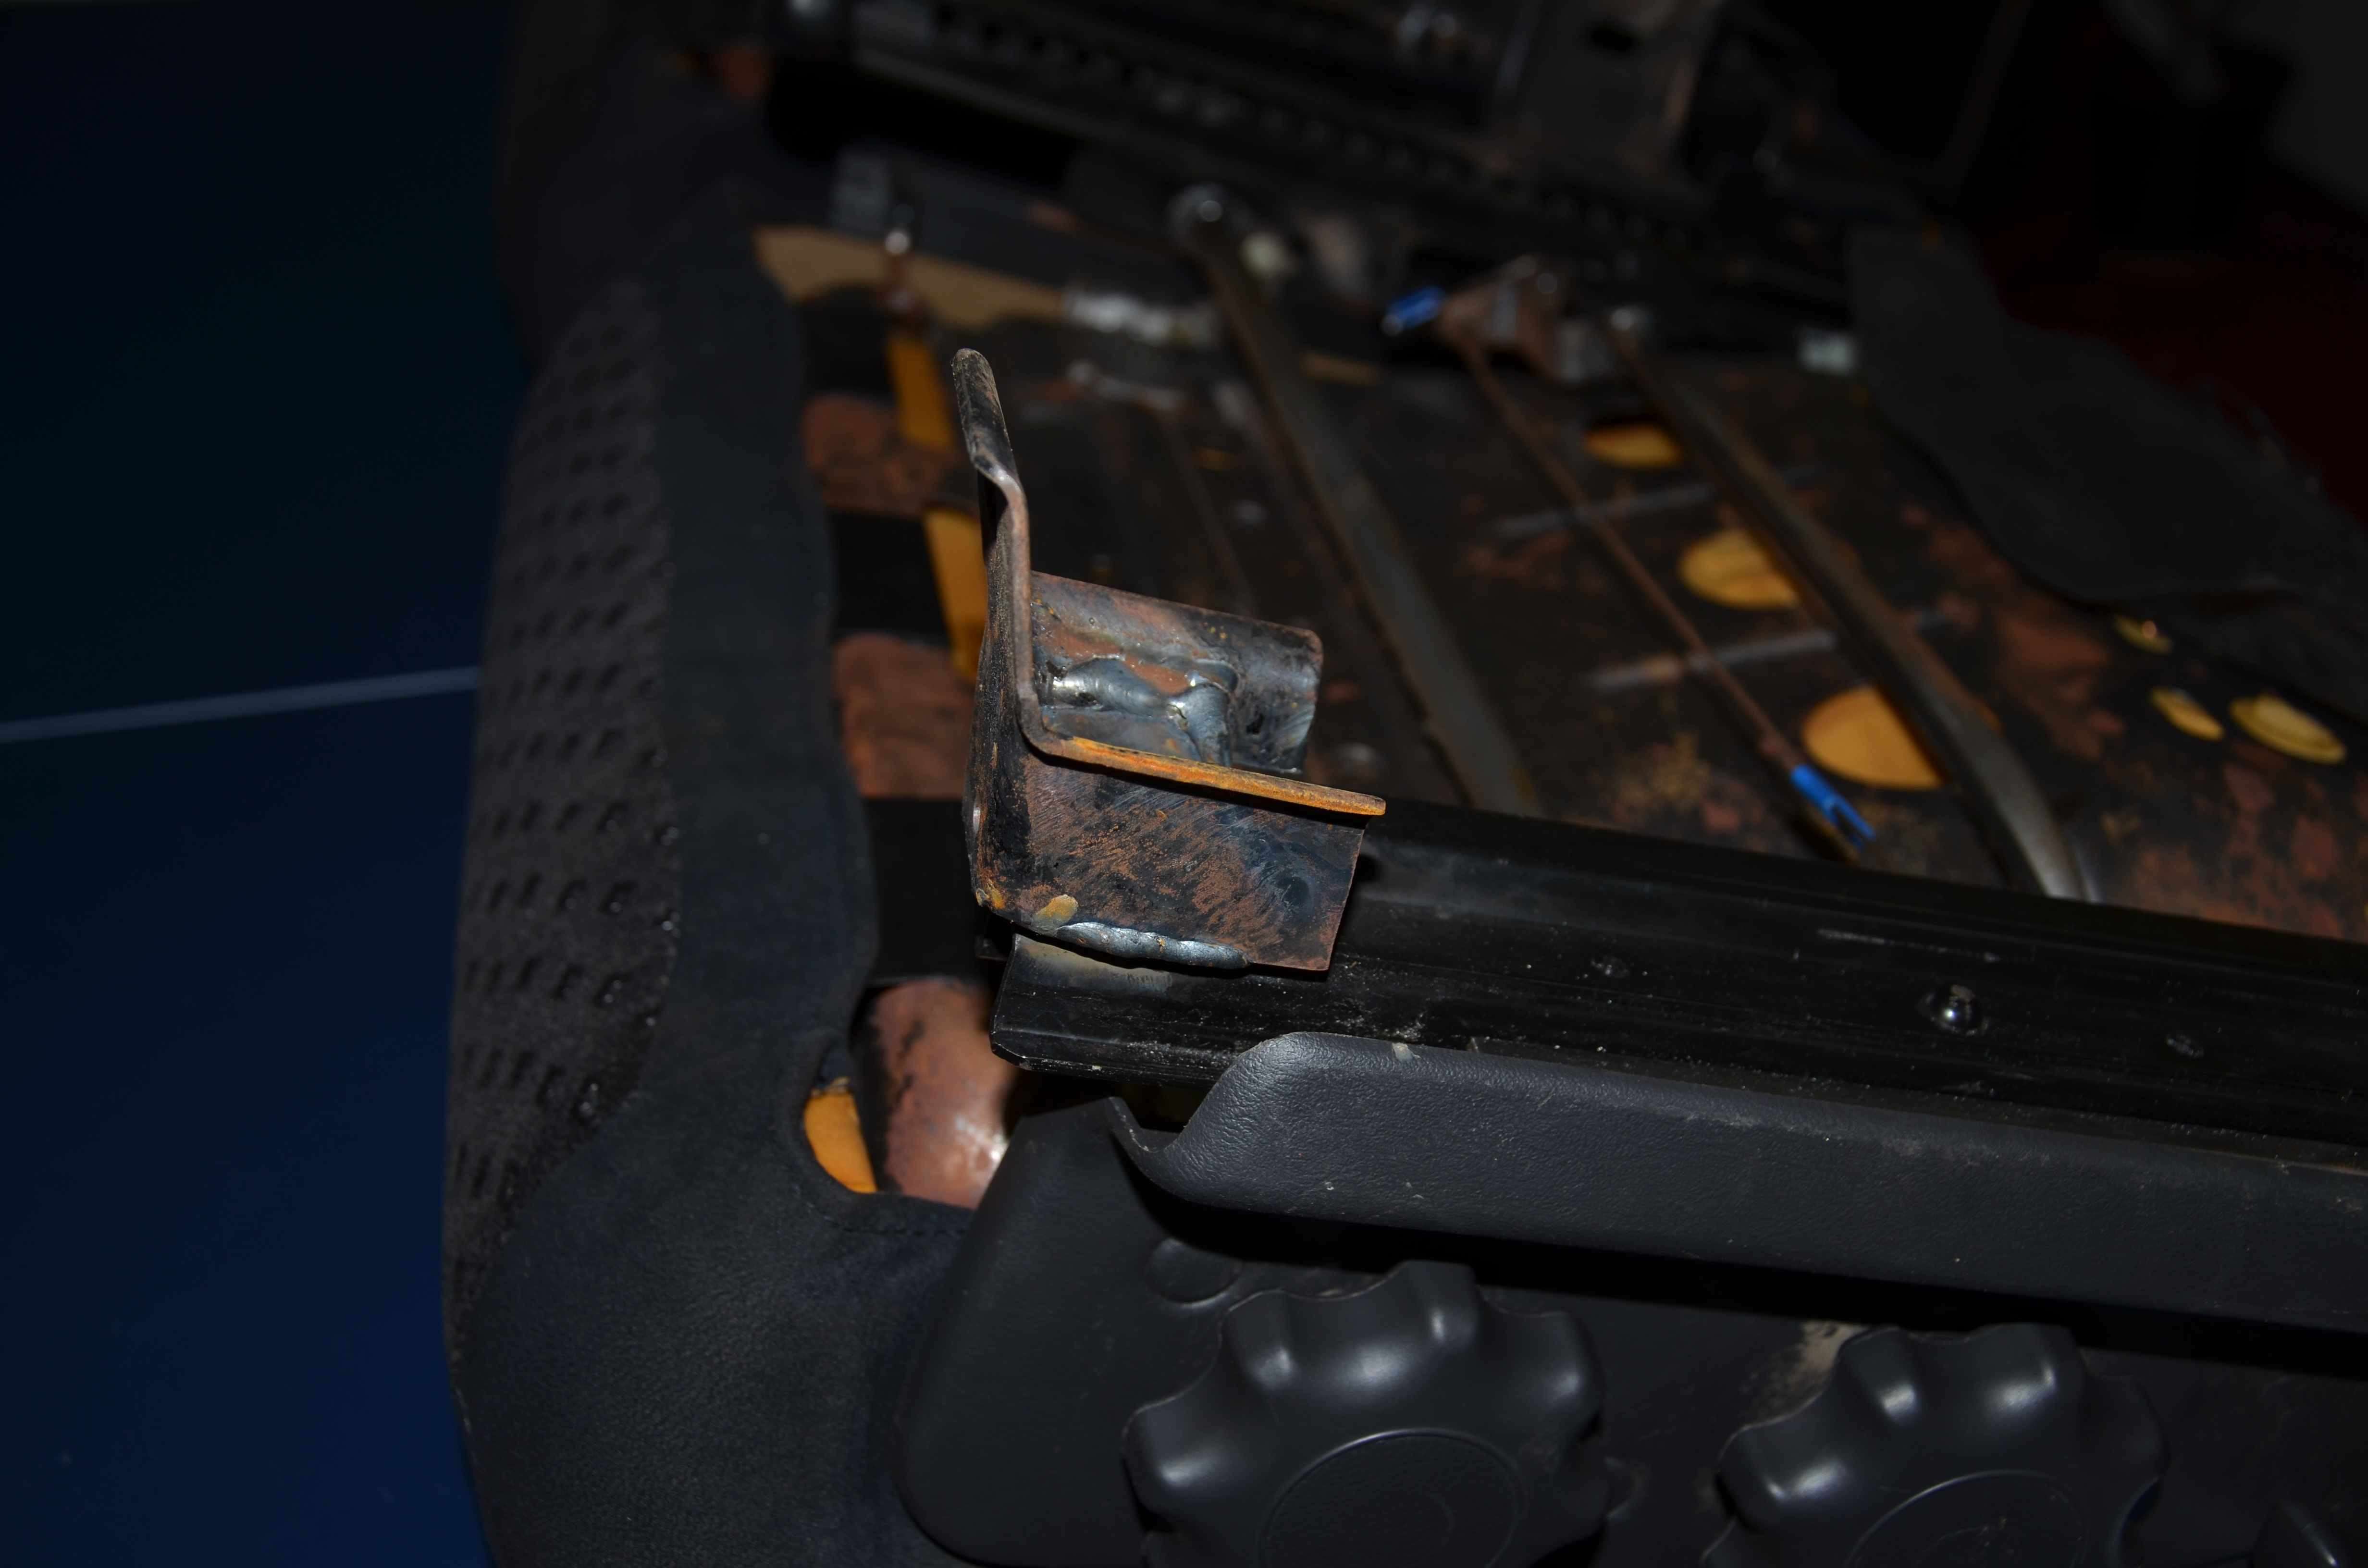
Rear left all welded up, ground back and sprayed against rust:
Very happy with the finished product - Ruby Scoo now feels very tight on the road and doesn't float around which I thought was a worn component on the front end, so I wasn't really worried about it. Now to monitor the whole thing and make sure it doesn't happen again or start to crack again.
Needless to say I'll be taking it easier on unknown roads to avoid the same situation.
HUGE shout out to Jimmy for his help and the use of his vast facilities! His hoist really helped out with the job, that thing is an amazing piece of kit! And good times had catching up as well - been too long between drinks for us!
Cheers
Bennie
- El_Freddo
- Master Member
- Posts: 12506
- Joined: Tue Oct 04, 2005 10:00 am
- Location: Bridgewater Vic
- Contact:
Well here's what I've done - after reading your note on the seat height I pulled one seat out, sat the foz seat in to compare seat base heights. The foz seat was well higher than the L series stock height!GOD wrote:On my first attempt at fitting new seats, I did as you describe - drilled out the weld and rivet holding the mounts onto the Lib seat rails, then bolted (and welded?) the L mounts onto the new seat rails.
That put my head too close to the roof, so I redid the driver's seat by pulling apart the whole assembly and fitting the L lower seat frame into the Lib seat cushion and back, and sat it on original L rails and mounts.
So I went into looking at cutting as much out of the seat height as possible. The best I could get was 15mm without then changing the floor pan mounts themselves.
I got a set of other rails from a parts car to compare the rails. The outside rail of each seat is detachable so I got these pics to compare:
The rear is a fair way out, but a grinder and welder can sort that out, this is one of the outer rails.
Best bit was that the width of the foz rails are pretty much the same as the L series - so no need to worry about the width. Bonus!
So after cutting the L series mounts off their rails, I then took a further 15mm out of them. Most I cut, the Inner rear mount I welded the original hole and moved it 15mm up the bracket.
This is how they turned out before spraying for rust and to make them look purdy:
The rear mounts were drilled out then welded onto the foz rails. Due to one of the rails being permanently attached I had to be very careful to cover the fabric with a leather protective sheet to avoid burning holes in my lovely new seats.
This is the end result, please excuse my dodgy interior, it's got character, at least that's what I keep telling myself:
The verdict:
After all the work was done and the seats were in I drove her home to M&D's, I found the ride height too high and wasn't real happy with that. But the quality of the seats are second to none over the L series seats, I can't believe I just compared the two different seats as the foz seats are light years ahead!
Now that I've had a bit more driving time (about 12-15 hours) I'm pretty happy with them and I'm now used to the higher seating position, 4wd'n will be interesting. My only real concern is now I find my rear view mirror is in the way when panning to the left or trying to check out an intersection as I approach. Also, I'm 186cm so not a short fella to start with.
Best bit now: 1) this mod has the other half's approval and 2) the gucci arm rests that aren't actually made by gucci.
Once the paint has dried on them they'll be going back in and I can forget about them for a while
Cheers
Bennie
- El_Freddo
- Master Member
- Posts: 12506
- Joined: Tue Oct 04, 2005 10:00 am
- Location: Bridgewater Vic
- Contact:
Comfy is an understatement!! The reason I got them specifically was for the arm rests. Been waiting a loooooong time to pick up a set, I've had them half the season and last week was the first time I could do anything with them!taza wrote:The seats are looking good Bennie, comfy? I love them in my Foz and the arm rests just top it off, very comfortable for cruising and when your in the mood for quick gear changes and belting around corners you can folder them up and away
Gotta love fleabay!
Cheers
Bennie
I hit my head enough 4wding with standard L seats... and i am about 5" shorter than you! make sure you take some panadol for your headacheEl_Freddo wrote: The foz seat was well higher than the L series stock height!
Now that I've had a bit more driving time (about 12-15 hours) I'm pretty happy with them and I'm now used to the higher seating position, 4wd'n will be interesting...
Also, I'm 186cm so not a short fella to start with.
seats look pretty schmick!!
- El_Freddo
- Master Member
- Posts: 12506
- Joined: Tue Oct 04, 2005 10:00 am
- Location: Bridgewater Vic
- Contact:
Well the seats went awesome off road for the sand 4wd'n in Robe/Beachport and in the Wyperfeld NP as well as the 4wd'n we did in the Lerderderg State Forest recently.MTB92 wrote:I hit my head enough 4wding with standard L seats... and i am about 5" shorter than you! make sure you take some panadol for your headache
Today I pulled Ruby Scoo's power steering pump apart since it blew after the Wyperfeld trip, I was almost at the top of Hotham when I noticed something leaking pretty seriously while pulled over for a photo.
The powersteering pump is an interesting design, I've not seen this before - I was expecting it to be two gears working like a VW oil pump... But it's a little more complicated than that. And it should be an easy fix with a new bearing and a new seal. Otherwise everything looks serviceable - just need to get the parts.
But that got me thinking - I've got an L series PS pump doing nothing so I pulled it apart to find that the EJ PS tank bolts straight to the L series PS pump and that the EJ pulley fits on it too. While mounting it I found the difference between the two pumps - there's two differences actually:
1) the mounting bolts are smaller on the EJ pump, requiring the EJ mount to be re-drilled which I'll be doing to a second mount tomorrow and
2) if you try to change the outlet line bolt they're a different size between the EJ and EA pump - the EJ's was smaller.
Pics tomorrow or sunday hopefully.
Cheers
Bennie
- El_Freddo
- Master Member
- Posts: 12506
- Joined: Tue Oct 04, 2005 10:00 am
- Location: Bridgewater Vic
- Contact:
^^^ Scrub that ^^^
While the mounting holes look like the same pattern, the EJ's have been spread out. Short of slotting each hole towards the centre it won't fit. I'm *thinking* of making a U shaped plate that matches the EA's pump bolting pattern to clamp it in place with the holes slotted on the EJ mounting - hopefully I'll have enough clearance between the bolt heads and the pulley to do the job.
Other than this news the only thing I've got to show is the internals of the powersteering pump:
The bearing beside the shaft is the only one in the pump and this is what is shot, there's loads of play in it and from this the seal on the shaft gave out, everything else seems to be in serviceable condition.
Cheers
Bennie
- The Loyale
- Junior Member
- Posts: 53
- Joined: Fri Aug 17, 2007 2:56 pm
- Location: Waukesha, WI. United States
- Contact:
At least now I know what an EA82 P/S pump looks like in pieces! Hats off to you mate.
'92 Loyale - Safariwagon (Under Restoration)
130,000
'92 Toyota Landcruiser - Safariwagon-II "Nimble as an Ox!"
181,000
[SIGPIC][/SIGPIC]
130,000
'92 Toyota Landcruiser - Safariwagon-II "Nimble as an Ox!"
181,000
[SIGPIC][/SIGPIC]
- El_Freddo
- Master Member
- Posts: 12506
- Joined: Tue Oct 04, 2005 10:00 am
- Location: Bridgewater Vic
- Contact:
Thanks mate, This is an EJ pump, but I'm pretty sure they'd be the same, I've not pulled the EA82 pump apart, but it wouldn't be hard to find out if they are the same, I doubt they'd be different internally!The Loyale wrote:At least now I know what an EA82 P/S pump looks like in pieces! Hats off to you mate.
Cheers
Bennie
- RSR 555
- Elder Member
- Posts: 6951
- Joined: Sat Nov 10, 2007 10:42 am
- Location: ATM... stuck in Rockingham
Pretty much the same. Just different size. Just need to check for score marks if rebuilding.
You know you are getting old when the candles on your birthday cake start to cost more than the cake itself.
RSR Performance
Home of the 'MURTAYA' in Oz
Subaru Impreza WRX based Sportscar
[SIGPIC][/SIGPIC]
Disclaimer: Not my website but hyperlink here to Subaru workshop manuals
RSR Performance
Home of the 'MURTAYA' in Oz
Subaru Impreza WRX based Sportscar
[SIGPIC][/SIGPIC]
Disclaimer: Not my website but hyperlink here to Subaru workshop manuals
- The Loyale
- Junior Member
- Posts: 53
- Joined: Fri Aug 17, 2007 2:56 pm
- Location: Waukesha, WI. United States
- Contact:
Still on the topic of Power Steering pumps, I want to say that the first gen EJ22 (OBD-I) has an almost perfect match P/S pump, where as the 2nd gen EJ22 and up has a slightly different design. Something I read on USMB once.
Bennie, I forgot you swapped to EJ power. No tenderness for the old EA eh?
'92 Loyale - Safariwagon (Under Restoration)
130,000
'92 Toyota Landcruiser - Safariwagon-II "Nimble as an Ox!"
181,000
[SIGPIC][/SIGPIC]
130,000
'92 Toyota Landcruiser - Safariwagon-II "Nimble as an Ox!"
181,000
[SIGPIC][/SIGPIC]
- El_Freddo
- Master Member
- Posts: 12506
- Joined: Tue Oct 04, 2005 10:00 am
- Location: Bridgewater Vic
- Contact:
Yeah, the difference in the "almost perfect match" of the EA and gen1 EJ PS pumps is the mounting bolt holes are different, everything else is a direct swap! Good thinking Mr Fuji!!The Loyale wrote:Still on the topic of Power Steering pumps, I want to say that the first gen EJ22 (OBD-I) has an almost perfect match P/S pump, where as the 2nd gen EJ22 and up has a slightly different design. Something I read on USMB once.
Not the ones I had back then. I've now come to realise that they are a decent engine... when they're running quietly and don't require the heads to be pulled or the cam boxes to be cleaned up to fix an oil leak... I've got a soft spot for the EA81s, I reckon they're under estimated.The Loyale wrote:Bennie, I forgot you swapped to EJ power. No tenderness for the old EA eh?
Everyone goes on about how the EA82 produces more power than an EA81 - in stock form - when there's a debate about it. Take a look at the difference in the size of the carbies and that will give you your answer as to why - the EA81 has a smaller carbie!! Smash on a larger unit and you've got an instant power upgrade!
I'd love to do a single port FI conversion on an EA81, that'd be a sweet runner I reckon!
Cheers
Bennie
- RSR 555
- Elder Member
- Posts: 6951
- Joined: Sat Nov 10, 2007 10:42 am
- Location: ATM... stuck in Rockingham
You can fit the Gen2 Power Steering Pump on the Gen1 but you need to utilise the whole bracket, as the neck (front bearing housing) is larger for the later model.The Loyale wrote:Still on the topic of Power Steering pumps, I want to say that the first gen EJ22 (OBD-I) has an almost perfect match P/S pump, where as the 2nd gen EJ22 and up has a slightly different design. Something I read on USMB once.
Bennie, I forgot you swapped to EJ power. No tenderness for the old EA eh?
You know you are getting old when the candles on your birthday cake start to cost more than the cake itself.
RSR Performance
Home of the 'MURTAYA' in Oz
Subaru Impreza WRX based Sportscar
[SIGPIC][/SIGPIC]
Disclaimer: Not my website but hyperlink here to Subaru workshop manuals
RSR Performance
Home of the 'MURTAYA' in Oz
Subaru Impreza WRX based Sportscar
[SIGPIC][/SIGPIC]
Disclaimer: Not my website but hyperlink here to Subaru workshop manuals
- The Loyale
- Junior Member
- Posts: 53
- Joined: Fri Aug 17, 2007 2:56 pm
- Location: Waukesha, WI. United States
- Contact:
In the U.S the EA81 is the "Go to Motor" if you don't go EJ. Personally, I think the EA82 gets a lot of bad flack, because of its cooling issues and duel timing belts.
I've never had one problem with my EA82, and I love the sound more so then the EJs
'92 Loyale - Safariwagon (Under Restoration)
130,000
'92 Toyota Landcruiser - Safariwagon-II "Nimble as an Ox!"
181,000
[SIGPIC][/SIGPIC]
130,000
'92 Toyota Landcruiser - Safariwagon-II "Nimble as an Ox!"
181,000
[SIGPIC][/SIGPIC]
- El_Freddo
- Master Member
- Posts: 12506
- Joined: Tue Oct 04, 2005 10:00 am
- Location: Bridgewater Vic
- Contact:
Well, time for me to come clean - I've been working on Ruby Scoo to keep her moving, sentimental value is the real reason, I'm not ready to part with her yet.
So here's what I'm up to:
She didn't make the Mt Cole 4wd trip as I found the radius rod plate/gearbox crossmember mount plate was basically swinging in the air - after I was all geared up the week before (had a week in Benders before the trip). So no go. Here's the damage:
Oh yeah, and I had to rip out a captive nut when it broke it's welds, took some effort to get this bugger out! I'm also going to fix that rust while I'm there.
The silly season got in the way which was frustrating...
And thus the reason why the rotisserie thread came about I purchased this one as I couldn't make anything as sophisticated or buy the materials for the price I got this - fleabay special.
So this is her make over, more pics to come later in the week.
She'll be back better and strong than ever before Can't wait, I can tell you that!!
Cheers
Bennie