
Hi Bennie, saw on your first post you were after a set of original 13s. I have a set under the house which you are welcome to if you want to pick them up. I will need to get under there and check tyre condition but for memory three are good and one is flat(the fifth wheel and other good tyre went under the bonnet which vanished from a train station). They are painted black but as i said if your interested, they are all yours.
Brett
Red Targa Brumby
Moderator: El_Freddo
-
El_Freddo

- Master Member
- Posts: 12499
- Joined: Tue Oct 04, 2005 10:00 am
- Location: Bridgewater Vic
- Contact:
Thanks mate, I'd be happy to take them off your hands - PM sentberttus wrote:Hi Bennie, saw on your first post you were after a set of original 13s. I have a set under the house which you are welcome to if you want to pick them up. I will need to get under there and check tyre condition but for memory three are good and one is flat(the fifth wheel and other good tyre went under the bonnet which vanished from a train station). They are painted black but as i said if your interested, they are all yours.
Brett
I've stalled on this project at the moment - got a few other things to do on Ruby Scoo and really need an engine before going any further - I don't want to pull it all apart before I know where I'm going on this.
Rear diff will be coming out at some point though, it needs a clean up and I'll drop some new seals in at the same time.
Cheers
Bennie

-
El_Freddo
- Master Member
- Posts: 12499
- Joined: Tue Oct 04, 2005 10:00 am
- Location: Bridgewater Vic
- Contact:
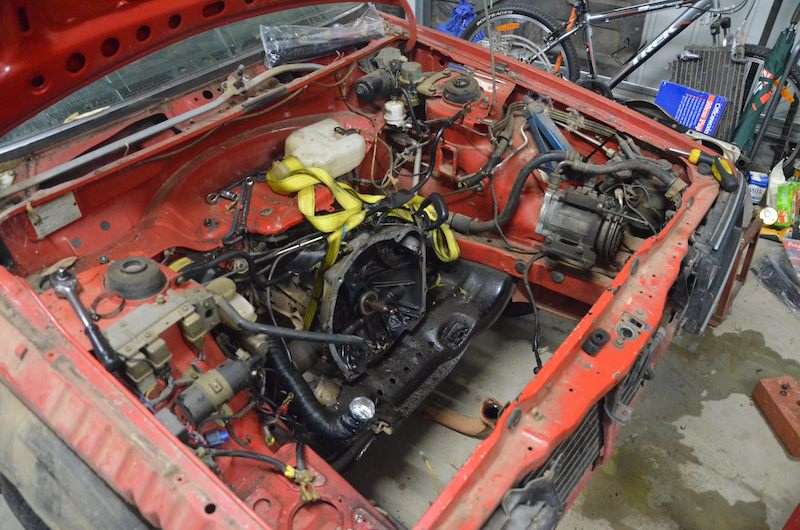
Ok, Dad and I did this last Friday... Well, Dad watched me do this:
Then we drained the sump:

And drained the sump some more:
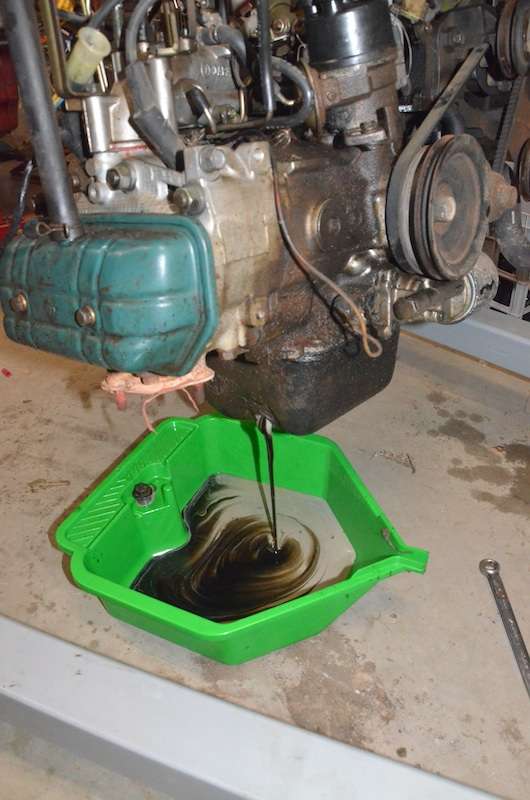
Saturday during the tear down we got even more, I reckon there was a good 14 or so litres of fluid in it!
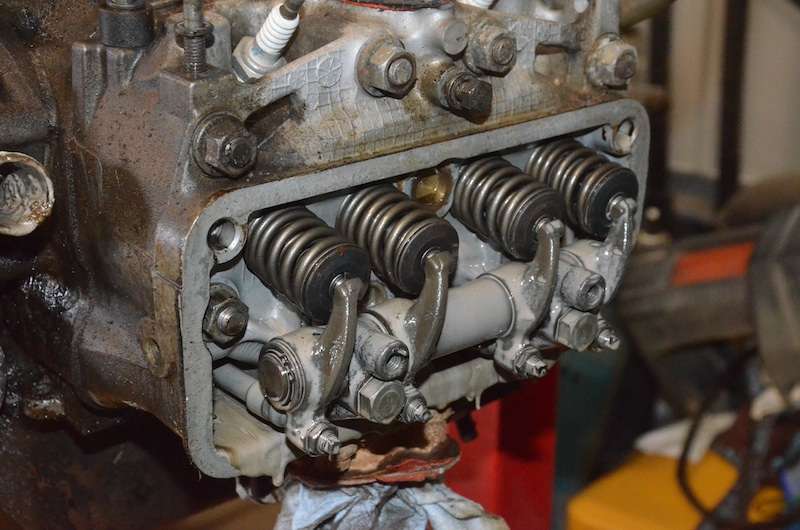
The rocker arms:
The cylinders, both sides were the same:
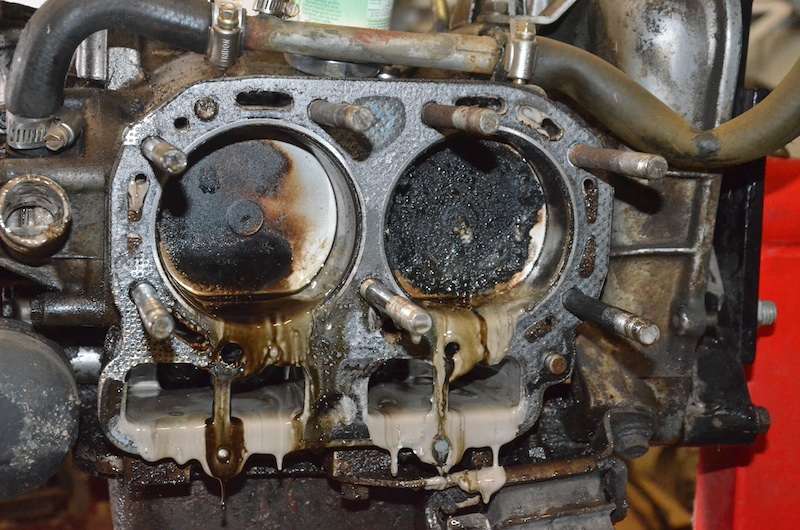
^ Mmmm, more "creamy goodness"
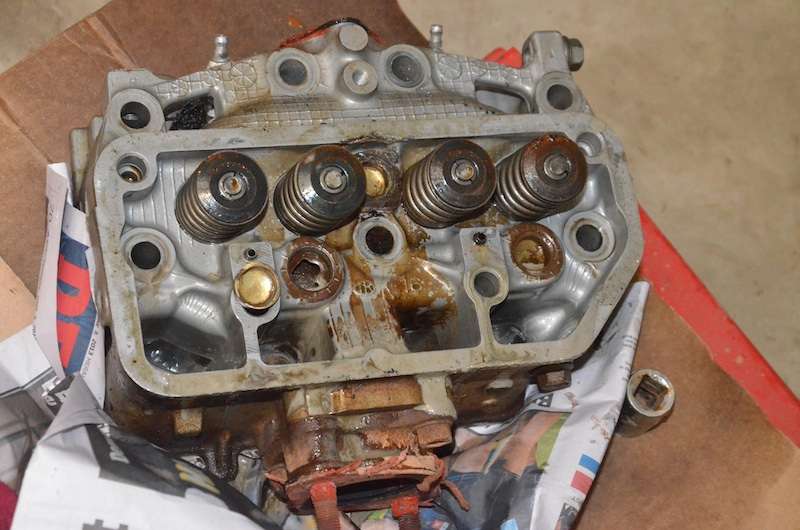
We were thinking there was a pretty major head gasket issue, until we removed the driver's side head:
This has been washed down, anyone notice what's missing?

There was a little bit of surface rust on the bores, it wore away well with some 1200 grit emery paper, but one pot has a tiny bit of pitting right at the top of the bore, hopefully it won't be an issue long term!
I'm hoping to get away with a new set of head gaskets, we'll see how that goes. As for all the sludge, I'm going to do this on the cheap - once the head gaskets are on and the engine is back in I'll fill it up with some used crankcase oil and a new filter, run it up to temp (if it starts - that'll be another issue), then drop the oil and filter for more used oil. Do the same, up to temp and drop. From here I'll gauge wether I should go another run with used oil or go for a fresh batch to run it with.
This will also tell me if there's other damage/wear with the engine - once I see it's not blowing smoke I'll be happy!
Also, if you look at the pistons, while not really clear in the images, they look like after market units to me - no fuji/subaru boomerang in a circle like symbol on the faces of these units... So hopefully all is good!
A question for the EA81 gurus out there: The two bolts holding the rocker assembly to the head, are these head bolts that need to be torqued in sequence? If so, how do you head bolt #9 in the sequence? I can't get socket in there to do anything, which means no torque wrench...
Cheers
Bennie
Then we drained the sump:
And drained the sump some more:
Saturday during the tear down we got even more, I reckon there was a good 14 or so litres of fluid in it!
The rocker arms:
The cylinders, both sides were the same:
^ Mmmm, more "creamy goodness"
We were thinking there was a pretty major head gasket issue, until we removed the driver's side head:
This has been washed down, anyone notice what's missing?
There was a little bit of surface rust on the bores, it wore away well with some 1200 grit emery paper, but one pot has a tiny bit of pitting right at the top of the bore, hopefully it won't be an issue long term!
I'm hoping to get away with a new set of head gaskets, we'll see how that goes. As for all the sludge, I'm going to do this on the cheap - once the head gaskets are on and the engine is back in I'll fill it up with some used crankcase oil and a new filter, run it up to temp (if it starts - that'll be another issue), then drop the oil and filter for more used oil. Do the same, up to temp and drop. From here I'll gauge wether I should go another run with used oil or go for a fresh batch to run it with.
This will also tell me if there's other damage/wear with the engine - once I see it's not blowing smoke I'll be happy!
Also, if you look at the pistons, while not really clear in the images, they look like after market units to me - no fuji/subaru boomerang in a circle like symbol on the faces of these units... So hopefully all is good!
A question for the EA81 gurus out there: The two bolts holding the rocker assembly to the head, are these head bolts that need to be torqued in sequence? If so, how do you head bolt #9 in the sequence? I can't get socket in there to do anything, which means no torque wrench...
Cheers
Bennie
-
Silverbullet

- Senior Member
- Posts: 2865
- Joined: Mon Aug 23, 2010 6:20 pm
- Location: Adelaide
What a mess! Are those two welch plugs completely MIA? 
The two bolts for the rocker assembly are two in the torque sequence, this is the cue for Jonno to post the pic of his special ring spanner for nut under the rocker assembly. Alternatively you can do what I did which is buy a cheap socket and grind it away until you can get a turn on the nut (most of the socket will be gone before it fits) I've still got mine and you can only get about 1/16th of a turn before you need to reposition it but it works")
The two bolts for the rocker assembly are two in the torque sequence, this is the cue for Jonno to post the pic of his special ring spanner for nut under the rocker assembly. Alternatively you can do what I did which is buy a cheap socket and grind it away until you can get a turn on the nut (most of the socket will be gone before it fits) I've still got mine and you can only get about 1/16th of a turn before you need to reposition it but it works
Will it ever end!?
-EA81 TWIN CARB!!!!
-L series 5 speed
-Custom paint job
-2" lift
-Full custom re-wire
-L series front end

-EA81 TWIN CARB!!!!
-L series 5 speed
-Custom paint job
-2" lift
-Full custom re-wire
-L series front end
-
El_Freddo
- Master Member
- Posts: 12499
- Joined: Tue Oct 04, 2005 10:00 am
- Location: Bridgewater Vic
- Contact:
Nah, only one is MIA:Silverbullet wrote:What a mess! Are those two welch plugs completely MIA?
Brilliant, not. Might have to shave up a socket for my use on this too.Silverbullet wrote:The two bolts for the rocker assembly are two in the torque sequence, this is the cue for Jonno to post the pic of his special ring spanner for nut under the rocker assembly. Alternatively you can do what I did which is buy a cheap socket and grind it away until you can get a turn on the nut (most of the socket will be gone before it fits) I've still got mine and you can only get about 1/16th of a turn before you need to reposition it but it works
Cheers
Bennie

-
Silverbullet
- Senior Member
- Posts: 2865
- Joined: Mon Aug 23, 2010 6:20 pm
- Location: Adelaide
Hehe it's funny how I'm the one suggesting it to you Bennie when just a couple years ago you suggested the exact same thing to me That page has the tool you're looking for 
showthread.php?t=19634&highlight=EA81+overhaul&page=11
showthread.php?t=19634&highlight=EA81+overhaul&page=11
Will it ever end!?
-EA81 TWIN CARB!!!!
-L series 5 speed
-Custom paint job
-2" lift
-Full custom re-wire
-L series front end
-EA81 TWIN CARB!!!!
-L series 5 speed
-Custom paint job
-2" lift
-Full custom re-wire
-L series front end
-
El_Freddo
- Master Member
- Posts: 12499
- Joined: Tue Oct 04, 2005 10:00 am
- Location: Bridgewater Vic
- Contact:
Thanks mate, that's just what I needed! I remember giving that advice thinking it was like the EA82 setup where you have to shave a socket to do the jobSilverbullet wrote:Hehe it's funny how I'm the one suggesting it to you Bennie when just a couple years ago you suggested the exact same thing to me
showthread.php?t=19634&highlight=EA81+overhaul&page=11
Now to scout out a cheap socket for the job!
Cheers
Bennie


-
El_Freddo
- Master Member
- Posts: 12499
- Joined: Tue Oct 04, 2005 10:00 am
- Location: Bridgewater Vic
- Contact:
Dad came up with some spares and a welder - the driver's side window is now in and operational again, we had to make a new runner for the bottom of the window as the old one was seriously bent, we also replaced the window regulator as the old was was also bent 
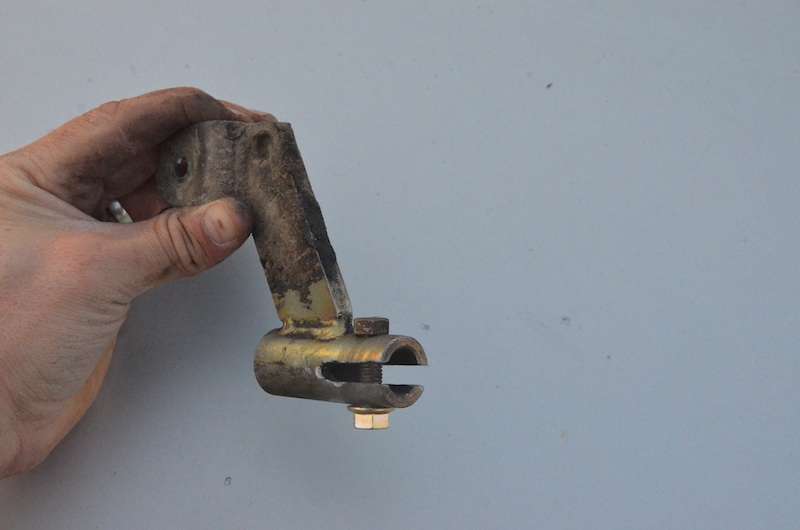
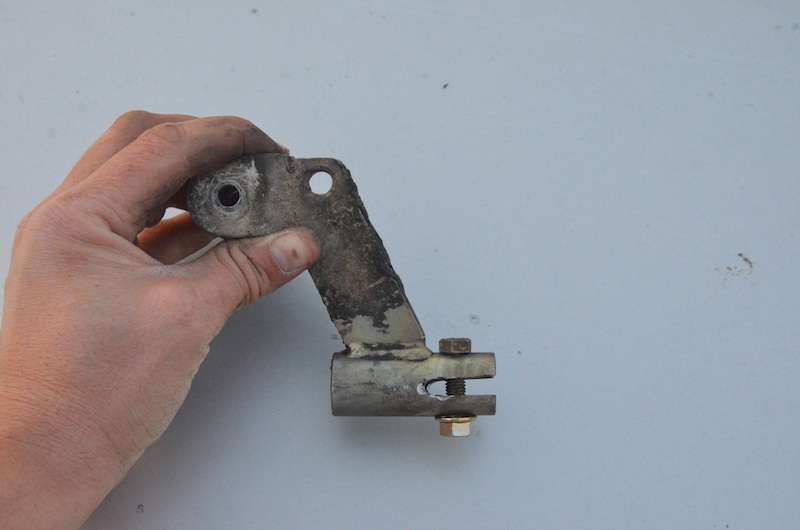
I also got onto fixing the sloppy shifter, this is how you do it - maybe a bit over board but it's nice and tight now!
That's it for now.
Cheers
Bennie
I also got onto fixing the sloppy shifter, this is how you do it - maybe a bit over board but it's nice and tight now!
That's it for now.
Cheers
Bennie
-
El_Freddo
- Master Member
- Posts: 12499
- Joined: Tue Oct 04, 2005 10:00 am
- Location: Bridgewater Vic
- Contact:
Nah not going to try that turbo setup. And if I went the EA82 Y pipe I'd have to work out how to fit the ERG pipe bit unless I get the Y pipe cut down to fit the cast spacers to sort out the ERG pipe part...steptoe wrote:And an EA82 Y pipe of course, or if adventurous - an EA82T exhaust set up, just run the left to right then down the back to see if you pick up a turbo sound
Next up is to get the engine back together, probably over the next 5 or 6 weeks with the way things are playing out
Cheers
Bennie
-
El_Freddo
- Master Member
- Posts: 12499
- Joined: Tue Oct 04, 2005 10:00 am
- Location: Bridgewater Vic
- Contact:
All welch plugs have had the same treatment - threaded and plugged. I swear I've got a pic somewhere but I've got to dig it up. Super pissed if I can't find it - see why below.TOONGA wrote:I would be very wary of the other welch plugs.
Too true Tony. I've only just managed to get the engine off the engine stand where it's been for the best part of six months to this:Tweety wrote:Some things just take time Scott....ask any inmate lol
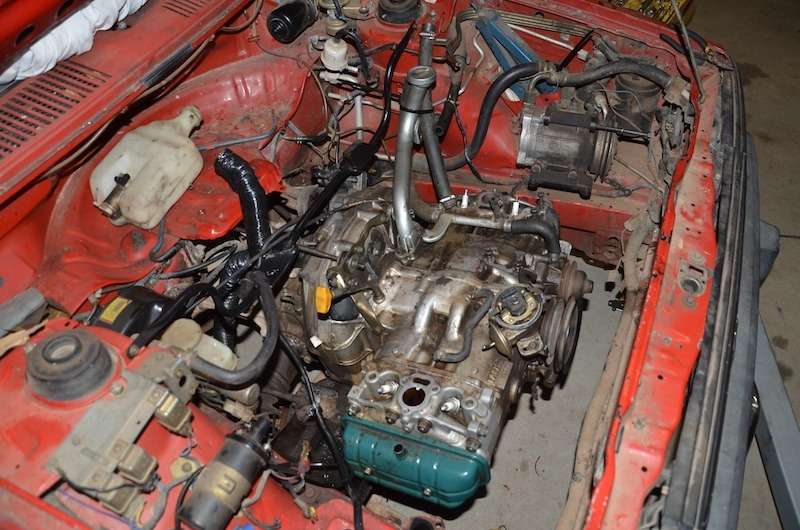
Exciting times. Still moving super slow as I realise what I've still got to do before I can put it up for a RWC check - I'm running out of time to get it sorted for when I want to be paying rego in the year.
But the above is a big move forward
Cheers
Bennie
-
Silverbullet
- Senior Member
- Posts: 2865
- Joined: Mon Aug 23, 2010 6:20 pm
- Location: Adelaide
Now there's a familiar sight  How did you go lining the clutch up? did you have a proper alignment tool?
Also, cover those intake holes up! lest a runaway washer or nut decides to make a new home
Also, cover those intake holes up! lest a runaway washer or nut decides to make a new home
Will it ever end!?
-EA81 TWIN CARB!!!!
-L series 5 speed
-Custom paint job
-2" lift
-Full custom re-wire
-L series front end
-EA81 TWIN CARB!!!!
-L series 5 speed
-Custom paint job
-2" lift
-Full custom re-wire
-L series front end
-
El_Freddo
- Master Member
- Posts: 12499
- Joined: Tue Oct 04, 2005 10:00 am
- Location: Bridgewater Vic
- Contact:
No alignment tool. The one I use (EJ input shaft) was too big, which surprised me a bit. So I did it by eye, that didn't work. Next trick was to loosen the pressure plate bolts right off, get it all in and bolted up the then use the starter motor hole to do the bolts up again.
Worked a treat!
And there's a cover over the top of the engine - I only removed it for the pic, otherwise it could almost pass for a cardboard box under there (where's the fun in that?)...
Cheers
Bennie
Worked a treat!
And there's a cover over the top of the engine - I only removed it for the pic, otherwise it could almost pass for a cardboard box under there (where's the fun in that?)...
Cheers
Bennie
-
RSR 555

- Elder Member
- Posts: 6951
- Joined: Sat Nov 10, 2007 10:42 am
- Location: ATM... stuck in Rockingham
El_Freddo wrote:All welch plugs have had the same treatment - threaded and plugged. I swear I've got a pic somewhere but I've got to dig it up. Super pissed if I can't find it - see why below.
You know you are getting old when the candles on your birthday cake start to cost more than the cake itself.
RSR Performance
Home of the 'MURTAYA' in Oz
Subaru Impreza WRX based Sportscar
[SIGPIC][/SIGPIC]
Disclaimer: Not my website but hyperlink here to Subaru workshop manuals
RSR Performance
Home of the 'MURTAYA' in Oz
Subaru Impreza WRX based Sportscar
[SIGPIC][/SIGPIC]
Disclaimer: Not my website but hyperlink here to Subaru workshop manuals