
Of the two EJ20s one is in storage at a mates place, I purchased it sight unseen other then seeing a few pics. So not sure what it actually is until I get around to collecting it. But I’m hopeful it is an original Ph 1.
The other one I do have at home is actually from a JDM donor and is the Ph 1.
It sounds frustrating chasing an engine for your RS, at a sensible price and reliable. And your probably right about the RS purity being unobtainable without throwing money at it. I picked up a V7 207 block for a great price for a build, and I’d suggest that’s probably your best avenue. Great factory blocks and fairly common. Bolt all your RS manifolds etc to it, and get that old girl running.
Great thing is you actually have an RS, even if it has a few things that need doing. Don’t ever part with it.
J.
RS wagon...
Moderator: El_Freddo
-
El_Freddo

- Master Member
- Posts: 12637
- Joined: Tue Oct 04, 2005 10:00 am
- Location: Bridgewater Vic
- Contact:
Re: RS wagon...
I don’t let my vehicles get away, so this one won’t be parting company with us any time soon either!
Sounds like you’ve got some bits and pieces around. I’ve got two phase 1 blocks with different issues that should make one good one once I’m in a better position to do a proper restoration. Everyone says ditch the RS heads, go WRX this and that etc. I do want the purity but for now I’m keen to just have it running and able to enjoy it.
It’ll get there! No work on it coming up any time soon.
Cheers
Bennie

-
El_Freddo
- Master Member
- Posts: 12637
- Joined: Tue Oct 04, 2005 10:00 am
- Location: Bridgewater Vic
- Contact:
Re: RS wagon...
I finally resealed the rear diff - I think it’s only been about a year since it came out of the RS to live on my shed’s floor. A house move has pushed me to finally get it done. So slack! If we weren’t moving I’d be fitting a factory rear locker to our Pajero and tidying up the Brumby and the L series... this WAS low priority on my list for now. Hand is forced so it’s done. Next will be to fill with oil and fit back into the RS.
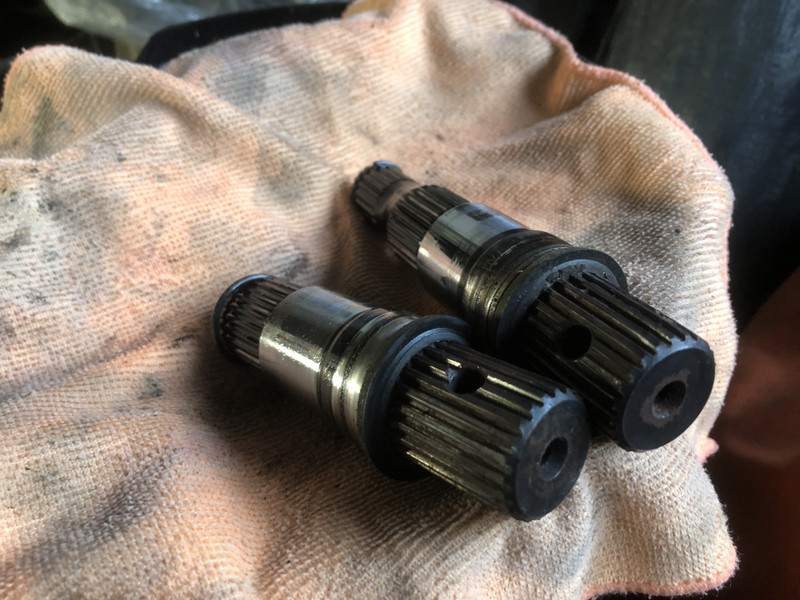
Solid clip in r160 stub axles - I didn’t realise the RHS stub axle was longer than the left, I always thought they were the same length internally:
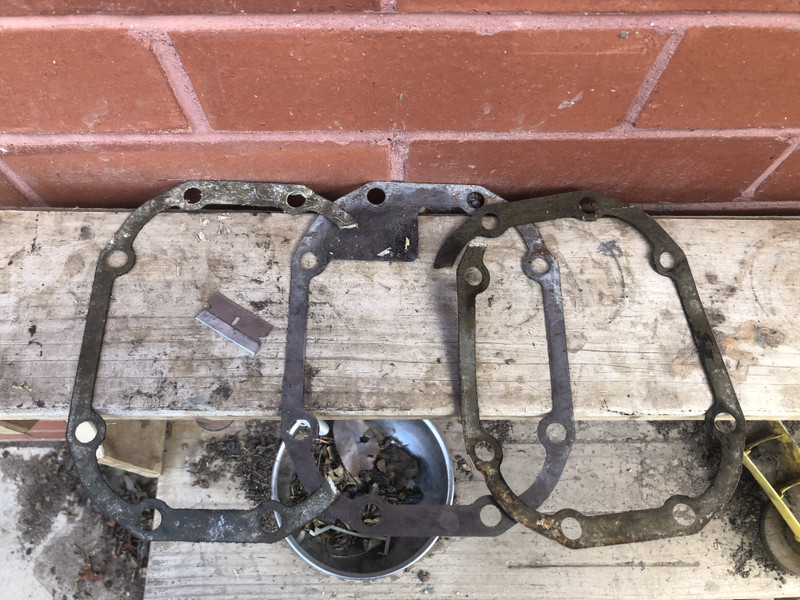
The rear cover gasket was pretty much dead. I contacted my local dealer to get an idea on price and availability, that was Thursday, I’m yet to hear from them. What I worked out is that the original gasket is metal sandwiched in paper. I know the later model diffs run a metal only gasket so I stripped all the paper off the metal and gave it a small smear of high torque silicone and assembled. Here’s the metal gasket in the middle of the paper pieces from each side of the metal unit:
Who knew the kid’s mud kitchen would actually be useful for something other than their mess and entertainment?!
That’s all for now.
Cheers
Bennie
Solid clip in r160 stub axles - I didn’t realise the RHS stub axle was longer than the left, I always thought they were the same length internally:
The rear cover gasket was pretty much dead. I contacted my local dealer to get an idea on price and availability, that was Thursday, I’m yet to hear from them. What I worked out is that the original gasket is metal sandwiched in paper. I know the later model diffs run a metal only gasket so I stripped all the paper off the metal and gave it a small smear of high torque silicone and assembled. Here’s the metal gasket in the middle of the paper pieces from each side of the metal unit:
Who knew the kid’s mud kitchen would actually be useful for something other than their mess and entertainment?!
That’s all for now.
Cheers
Bennie
-
El_Freddo
- Master Member
- Posts: 12637
- Joined: Tue Oct 04, 2005 10:00 am
- Location: Bridgewater Vic
- Contact:
Re: RS wagon...
RS is finally back on four wheels. It was a long time coming.
Future Bennie played around with the RHS leak, seems it wasn’t anything to worry about, loads of oil behind it that wasn’t leaking out... time will tell. Now to put the oil back in the diff, it’s clean so I’ll put what came out back in.
Next is to paint/seal some primer then put the tailgate back on. I’ll acid treat some exposed metal before it cops some primer. After all this it’ll get packed up for the impending move.
It’s good to be working on it again, even though it’s only little bits and pieces at a time.
Cheers
Bennie
-
El_Freddo
- Master Member
- Posts: 12637
- Joined: Tue Oct 04, 2005 10:00 am
- Location: Bridgewater Vic
- Contact:
Re: RS wagon...
Small update on the RS:
Got stuck into the timing gear and associated seals on a replacement engine that I picked up about two years ago. Bit of a gamble but it came with original heads etc and a VF8 - seems it was from an auto.
The previous owner said something about swapping the oil pump out and I thought it was a smaller unit but it seems It’s a 12mm rotor unit. It’ll get a clean and go back on.
Plan is to replace the crank and cam seals, rocker cover seals, coolant crossover pipe O rings and intake manifold gaskets as I’ll swap the intake manifold to the one that came with the RS - this way I know the injectors are the right ones etc. I believe the auto ran different injectors to the manual. I know it ran a different turbo.
Secondary plan is to pull the RS out of its storage location and drop the engine in. Once that’s done the plan is to get it running. This should see this project move along a bit quicker if the engine is running - makes it easier to move it around etc.
With only a carport to work with, having it move under its own steam is super important (and handy)!
Cheers
Bennie
-
El_Freddo
- Master Member
- Posts: 12637
- Joined: Tue Oct 04, 2005 10:00 am
- Location: Bridgewater Vic
- Contact:
Re: RS wagon...
Today saw the RS pulled from its hothouse “cocoon” (go Redback who was the tug vehicle!) to emerge as an almost parts car (cry). Mice made many visits as have rats it seems. The interior stinks but from what I can see there’s no lasting chew damage to the interior.
I gave the engine and engine bay a degrease and pressure wash. The engine got the intake fitted after the coolant crossover pipe O rings were swapped for new ones. The engine is now ready to come off the stand and have the rear air/oil separator plate swapped for a metal one (need to find it!), the rear main will be replaced before the flywheel and clutch goes on.
I’m going to run the pressure plate and disc that came with the RS - it’s becoming a bit of an exercise to get this going on a tight budget working with what I’ve got unless it’s necessary to sort it out. I see the value in returning it to a complete running vehicle at this point - anything that needs replacing later can be done then.
I need to read up on the process of installing the engine with the pull clutch - from memory the throw out bearing comes off and joins the clutch fork on the gearbox. Once the engine is installed it clicks back into the clutch assembly and works from that point on. I also need to locate the clutch fork pivot shaft. I know I’ve got it, finding it is the issue. Worst case scenario I pull the shaft from a phase 2 box I’ve got in the wings. Hopefully there the same unit - but hopefully it won’t come to this. I found the clutch fork so that’s a start.

^ this is basically where she’s at - this is the closest a complete engine has been to the RS since pulling out the dead engine 4 house moves ago! I was hoping to be further along on this today but I forgot how involved cleaning is - and I might as well do that now while I’ve got full access! And after giving the bumper a bit of a squirt while doing the engine bay, she might just scrub up ok after a decent wash, time will tell on this one too.
Lastly, I pushed on the clutch slave cylinder and fluid went everywhere - another thing to sort out as I don’t have a spare laying around. Hoping I can put a seal kit through it…
Cheers
Bennie
I gave the engine and engine bay a degrease and pressure wash. The engine got the intake fitted after the coolant crossover pipe O rings were swapped for new ones. The engine is now ready to come off the stand and have the rear air/oil separator plate swapped for a metal one (need to find it!), the rear main will be replaced before the flywheel and clutch goes on.
I’m going to run the pressure plate and disc that came with the RS - it’s becoming a bit of an exercise to get this going on a tight budget working with what I’ve got unless it’s necessary to sort it out. I see the value in returning it to a complete running vehicle at this point - anything that needs replacing later can be done then.
I need to read up on the process of installing the engine with the pull clutch - from memory the throw out bearing comes off and joins the clutch fork on the gearbox. Once the engine is installed it clicks back into the clutch assembly and works from that point on. I also need to locate the clutch fork pivot shaft. I know I’ve got it, finding it is the issue. Worst case scenario I pull the shaft from a phase 2 box I’ve got in the wings. Hopefully there the same unit - but hopefully it won’t come to this. I found the clutch fork so that’s a start.
^ this is basically where she’s at - this is the closest a complete engine has been to the RS since pulling out the dead engine 4 house moves ago! I was hoping to be further along on this today but I forgot how involved cleaning is - and I might as well do that now while I’ve got full access! And after giving the bumper a bit of a squirt while doing the engine bay, she might just scrub up ok after a decent wash, time will tell on this one too.
Lastly, I pushed on the clutch slave cylinder and fluid went everywhere - another thing to sort out as I don’t have a spare laying around. Hoping I can put a seal kit through it…
Cheers
Bennie
-
Bantum

- Senior Member
- Posts: 2004
- Joined: Sun Jul 29, 2012 4:30 pm
- Location: Northern Territory + QLD
- Contact:
Re: RS wagon...
Looking good there ... 
Progress is progress, I've had to move at least 5 times since I've had the Brumby, makes it hard to work on projects ...
Cioa, Bantum ...
Progress is progress, I've had to move at least 5 times since I've had the Brumby, makes it hard to work on projects ...
Cioa, Bantum ...
Re: RS wagon...
Holy hell El Freddo, how many Eastern Brown Snakes do you have hidden in your wood stack? 
-
El_Freddo
- Master Member
- Posts: 12637
- Joined: Tue Oct 04, 2005 10:00 am
- Location: Bridgewater Vic
- Contact:
Re: RS wagon...
Very true on both accounts - anything that moves a project forward is progress. Sometimes (*usually) it’s painfully slow.
None, they’re all down the river behind us
Nothing else happened since the last post as I went to work yesterday to sort out some bits before we officially go back next week.
One thing that did happen was waking up this morning to someone having attempted to steal Ruby Scoo. Install kill switches or immobilisers!!
Cheers
Bennie
-
El_Freddo
- Master Member
- Posts: 12637
- Joined: Tue Oct 04, 2005 10:00 am
- Location: Bridgewater Vic
- Contact:
Re: RS wagon...
After essentially two day’s off, I got another day at it - listening to the Hottest 100 (which should be tomorrow on Oz day like it used to be… that’s another story though!).
New rear main seal, plastic oil/air separator plate swapped for an alloy unit, flywheel and clutch fitted. The clutch fork shaft was located and the gearbox side of things sorted.
Then came time to lift the engine to drop it in. Only that moving the crane on dirt was nearly impossible, certainly sketchy at best. So Redback was employed to pull the RS forward until the engine was in about the right place. Then it all went together without any issues.
She’s currently sitting like this - about 8 years and three months since the last time she sported an engine in the engine bay.

Now to see if the engine will fire on some start ya bastard before hooking EVERYTHING up properly.
After that it’s cleaning everything out from the unwanted visitors and get stuck into putting the whole vehicle back together.
I’ll be stoked if it fires up without any concerns - a feeling I’m trying to hold at bay until it’s confirmed, not easy!!
Cheers
Bennie
New rear main seal, plastic oil/air separator plate swapped for an alloy unit, flywheel and clutch fitted. The clutch fork shaft was located and the gearbox side of things sorted.
Then came time to lift the engine to drop it in. Only that moving the crane on dirt was nearly impossible, certainly sketchy at best. So Redback was employed to pull the RS forward until the engine was in about the right place. Then it all went together without any issues.
She’s currently sitting like this - about 8 years and three months since the last time she sported an engine in the engine bay.
Now to see if the engine will fire on some start ya bastard before hooking EVERYTHING up properly.
After that it’s cleaning everything out from the unwanted visitors and get stuck into putting the whole vehicle back together.
I’ll be stoked if it fires up without any concerns - a feeling I’m trying to hold at bay until it’s confirmed, not easy!!
Cheers
Bennie
Re: RS wagon...
Wish I was as adept as you swinging a spanner Bennie, plus have the knowledge to do the job in the first place. You certainly have it coming together in good time.
-
El_Freddo
- Master Member
- Posts: 12637
- Joined: Tue Oct 04, 2005 10:00 am
- Location: Bridgewater Vic
- Contact:
Re: RS wagon...
Yeah I had some momentum going!! Thanks for the complement. It’s all learning, even when you know stuff there are still things to learn!
Today I’ve stalled because I didn’t account for the new wiring needed for the fuel pump install. I can’t for the life of me find my soldering iron!
The fuel pump is a Deatschwerks model DW200. I’ve had to reuse the RS’s sock as it sits deeper than the supplied unit. So I’m using the old one which doesn’t look as good as the new one but should be fine for the task. I snapped one of the fuel pump hanger studs on the fuel tank. Bummer, but I’m hoping it’s not all doom and gloom over that.
In other news, last night I got the engine to fire on some start ya bastard!! Very excited and it did it easily. So now I’m hoping once the fuel system and the AFM are hooked up it’ll fire up no worries all going well.
I just need this soldering iron!! I might look into using a set of connectors but I don’t really like the sound of this idea. I would get me moving forward on the project again though.
Cheers
Bennie
-
Suby Spanner
- Junior Member
- Posts: 113
- Joined: Wed Apr 29, 2015 9:02 pm
- Location: Adelaide, Australia

Re: RS wagon...
AWESOME! Good job mate.
I know the pain. I've got a (non-subaru) sleeper here myself. 2011 was the last time it seen the road, engine was in a couple years later, it runs but was modified, so I got to change injectors/fuel pump etc etc.. and TBH it's a chore I don't enjoy, for a car that's now worth too much to drive daily....
Keep going mate, I know my circle of friends really appreciate the old RS's these days.
-
El_Freddo
- Master Member
- Posts: 12637
- Joined: Tue Oct 04, 2005 10:00 am
- Location: Bridgewater Vic
- Contact:
Re: RS wagon...
Thanks Suby Spanner! Mine won’t be a great example - but it’ll be a genuine AUDM RS Liberty wagon at least!
Today’s effort was a roller coaster ride early on. With this fuel pump wiring I decided overnight to just do a patch wire job and sealed each wire with some heat shrink for the time being. I found a 9-0791 install kit for the DW200 for a good price on eBay so I made a purchase, this will replace the wiring and the sock.
I discovered last night that the DW200 fuel pump comes in a kit that includes the 9-0791 install kit for the same price as the kit I purchased a number of years ago. Bit annoyed about that!
With the temporary wiring decision made, it was done and installed. I put the 20L of fresh 98 that I got yesterday into the tank and decided to flush the input line at the engine end to get rid of any last remaining dead fuel. No bueno.
Looked into it and I couldn’t get the pump to prime. I checked fuses, hot wired the pump at the tank and decided it might be my joints I just twisted together and heat shrank.
I set up a “test bed” on a cardboard box on the ground (because my shed is awesome - it was f’n hot today too!) and found that the pump was trying to turn but was seized. By this stage I was full spewing - what a waste of money etc. After pacing around I spoke with Mrs El_Freddo and told her what was going on - as I did this I shook the pump and I felt the centre of it click a little. Back to the test bed and while hitting the positive to activate the pump I shook it in the same manner and it came to life! Stoked!
Back in it went and purged the fuel line no worries. It’s also super quiet which I was really stoked about - no whining noises! Now waiting on the install kit with the proper wire and new sock in it to fit and forget about this part of the build.
With that done I got the engine to idle really roughly with my ghetto turbo bypass intake system - I borrowed Ruby Scoo’s NA EJ22 intake and plumbed in the IACV and crank vent system, plugged off what wasn’t needed and hooked up the AFM. It wouldn’t start on its own accord without the use of some starter fluid like yesterday - but this time it kept running, albeit quite roughly. But it ran with its own fuel system. STOKED!
I’ve got an exhaust leak at the base of the up pipe, hoping it’s just a loose fitting or a new gasket required. It could be a split up pipe from what I’m told - I’m learning quite a few bits about these machines which is awesome!
At this point I need to make a shout out to RSguy (Rob Z) from the RSLC forum who was very helpful with my questions and requests over the last few days! He’s the only person I know/have contact with that also owns and knows RSs.
I rigged up the cooling system that bypassed the heater core because I didn’t want to hook it up due the PO who put a T piece in one of the lines (driver’s side) with a smaller diameter off shoot that I can’t work out what it’s for. I still don’t have a coolant temp sensor hooked up - I need to source a plug and I’m reluctant to cut one off another loom in the shed that might be used in the future. I’ll get one sorted at some stage. This could be the hard starting issue I’m experiencing.
With the cooling system hooked up I could give it a longer run and found another vacuum leak to deal with. I made a super ghetto IAVC pipe setup with a small section of rad hose, another piece of the factory IACV plumbing and some duct tape! It still stumbles around a bit when idling - not like it’s sorting out it’s idle on first start with the battery reconnected.

Interestingly, even with the 40° weather today, there was still exhaust vapour that could be seen. It didn’t smell odd, but I am running tap water too - this is because I’ll open up the cooling system again soon, I also didn’t want to waste good coolant if there was a big issue to deal with. Hoping this vapour just exhaust vapour/crap from sitting so long and not anything sinister! No bubbles in the remote res so that’s a positive.
And that was play time over. I made it to the goal I wanted to achieve, mind you a few things were different to the original plan (namely the turbo bypass intake setup) and it was two days later than i thought. Can’t complain, I essentially had two days off from the project last week and I still made it before the end of my holidays so it’s a win! Plus my eldest got in on the action for a few days before the stupid hot weather kicked in.
Now it’s dawned on me - I’m into that “10% that takes 90%” zone with the engine bay etc. What needs to be done now:
- clutch hydraulic system overhaul (then it’ll move under its own power!)
- engine mount nuts.
- inspect the up pipe/fix exhaust leak from this area.
- dump pipe gasket fitted (no gasket atm for test purposes) along with all required nuts and bolts.
- buy new turbo elbow - my one is proper rooted with a super dodgy repair!
- pitch stopper rod bolted in.
- charcoal canister mounted and its third line to/from it sorted. I need to work out where this goes/comes from.
- sort out the temp sensor plug and wiring, locate the engine wiring loom under the back of the intake manifold where I think it’s meant to be - intake manifold will need to be lifted for this (fun!)
- sort out turbo intake tract pieces and find the missing bits I apparently don’t have - removed for a catch can by the PO I think.
- source a new brake master cylinder cap - noticed mine sports a split in the centre of it. Not ideal!
- bolt in the auxiliaries and fit the fan belts
- fit the thermo fans
I’m sure there’s more in there - that’s a general run down!
Things will no doubt slow down a bit with this one now. I’m hoping to keep pushing along with it when I can.
Thanks for reading for those that took the time to do so. And another shout out for all the help from Rob Z/RSguy!
Cheers
Bennie
Today’s effort was a roller coaster ride early on. With this fuel pump wiring I decided overnight to just do a patch wire job and sealed each wire with some heat shrink for the time being. I found a 9-0791 install kit for the DW200 for a good price on eBay so I made a purchase, this will replace the wiring and the sock.
I discovered last night that the DW200 fuel pump comes in a kit that includes the 9-0791 install kit for the same price as the kit I purchased a number of years ago. Bit annoyed about that!
With the temporary wiring decision made, it was done and installed. I put the 20L of fresh 98 that I got yesterday into the tank and decided to flush the input line at the engine end to get rid of any last remaining dead fuel. No bueno.
Looked into it and I couldn’t get the pump to prime. I checked fuses, hot wired the pump at the tank and decided it might be my joints I just twisted together and heat shrank.
I set up a “test bed” on a cardboard box on the ground (because my shed is awesome - it was f’n hot today too!) and found that the pump was trying to turn but was seized. By this stage I was full spewing - what a waste of money etc. After pacing around I spoke with Mrs El_Freddo and told her what was going on - as I did this I shook the pump and I felt the centre of it click a little. Back to the test bed and while hitting the positive to activate the pump I shook it in the same manner and it came to life! Stoked!
Back in it went and purged the fuel line no worries. It’s also super quiet which I was really stoked about - no whining noises! Now waiting on the install kit with the proper wire and new sock in it to fit and forget about this part of the build.
With that done I got the engine to idle really roughly with my ghetto turbo bypass intake system - I borrowed Ruby Scoo’s NA EJ22 intake and plumbed in the IACV and crank vent system, plugged off what wasn’t needed and hooked up the AFM. It wouldn’t start on its own accord without the use of some starter fluid like yesterday - but this time it kept running, albeit quite roughly. But it ran with its own fuel system. STOKED!
I’ve got an exhaust leak at the base of the up pipe, hoping it’s just a loose fitting or a new gasket required. It could be a split up pipe from what I’m told - I’m learning quite a few bits about these machines which is awesome!
At this point I need to make a shout out to RSguy (Rob Z) from the RSLC forum who was very helpful with my questions and requests over the last few days! He’s the only person I know/have contact with that also owns and knows RSs.
I rigged up the cooling system that bypassed the heater core because I didn’t want to hook it up due the PO who put a T piece in one of the lines (driver’s side) with a smaller diameter off shoot that I can’t work out what it’s for. I still don’t have a coolant temp sensor hooked up - I need to source a plug and I’m reluctant to cut one off another loom in the shed that might be used in the future. I’ll get one sorted at some stage. This could be the hard starting issue I’m experiencing.
With the cooling system hooked up I could give it a longer run and found another vacuum leak to deal with. I made a super ghetto IAVC pipe setup with a small section of rad hose, another piece of the factory IACV plumbing and some duct tape! It still stumbles around a bit when idling - not like it’s sorting out it’s idle on first start with the battery reconnected.
Interestingly, even with the 40° weather today, there was still exhaust vapour that could be seen. It didn’t smell odd, but I am running tap water too - this is because I’ll open up the cooling system again soon, I also didn’t want to waste good coolant if there was a big issue to deal with. Hoping this vapour just exhaust vapour/crap from sitting so long and not anything sinister! No bubbles in the remote res so that’s a positive.
And that was play time over. I made it to the goal I wanted to achieve, mind you a few things were different to the original plan (namely the turbo bypass intake setup) and it was two days later than i thought. Can’t complain, I essentially had two days off from the project last week and I still made it before the end of my holidays so it’s a win! Plus my eldest got in on the action for a few days before the stupid hot weather kicked in.
Now it’s dawned on me - I’m into that “10% that takes 90%” zone with the engine bay etc. What needs to be done now:
- clutch hydraulic system overhaul (then it’ll move under its own power!)
- engine mount nuts.
- inspect the up pipe/fix exhaust leak from this area.
- dump pipe gasket fitted (no gasket atm for test purposes) along with all required nuts and bolts.
- buy new turbo elbow - my one is proper rooted with a super dodgy repair!
- pitch stopper rod bolted in.
- charcoal canister mounted and its third line to/from it sorted. I need to work out where this goes/comes from.
- sort out the temp sensor plug and wiring, locate the engine wiring loom under the back of the intake manifold where I think it’s meant to be - intake manifold will need to be lifted for this (fun!)
- sort out turbo intake tract pieces and find the missing bits I apparently don’t have - removed for a catch can by the PO I think.
- source a new brake master cylinder cap - noticed mine sports a split in the centre of it. Not ideal!
- bolt in the auxiliaries and fit the fan belts
- fit the thermo fans
I’m sure there’s more in there - that’s a general run down!
Things will no doubt slow down a bit with this one now. I’m hoping to keep pushing along with it when I can.
Thanks for reading for those that took the time to do so. And another shout out for all the help from Rob Z/RSguy!
Cheers
Bennie
Re: RS wagon...
From reading your post and others Bennie, I have learned that Facebook will never replace Forums for this type of help with our vehicles.
We can just do so much more with Forums than FB.
We can just do so much more with Forums than FB.
-
Silverbullet

- Senior Member
- Posts: 2921
- Joined: Mon Aug 23, 2010 6:20 pm
- Location: Adelaide
Re: RS wagon...
Ah you are in the midst of an adventure for sure
If you are really stuck for a cooant temp sensor connector then check out iWire
https://iwireusa.com/
It's where I got my entire suite of engine harness plug and pin kits for my EJ swap. All brand new plastics, crimp terminals and seals they are awesome. But from USA though so postage could hurt for one connector. If you've got lots of crusty old perished plastics on the engine loom, could be a chance to replace a few?
Keep up the good work!
-
El_Freddo
- Master Member
- Posts: 12637
- Joined: Tue Oct 04, 2005 10:00 am
- Location: Bridgewater Vic
- Contact:
Re: RS wagon...
Never a truer word spoken about bookface!
Thanks SB! I’ll go down the route of pulling a second hand plug from a parts car when I get the chance. I’m not in any rush and the less coin I can spend on this the better! Plus it won’t be a concourse build so it doesn’t need to be flashy and newSilverbullet wrote: ↑Tue Jan 28, 2025 8:49 pmAh you are in the midst of an adventure for sure
If you are really stuck for a cooant temp sensor connector then check out iWire
https://iwireusa.com/
I’m hoping to drop the hydraulic clutch system in for an overhaul before the working week is out. Hopefully it’s not too far above $250. Time will tell.
Cheers
Bennie
-
El_Freddo
- Master Member
- Posts: 12637
- Joined: Tue Oct 04, 2005 10:00 am
- Location: Bridgewater Vic
- Contact:
Re: RS wagon...
On Friday just gone (31st Jan) the DW200 install kit - 9-0791 - for the RS arrived.
This was fitted on Saturday - again in the 40°C heat. I’m a sucker for it! This time I had to move some boxes of parts that are in storage in the back of the car to access the fuel pump area.
Fitting was a complete plug and play! Stoked!

I failed to get the new retainer clip on so used the old one that seems to do a good job still.
To the left of the hanger you can see the cut and shut wiring I initially used. The heat shrink, even though it was above the fuel level, had gone soft and mushy. Glad I offset the joints, even then I should’ve put them further apart as one had a wire poking out the side of it! MORAL OF THE STORY: get the right fitting kit or have the correct fuel rated items to do the job properly!
Of course before buttoning everything up completely I had to test the fuel lines for leaks and that everything was working. Out came the starter fluid and she fired up no worries (I tried without it but no dice). No leaks as expected. Still a rough idle.
I investigated the up pipe exhaust leak further. Rookie mistake here with my initial diagnosis after sundown last time but a massive bonus - there’s a front O2 sensor port/bung that’s completely open. Hoping that will be an easy fix!
The hydraulic clutch setup is in for an overhaul and a new braided line. I also got a quote on new discs and pads as I’ll need these closer to the time for the roadworthy. I might paint the calipers - seems I’ve got the bug after painting Redback’s calipers. Red will be the go this time I reckon.
That’s it for now.
Cheers
Bennie
This was fitted on Saturday - again in the 40°C heat. I’m a sucker for it! This time I had to move some boxes of parts that are in storage in the back of the car to access the fuel pump area.
Fitting was a complete plug and play! Stoked!
I failed to get the new retainer clip on so used the old one that seems to do a good job still.
To the left of the hanger you can see the cut and shut wiring I initially used. The heat shrink, even though it was above the fuel level, had gone soft and mushy. Glad I offset the joints, even then I should’ve put them further apart as one had a wire poking out the side of it! MORAL OF THE STORY: get the right fitting kit or have the correct fuel rated items to do the job properly!
Of course before buttoning everything up completely I had to test the fuel lines for leaks and that everything was working. Out came the starter fluid and she fired up no worries (I tried without it but no dice). No leaks as expected. Still a rough idle.
I investigated the up pipe exhaust leak further. Rookie mistake here with my initial diagnosis after sundown last time but a massive bonus - there’s a front O2 sensor port/bung that’s completely open. Hoping that will be an easy fix!
The hydraulic clutch setup is in for an overhaul and a new braided line. I also got a quote on new discs and pads as I’ll need these closer to the time for the roadworthy. I might paint the calipers - seems I’ve got the bug after painting Redback’s calipers. Red will be the go this time I reckon.
That’s it for now.
Cheers
Bennie
-
El_Freddo
- Master Member
- Posts: 12637
- Joined: Tue Oct 04, 2005 10:00 am
- Location: Bridgewater Vic
- Contact:
Re: RS wagon...
I sent the hydraulic clutch setup in for an overhaul and a braided line. Came back mint last week. I installed it today after sorting out Ruby Scoo’s ignition barrel with the scissor piece stuck in it.
No pics for this thread sorry, not much to show really.
After doing some clutch bleeding research on the RSLC forum for “best practice”, I fitted the clutch MC and the slave cylinders. I had to shave the hard line end of the new braided hose as it was half a bee’s dick too big to fit in the factory clamp. After some stuffing around using the chainsaw blade sharpener it fitted snug, then I had to widen the inner diametre of the retainer clip to slip that in place. I filled the reservoir with fresh dot4 brake fluid and opened the bleed nipple to let it do some gravity bleeding. That went well.
I was too impatient to wait for my senior apprentice to get home so I went for a solo bleed session. I got good pedal feel when it was right down near the floor. I read on the RSLC that the shaft to the MC needed adjusting for others that had the same issue. So I stuffed around with that and it came up really well. I’m pretty stoked - I dare say I probably bleed the slave cylinder too much but I was being cautious about getting air stuck in it. Best bit of advice on the forum was to crack the bleed nipple and push the slave cylinder’s piston back in as far as it would go. I did this once with pressure on the pedal via an extendable pole jammed in to hold it down.
I didn’t see any air bubbles so called it good. I set up my NA system again using a second intake pipe because Ruby Scoo needed hers back again. This time though the RS wouldn’t start. I got some puffs and backfires at times when letting go of the start position, but nothing to keep it going. I’ve jerry-rigged a second CTS to trick the ECU. It didn’t change anything. Noticed things were smelling very varnish like. Thought it best to get another jerry can of 98 as the other side of the tank most likely still had a lot of crap fuel that’s now siphoned across. After this new fuel was added the RS popped and farted to life again. I was at this for ages! But it ran and once I reconnected my jerry-rigged CTS it settled down and idled a bit lumpy for a bit. I dunno if this crap fuel was to blame or if I’ve got a dodge spark plug. Anyway it somewhat settled and now revs quickly when stabbing the throttle. It pushes out some blue smoke, not a lot, hopefully just residual crap in the exhaust - could be wishful thinking too.
Everything else seems good otherwise. Clutch works, so bonus there. Still can’t move it as I need to change the battery terminals over to the larger style ones, and pump up a tyre or two again.
Small steps with each bit of effort. Fans are lined up to be fitted now too, even though I suspect they’ll run all the time - got a code 31 - TPS. I’ll have to double check that next time as I thought it would be the Coolant Temp Sensor… it’s the only code there too.
That’s it for now. Just waiting on the turbo intake elbow and need to find the bolts to hold the fans to the radiator. They’re the main priorities now - the correct CTS wiring is still on the list!
Cheers
Bennie
-
El_Freddo
- Master Member
- Posts: 12637
- Joined: Tue Oct 04, 2005 10:00 am
- Location: Bridgewater Vic
- Contact:
Re: RS wagon...
Had to move the RS today and I “drove” it FOR THE FIRST TIME WITHOUT A SMOKE SCREEN!!”
Admittedly it was 10m in reverse then 20m forward with me hunched over to fit in the vehicle, I’ve got the roof lining suspended below where it is factory mounted, but it felt good none the less!
Still NA - and it seems to start well with a good battery. I hooked up one thermo fan and it came on at one point for some reason - but it’s not running all the time, so the check engine light must really be for the TPS. Can someone confirm the NA TPS unit is interchangeable? I’ve got a spare NA unit.
New intake elbow arrived - I’m yet to fit it, and looking at the engine bay tonight I realised I should sort out the heater hoses and everything in that area before fitting the intercooler and associated piping. I’ll get a pic of the two intake elbows to compare the old and the new.
So I’ve got a lot to go yet before I button up the factory intake and this the engine bay sorted. That’s all good though as I’ve got a rear diff locker to swap into our Pajero before a boys weekend in the high county next month. That’ll keep me busy for a weekend or two (hopefully one but I know how projects go…)
Cheers
Bennie