Silverbullets' resto: Engine, gearbox, suspension

Detailed reference pages on Members special projects ...
User avatar
Bantum
General Member
Posts: 1923
Joined: Sun Jul 29, 2012 4:30 pm
Location: Northern Territory + QLD
Contact:

Post by Bantum » Mon Feb 08, 2016 3:24 pm

Should check the chemistries, stainless steel & aluminium don't play well together ... ��. There's a reason you don't see it used from the factory ... ;)


Add : Chart showing galvanic corrosion risk:

Image

Sent from my MID-782 using Tapatalk

User avatar
TOONGA
Elder Member
Posts: 5335
Joined: Sat May 30, 2009 10:15 am
Location: Australind closer to where they divided by zero
Contact:

Post by TOONGA » Mon Feb 08, 2016 5:39 pm

Bantum wrote:Should check the chemistries, stainless steel & aluminium don't play well together ... 😠. There's a reason you don't see it used from the factory ... ;)


Sent from my MID-782 using Tapatalk
That would only really cause a problem if he was using salt water as coolant :)

If you are really worried SB, get a 3mm thick but 1cm wide by 10cm long Zinc strip and clamp that in the bottom of the radiator hose, either top or bottom will do. that will sacrifice itself in the galvanic reaction process.

TOONGA
Image
PJ Gone but not forgotten
JETCAR AKA the sandwedge Rusted in pieces

User avatar
Silverbullet
Senior Member
Posts: 2865
Joined: Mon Aug 23, 2010 6:20 pm
Location: Adelaide

Post by Silverbullet » Thu Mar 17, 2016 7:59 pm

It's been a while since any real progress has been made; I'm gathering the parts required piece by piece to allow me to start the engine. I'm waiting for a phone call to say my carbies+manifold are ready to pick up (bead blasted, steel parts re-zinc'd and carbies rebuilt) and I need to drop my starter motor round to a guy I know who can rebuild it for me. The white metal bearing at the pinion gear end of the starter was no longer a bearing but a curved slip of soft metal, there were shiny pieces of copper and alloy dust thrown around inside the starter housing too.

I'll just post a couple of pics of something that arrived today; I can't tell you how glad, relieved/happy I am to have found this little piece of plastic. It's a brand new factory VW connector to match my Audi VR crank angle sensor. I had originally thought I was going to have to cut the factory plug of the new sensor because I couldn't find the female end to put on my engine loom wiring. No more! Now it will look more factory and if the sensor ever fails it will be easy to swap in a new one. This came with crimp terminals and rubber seals for a water proof connection ;)

Image

The new plug is on the right, VR sensor plug on the left
Image
Will it ever end!?
-EA81 TWIN CARB!!!!
-L series 5 speed
-Custom paint job
-2" lift
-Full custom re-wire
-L series front end
Image

User avatar
Bantum
General Member
Posts: 1923
Joined: Sun Jul 29, 2012 4:30 pm
Location: Northern Territory + QLD
Contact:

Zinc Plating ...

Post by Bantum » Fri Mar 18, 2016 2:46 am

TOONGA wrote:That would only really cause a problem if he was using salt water as coolant :)
True - Salt water would exacerbate the situation, but just the two metals in contact with each other will set of corrosion in the aluminium. It just takes longer without an agent ... :)

See chart here : http://www.anzor.com.au/blog/galvanic-c ... als-apart/

Hence Gold Zinc Plating being the preferred medium ... :twisted: Add : You can DIY and get a home brew kit, hook it up to a battery / low voltage power source & have some original bolts recoated if you that way inclined ... ;)

P.S. - Nice find on the plug there ... :D

Ciao, Bantum ...

User avatar
El_Freddo
Master Member
Posts: 12499
Joined: Tue Oct 04, 2005 10:00 am
Location: Bridgewater Vic
Contact:

Post by El_Freddo » Sat Mar 19, 2016 7:04 am

Neat work on the plug there mate - an awesome solution that as you say will allow you to plug and play a new sensor in place if/when needed.

With the crazy effort for detail/renewing old parts it must be costing you a fortune!! Have you been keeping tabs on the build cost so far?

Cheers
"The lounge room is not a workshop..."
Image
El Freddo's Pics - El_Freddo's youtube

User avatar
Silverbullet
Senior Member
Posts: 2865
Joined: Mon Aug 23, 2010 6:20 pm
Location: Adelaide

Post by Silverbullet » Sat Mar 19, 2016 4:11 pm

I know I am going to extremes of detail with this build, which is why this build is taking so farking long! :eek: I haven't kept every recipt/invoice from every part I've bought or re-furbished, although sometimes I think it would have been cool to tally up how much it cost right at the end but then again maybe not :oops: I have a rough figure in my head, needless to say by now I could have bought a pretty nice second hand 4th gen turbo Liberty with all the trimmings (my favorite Liberty shape) or even a classic shape Rexy. But I figure all the effort that's gone into this it will be like a new car anyway, and you can't put a price on the feeling you get when you drive a car that has your blood, sweat and tears in it :D

Especially if it actually works :mrgreen:

Also, looking back at Bantums posts re - galvanic corrosion, maybe I will take measures to prevent this on the engine block coolant breather. I think teflon tape on the threads would make a pretty decent barrier between the dissimilar metals, but I know electroplating with zinc is so easy I might do that too.
Will it ever end!?
-EA81 TWIN CARB!!!!
-L series 5 speed
-Custom paint job
-2" lift
-Full custom re-wire
-L series front end
Image

User avatar
Silverbullet
Senior Member
Posts: 2865
Joined: Mon Aug 23, 2010 6:20 pm
Location: Adelaide

Post by Silverbullet » Fri Mar 25, 2016 7:35 pm

Another neat little gizmo arrived this week, with safety being the main purpose;

Image

This little box goes in the fuel pump circuit and will cut fuel in the event that the engine stops (i.e in a crash) even if the ignition switch is still on. It does this by monitoring the tacho signal and cuts fuel if there is no tacho signal. The really clever thing (and something I've been scratching my head over for a long while) is that it will run the fuel pump for 3 seconds when ignition is first turned on, to prime the carbie fuel bowls :mrgreen: There are more simple ways of cutting the fuel pump in a crash (some older cars use oil pressure switches) but none that I've found allow you to prime the fuel bowls before you crank the engine. I'm really happy there was a neat little water proof black box I could bolt up (with rivnuts :p) and tuck away somewhere under the engine bay that will do everything I want.

Only annoying thing is it needs a 12v+ tacho signal to work...the MY tacho uses the negative pulses from the coil to run :? Lucky I've got EDIS and a megajolt ECU that puts out a nice 12v+ square wave tach signal :)
Will it ever end!?
-EA81 TWIN CARB!!!!
-L series 5 speed
-Custom paint job
-2" lift
-Full custom re-wire
-L series front end
Image

User avatar
steptoe
Master Member
Posts: 11582
Joined: Thu Oct 06, 2005 10:00 am
Location: 14 miles outside Gotham City

Post by steptoe » Sat Mar 26, 2016 6:29 am

weatherproof all sealed up guts is a good thing to know. I use an LPG safety switch that is not sealed, although I do have one that is sealed and hapy to live in the engine bay. Got a link to this lil baby Sam?

User avatar
El_Freddo
Master Member
Posts: 12499
Joined: Tue Oct 04, 2005 10:00 am
Location: Bridgewater Vic
Contact:

Post by El_Freddo » Sat Mar 26, 2016 4:03 pm

Later model Brumby and L series have one of these. Only difference is that they don't do an initial 5 sec prime like the MPFI units do. It'll only pump once the crank turns and an ignition pulse is detected.

Great little system to add for the event no one wants to experience.

Cheers

Bennie
"The lounge room is not a workshop..."
Image
El Freddo's Pics - El_Freddo's youtube

User avatar
Silverbullet
Senior Member
Posts: 2865
Joined: Mon Aug 23, 2010 6:20 pm
Location: Adelaide

Post by Silverbullet » Sat Mar 26, 2016 6:12 pm

Jonno, it's a US made item so I sourced it from ebay, sent over from the US (probably packaged and sent by the man who designed/made it himself :rolleyes:) Here is their website
http://www.revolutionelectronics.com/
ebay link
http://www.ebay.com.au/itm/Fuel-Pump-Sa ... xyyF5RPQyR

It's aimed more at hot rodders and custom cars me thinks, but fits the bill perfectly for my application.

Bennie, I'm sure there were some cars that had something like this; in my later (83') FSM it mentions something about a revolution sensor being somewhere in the fuel pump system. And I'm sure the little electrical box behind the choke knob has something to do with it as well. Since all that went in the bin with my old wiring harness I needed something like this :)

Good news also I should get my starter motor back tomorrow, one more piece of the puzzle. Anyone know off the top of their head what the spacer thickness should be for L series 5 speed with MY starter motor? Should be carbies/manifold going on next weekend, I've got all the stuff to make my own ignition leads (Ford coil pack has funny terminals on it) I still need to make something for the heater pipe that goes under the alt, the radiator is in there (albeit temporarily) So not much left to do until that tentative first fire up on the new engine :shock: with completely open exhaust ports it should be loud if it actually runs at all, must warn the neighbors first :oops:

That reminds me, is it a bad idea to run the engine (in neutral obviously) with no oil in the gearbox? I haven't got a tail shaft plugged in the back at the moment so can't put oil in it.
Will it ever end!?
-EA81 TWIN CARB!!!!
-L series 5 speed
-Custom paint job
-2" lift
-Full custom re-wire
-L series front end
Image

User avatar
El_Freddo
Master Member
Posts: 12499
Joined: Tue Oct 04, 2005 10:00 am
Location: Bridgewater Vic
Contact:

Post by El_Freddo » Sat Mar 26, 2016 7:05 pm

Don't run the engine without oil in the gearbox! And don't put it in neutral to get around this as you'll only shag the input bearing. If it's a quick fire up and shut down you'll be fine. Anymore than that and I'd be putting a shaft in the rear (or coke can and a hose clamp). Oil shouldn't get up that far without driving it anyway.

To work out the spacer thickness put the starter motor in with a washer in place then turn the engine over by hand. If you feel a clatering like resistance you need another washer. The starter needs to clear the ring gear when the engine is in motion. Last time I looked at this on a mate's MY/Brumby it needed two washers (those cheap packet ones) to make it all work properly.

For the heater pipe crossover I made a T piece for the coolant hose to the carbie. The rest is heater hose all the way. From memory I cut up the original metal heater pile to cable tie the heater hose I made to keep its shape and avoid rubbing on anything.

Cheers

Bennie
"The lounge room is not a workshop..."
Image
El Freddo's Pics - El_Freddo's youtube

User avatar
steptoe
Master Member
Posts: 11582
Joined: Thu Oct 06, 2005 10:00 am
Location: 14 miles outside Gotham City

Post by steptoe » Sun Mar 27, 2016 7:25 am

I found 4.0mm aluminium spaced the starter out on EA81 to EA82 4WD five speed did just fine. Remind to self : need to find it for next project .... or rescue another keep left sign road kill. Thanks for the dual links - I like the interior light fader and how it works. I have bought a few ebay timer circuit thingies to try do same and like many projects, bits are hoarded somewhere for the right day to work one out. This guys might be an easier happening solution :)

Next time you need a primer fuel pump cut out consider the people over Mornington way - peel instruments, although their circuits are just moisture proofed not weathertight, yet I think the guys there, all family I think, have said they have run them under bonnet for years with no troublesi.

User avatar
Silverbullet
Senior Member
Posts: 2865
Joined: Mon Aug 23, 2010 6:20 pm
Location: Adelaide

Post by Silverbullet » Sun Apr 03, 2016 4:33 pm

Bennie, thanks for the confirmation. Looks like I will have to get that custom tailshaft sooner rather than later. There's a place in Adelaide that will do it, annoyingly an hours drive away on the other side of town and only open till 5PM, which is when I finish work :(

A little more done today; Starter motor is rebuilt and with new phosphor bronze bushings at either end, commutator skimmed and all cleaned up nice and new looking. Also made a spacer plate for it, which might be a little too thin but its what I had available. If it is too thin I can always easily make a shim out of sheet metal in the same shape as this plate and put it in there to get the right depth.

Only power tool used was a drill press :cool: Everything else was hand file and hack saw (well actually, fret saw)

Image

Image


Still don't have my carbies back :mad: The guy was obviously not working the past short week after easter, didn't answer the 3 times I phoned.
Will it ever end!?
-EA81 TWIN CARB!!!!
-L series 5 speed
-Custom paint job
-2" lift
-Full custom re-wire
-L series front end
Image

User avatar
Silverbullet
Senior Member
Posts: 2865
Joined: Mon Aug 23, 2010 6:20 pm
Location: Adelaide

Post by Silverbullet » Sat Apr 09, 2016 9:06 pm

Todays progress was more electrical than engine related, but since you can't run an engine without the battery I'll put it in here :rolleyes: Also had a nice visit and chat with Mr Proton Mouse via QLD who is in town this weekend :)

This week some more goodies arrived from the auto electrical supplies place, and today I went out and bought the battery I will use in this car. I bought the biggest battery I could that will still fit in the original space. It fits, JUST! 5mm bigger in any dimension would make it too big. With all my relays and other gear bolted to the side of the engine bay in that area the battery is right up against them, and over hangs the edge of the battery ledge by about 5mm at the front (where the battery ledge tapers down) But the hold down has it secured firmly in place. I thought about a battery box type of dealie, but all the ones I've seen are just way too big and bulky.

Image

There's alot going on in this pic! Not only the battery and fuse box, but also an 80A circuit breaker beside the battery and a smaller fuse box that has 4 circuits (2 mini blades and 2 cartridge style fuse links) that can come off a single M6 input stud; this is for the remaining power hungry things I haven't wired in yet such as the A/C circuit. Also note my nice new positive terminal junction - under the cover there are 3 studs for big cable lugs - 2x M6 studs and 1x M8 for the starter cable. It was hard to cram all this in with such a big battery and still be able to pull the lid off the little fuse box, but it is in and looks like it should be there :cool: I'm really pleased how this turned out, now I just need to run cables to it all; to that end I have cut some pieces of big cable to length, have the big copper lugs in hand and will take it all to work where I can borrow the lug crimping tool. It's going to look neat and factory, and have the best possible electrical connection :cool:

Still no sign of my carbies :(
Will it ever end!?
-EA81 TWIN CARB!!!!
-L series 5 speed
-Custom paint job
-2" lift
-Full custom re-wire
-L series front end
Image

User avatar
steptoe
Master Member
Posts: 11582
Joined: Thu Oct 06, 2005 10:00 am
Location: 14 miles outside Gotham City

Post by steptoe » Sun Apr 10, 2016 7:47 am

very tidy piece of work you show there Sam. Well done. Can't wait to see a fee muddy puddle splash marks reach up there :)

User avatar
Silverbullet
Senior Member
Posts: 2865
Joined: Mon Aug 23, 2010 6:20 pm
Location: Adelaide

Post by Silverbullet » Sat Apr 16, 2016 7:32 pm

Today I decided I would try and turn the engine over on the starter and get some oil pressure up, see if my oil gauge in the dash would do anything. Also to see if my starter motor was going to work :rolleyes: To that end the engine now has oil in it as well as the gearbox. I've plugged the L series tailshaft in the back sort of temporarily, in case any oil should spill out.

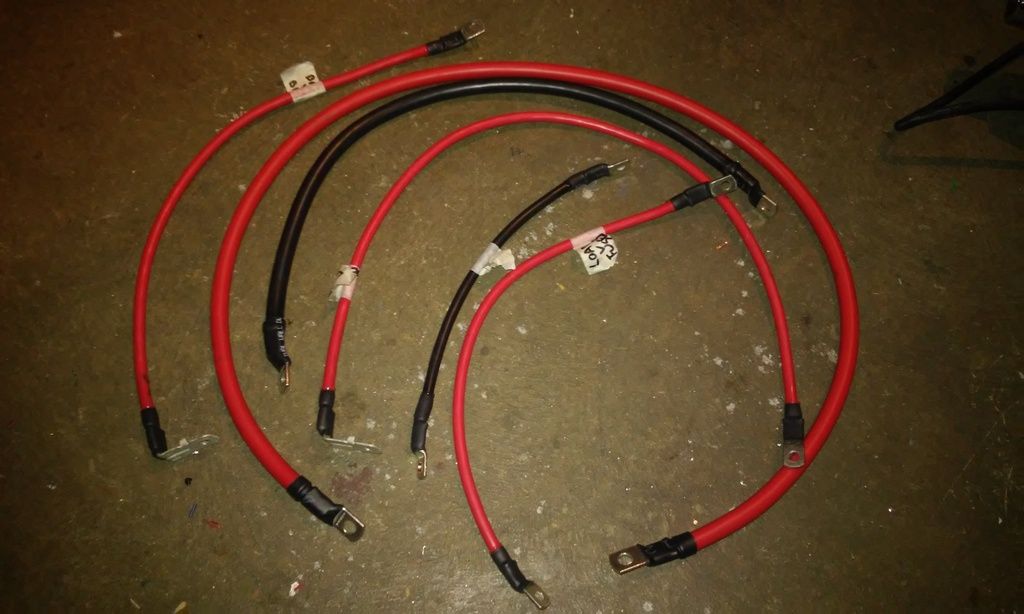
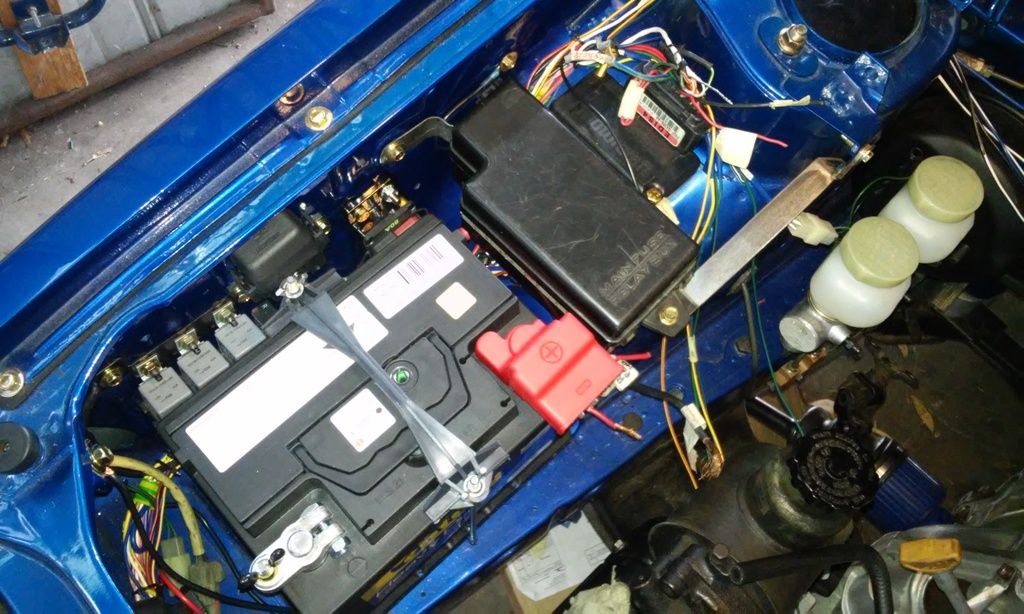
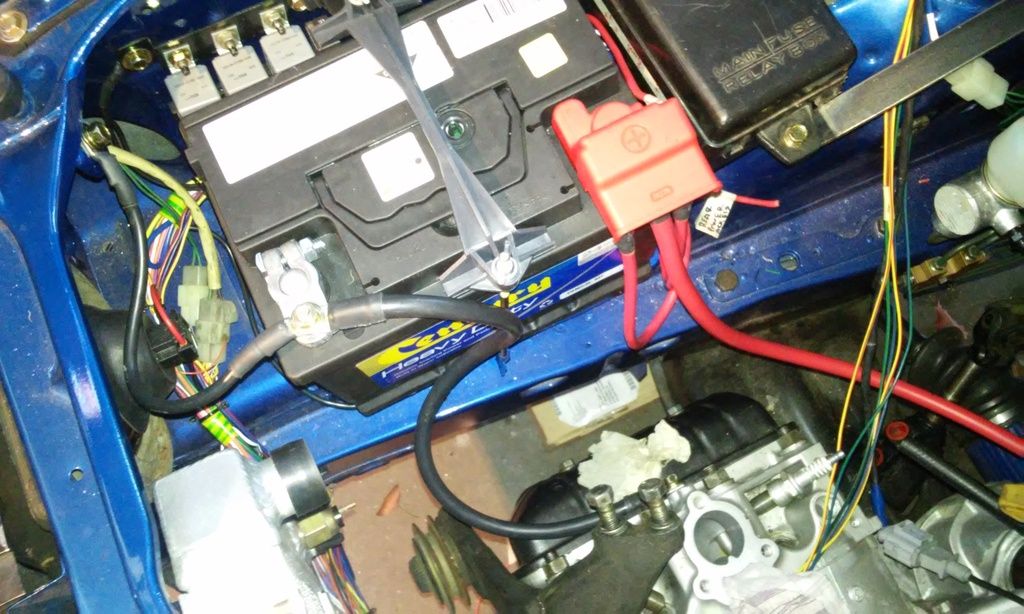
I've made up all my power distribution and starter cables with decent solid copper lugs and thick, glue lined heat shrink. Last week I measured all the bits out and cut them, then took the lot in to work and borrowed the big lug crimping tool. I think they look pretty good, all professional like :rolleyes: And literally half the price (or less) than the ready made ones you can buy at super crap. The cable could do with being one size smaller though, I bought this stuff in my first order of wire from when I was starting on the cars wiring and before I had any idea of cable cross section, so I didn't really know what I was buying. Still, too thick is better than not thick enough.

Image

Got everything hooked up to how it will be at the end with nice new battery terminals. Everything still worked as it should electrically, the alarm went off (silently) when I put the negative terminal on.

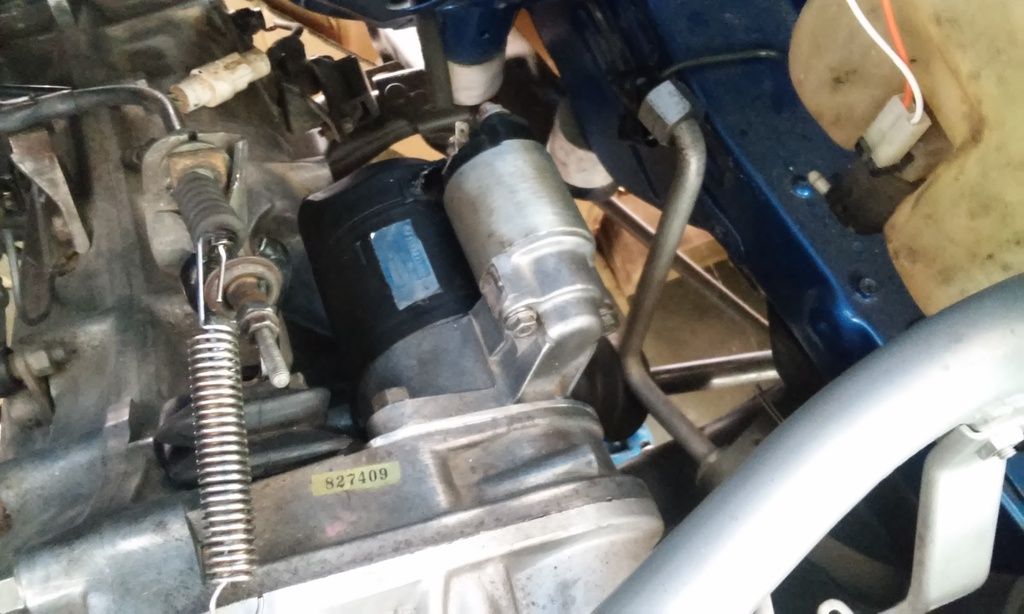
When it came to the starter though, all was not well :( I didn't hook it up straight away so I could put a multimeter between the cable and the starter post on the solenoid and measure if there was any current draw when there shouldn't be. The MM said there was .03 milli amps flowing, absolutely bugger all. So when I hooked up the starter cable to the motor I was surprised to see tiny tiny sparks jumping across when I put the lug to the post. Didn't think much of it at the time. I pulled all the spark plugs (and the rags from the intake holes ;) ) and blipped the starter with the key - starter motor did nothing :( 
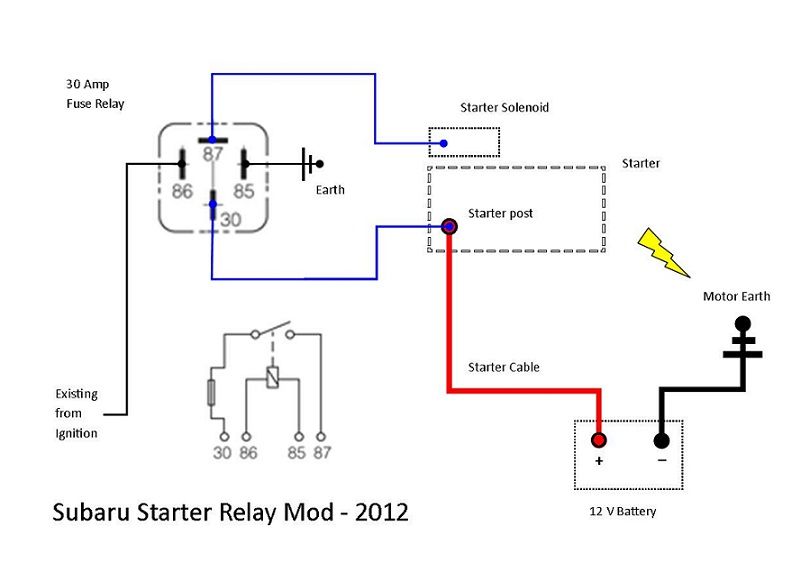
Had a suspicion I'd wired up the starter relay wrong so went to test my theory and yes I had it wired up wrong; the male spade on the starter solenoid wants ground to activate the starter motor itself, I had 12v+ going to it. It was about now I noticed the starter solenoid was almost too hot to touch :(

This starter motor was originally on my ute and died one day (wouldn't turn over) So I had to swap it with the one from this wagon which was in the shed (in the dark at 6AM) and so the original one from the wagon still lives in the ute. When I pulled the utes dead starter apart I found one of the bearings for the pinion shaft was MIA, so thought that was the culprit (the motor shaft jamming and stalling the starter) It seems though that wasn't the only problem. Anyone have any ideas about this problem? Do I need a new solenoid?

Letting it cool down and with the solenoid "trigger" wire disconnected, I touched the starter cable to the post again to double check and the solenoid started getting warm straight away, bugger! :( Interestingly when I tested my wiring fault by putting a grounded wire to the male spade, the starter kicked into life and turned the engine over beautifully, but obviously there's something wrong inside still.
Will it ever end!?
-EA81 TWIN CARB!!!!
-L series 5 speed
-Custom paint job
-2" lift
-Full custom re-wire
-L series front end
Image

User avatar
Proton mouse
Junior Member
Posts: 378
Joined: Mon Nov 06, 2006 11:35 pm
Location: Diagonally parked in a parallel universe

Post by Proton mouse » Sat Apr 16, 2016 8:29 pm

Hey Sam, was great to finally meet you and see the excellent work achieved thus far on the wagon!! That was the start to an excellent flying 4 day visit to Radelaide!!

Re the above post.....The male spade terminal on the solenoid requires a positive++ 12 volts to actuate the starter!! I just went down and hooked up my multimeter on my Brumby to double check!!

Cheers, John

User avatar
Bantum
General Member
Posts: 1923
Joined: Sun Jul 29, 2012 4:30 pm
Location: Northern Territory + QLD
Contact:

Relayed ...

Post by Bantum » Sun Apr 17, 2016 1:16 am

Looking good there Sam - be sure to get some installed pictures.

Starter relay wiring should look something like this :

Image

Add : You'll note that the engine strap completes the circuit, so be sure that side is secured - I'd also consider an earth strap from gearbox to fire wall ... :)

Make sure to get the relay & attached wiring as close as possible to the starter ( A good spot to mount it is just under the tyre holder on fire wall ) with as short as possible cable run, allowing some flex for engine movement - from starter post to relay, and back to solenoid ... ;)

Also check the solenoid contacts, as if they are worn out it will have the symptoms you describe of not properly 'engaging' - I think you can still get replacements for it, check with 'frog' - if not dig around to find a matching set.


Cheers, Bantum ...

User avatar
Silverbullet
Senior Member
Posts: 2865
Joined: Mon Aug 23, 2010 6:20 pm
Location: Adelaide

Post by Silverbullet » Sun Apr 17, 2016 12:16 pm

John, was nice to meet another fellow old gen Subie nut :) Glad you enjoyed your stay in this little town ;)

Bantum, my starter relay is essentially wired up the same as that, just gets power from the fuse box instead of the starter cable. But switching 12v+ to that spade terminal did nothing, earthing the spade terminal made the starter work as normal :confused: I think I've got a short or something around the wrong way, will investigate today. I'll see if I can disassemble the solenoid and see what's going on inside.

*Edit* Just checked the solenoid; impossible to disassemble but I'm pretty sure the coil of the solenoid is shorted to the casing somewhere internally. Both sides of the coil had continuity with the casing but not a dead short, something like 1.5 ohms which tells me the coil is touching the case somewhere in the middle of its windings :(
Will it ever end!?
-EA81 TWIN CARB!!!!
-L series 5 speed
-Custom paint job
-2" lift
-Full custom re-wire
-L series front end
Image

User avatar
Silverbullet
Senior Member
Posts: 2865
Joined: Mon Aug 23, 2010 6:20 pm
Location: Adelaide

Post by Silverbullet » Sun Apr 17, 2016 4:37 pm

Decided to dash down to U-pull it for a starter solenoid - only one MY which was wrecked and missing starter motor...then looking at L series starter motors I noticed they looked strikingly similar to my starter motor...actually identical! Looks like the ute had an L series starter motor when I bought it. Anyway, nicked a couple of good looking solenoids and headed home and...

Success! :)

https://www.youtube.com/watch?v=S_lH41a ... e=youtu.be

Pulled all the spark plugs and was pleased to see the oil pressure needle come up to number 2 in about 10-15 seconds. Pulled a rocker cover to confirm - oil everywhere on the rockers - peered down a spark plug hole to see a nice film on the walls of the cylinder - sigh of relief :)

And here's a pic of how my power cables and earth strap are hooked up

Image
Will it ever end!?
-EA81 TWIN CARB!!!!
-L series 5 speed
-Custom paint job
-2" lift
-Full custom re-wire
-L series front end
Image

Post Reply

Return to “Restorations and Project Build Ups.”