Silverbullets' resto: Engine, gearbox, suspension


-
Silverbullet

- Senior Member
- Posts: 2867
- Joined: Mon Aug 23, 2010 6:20 pm
- Location: Adelaide
Thanks and me toohenpecked wrote:Credit to you for sticking at this and getting it all done. I'm very interested in seeing how this all comes together on the road and camber/castor wise.
JP those are 86' Toyota Camry tie rod ends which are longer than MY or L series ones. This is because with the longer L series control arm none of the Subaru tie rod ends are long enough.
In other news, I'm going round to my engineer friends place tomorrow to borrow his lathe and machine the warped front discs on my Brumby and do a pad change, the hope is I'll get time to also help out with the adjustable radius rods and maybe get them back this week/next week. So all going well, the car should be properly on the ground in a week or so
Will it ever end!?
-EA81 TWIN CARB!!!!
-L series 5 speed
-Custom paint job
-2" lift
-Full custom re-wire
-L series front end

-EA81 TWIN CARB!!!!
-L series 5 speed
-Custom paint job
-2" lift
-Full custom re-wire
-L series front end
Good-o - being delivered to your home address this week is it ? ..... just curiousSilverbullet wrote:.... And not related to this thread I just got news that an MY 6 gauge analogue touring wagon instrument cluster is in the post with my name on it!......
-
Silverbullet
- Senior Member
- Posts: 2867
- Joined: Mon Aug 23, 2010 6:20 pm
- Location: Adelaide
Oi! Don't forget I know where you live too!henpecked wrote:Good-o - being delivered to your home address this week is it ? ..... just curiousas I may have some time on my hands this week and as I'm just a naturally helpful bloke, i could go and keep an eye out for you, you being at work and all.....
Nah s'all good, there's usually someone home to sign for it and if not it's easy enough to pick up from the P/O. If you want to come over and have a look at the wagon though, you're more than welcome
Will it ever end!?
-EA81 TWIN CARB!!!!
-L series 5 speed
-Custom paint job
-2" lift
-Full custom re-wire
-L series front end
-EA81 TWIN CARB!!!!
-L series 5 speed
-Custom paint job
-2" lift
-Full custom re-wire
-L series front end
-
El_Freddo

- Master Member
- Posts: 12502
- Joined: Tue Oct 04, 2005 10:00 am
- Location: Bridgewater Vic
- Contact:
Nice mods on the control arm! You'll rip something else before you crack that mod!
With the new tie rod ends, stick a wheel on the hub and make sure it clears the rim at full lock on each side. Subaru had the MY and L series units bent for a reason
I just want you to be sure it's right before you go any further!
Cheers
Bennie
With the new tie rod ends, stick a wheel on the hub and make sure it clears the rim at full lock on each side. Subaru had the MY and L series units bent for a reason
I just want you to be sure it's right before you go any further!
Cheers
Bennie

-
Silverbullet
- Senior Member
- Posts: 2867
- Joined: Mon Aug 23, 2010 6:20 pm
- Location: Adelaide
I was aware of this too, haven't had a chance to check it yet as the LCA's aren't on yet, and being a power steering rack it's a bit tricky to check lock to lock...oil comes squirting out the inlet/outlet holes even when they are capped. Also need to check if the struts will rub inside the tower as they are now.El_Freddo wrote:With the new tie rod ends, stick a wheel on the hub and make sure it clears the rim at full lock on each side. Subaru had the MY and L series units bent for a reason
I just want you to be sure it's right before you go any further!
Cheers
Bennie
Will it ever end!?
-EA81 TWIN CARB!!!!
-L series 5 speed
-Custom paint job
-2" lift
-Full custom re-wire
-L series front end
-EA81 TWIN CARB!!!!
-L series 5 speed
-Custom paint job
-2" lift
-Full custom re-wire
-L series front end
-
Green_eyed_liberty

- Junior Member
- Posts: 374
- Joined: Wed Oct 05, 2005 10:00 am
- Location: Gold Coast
-
Silverbullet
- Senior Member
- Posts: 2867
- Joined: Mon Aug 23, 2010 6:20 pm
- Location: Adelaide
Both good suggestions...if I had any power steering hoses to begin with  The P/S parts I've got I have collected bit by bit over the last couple of years, no hoses as of yet. Was going to get a new set made up.
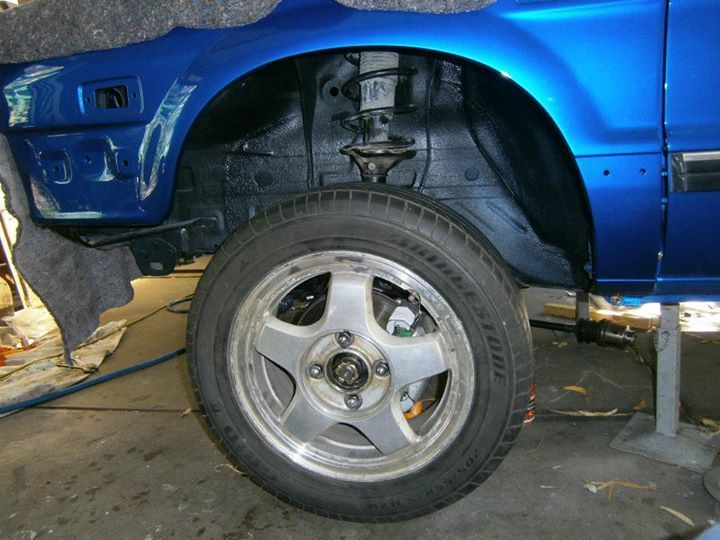
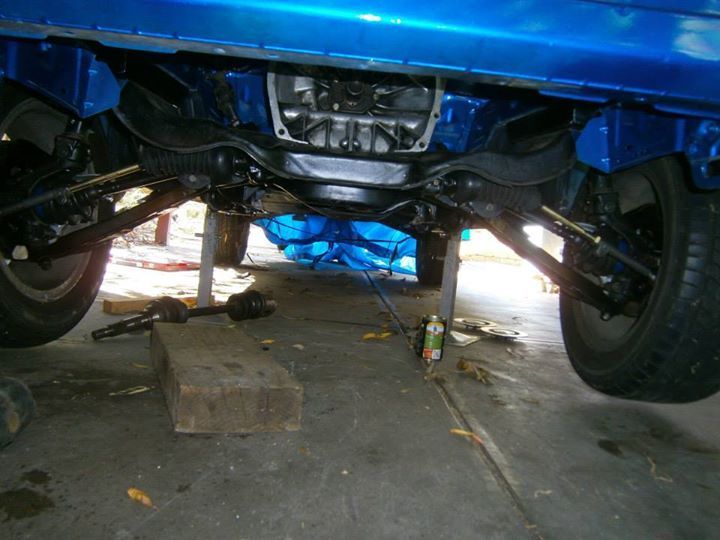
Anyway, the modified L series LCA's are painted up and fitted to the car. I was hoping I'd posted a photo on here with a wheel put on before the mod to compare, but I don't think I even tried it...having seen how far forward it was I didn't even bother putting a wheel on it to see. Anyway, here's what it looks like now with a wheel on it. Without the radius rods on it still, this is not how it will be when it's finished, but I have to say it looks ALOT better than it did. Still the wheel needs to go back a bit but this is off the ground at full dangle with at least 1" too much length in the strut, hence the ridiculous gap. There is some give in the jelly like Super-pro urethane LCA bushings, I'm confident the radius rods will pull it all up where I want it to be. With the strut leaning back now as well I think the wheel will move upwards and backwards as it is lowered and weight put on.
Really happy with the result so far, fingers crossed my mad plan may have actually worked Now I just need those adjustable rods back, getting really excited to see how it's going to turn out. As for the tie rod ends maybe hitting the inside of the rim; I don't really know until I can see how much angle there is on the wheels at full lock. The FSM says about 30 degrees...does this seem right? Anyway, we'll see soon enough I guess. Dunno what I will do if they do actually collide...back to the drawing board to see if I can extend the S shaped original tie rod ends...
Wheel in place, looking good so far
Center shot from under the car, just admiring the loooong control arms
Anyway, the modified L series LCA's are painted up and fitted to the car. I was hoping I'd posted a photo on here with a wheel put on before the mod to compare, but I don't think I even tried it...having seen how far forward it was I didn't even bother putting a wheel on it to see. Anyway, here's what it looks like now with a wheel on it. Without the radius rods on it still, this is not how it will be when it's finished, but I have to say it looks ALOT better than it did. Still the wheel needs to go back a bit but this is off the ground at full dangle with at least 1" too much length in the strut, hence the ridiculous gap. There is some give in the jelly like Super-pro urethane LCA bushings, I'm confident the radius rods will pull it all up where I want it to be. With the strut leaning back now as well I think the wheel will move upwards and backwards as it is lowered and weight put on.
Really happy with the result so far, fingers crossed my mad plan may have actually worked
Wheel in place, looking good so far
Center shot from under the car, just admiring the loooong control arms
Will it ever end!?
-EA81 TWIN CARB!!!!
-L series 5 speed
-Custom paint job
-2" lift
-Full custom re-wire
-L series front end
-EA81 TWIN CARB!!!!
-L series 5 speed
-Custom paint job
-2" lift
-Full custom re-wire
-L series front end
-
Silverbullet
- Senior Member
- Posts: 2867
- Joined: Mon Aug 23, 2010 6:20 pm
- Location: Adelaide
Just an errant reflection, no chips in the paint I can assure yousteptoe wrote:what is the story behind the white reflection on the front left gurad ? Looks like a mishap .....
Well this weekend I had planned to have the rear diff mounted and the L series G/box shifter linkages sorted; I started on the linkages last week but got so far until I realized half the bushes were missing and the shifter was all slop. So I ordered a complete new set from FROG hoping they would get here in time but alas they did not, despite Andy's best efforts
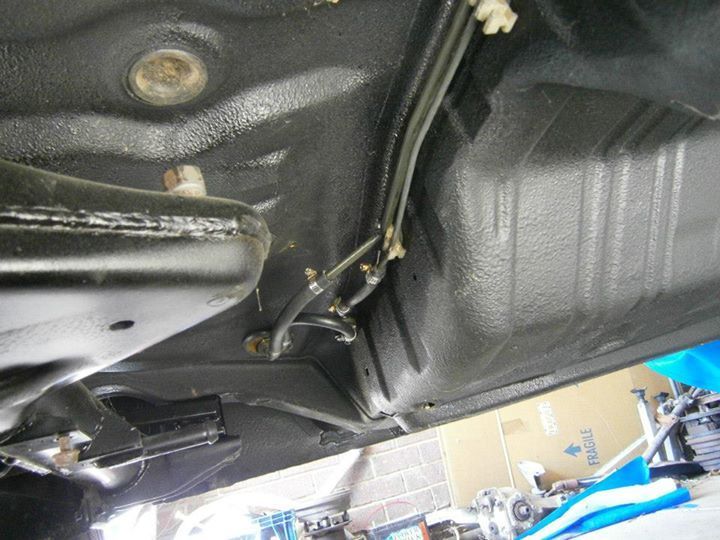
Luckily I had stopped by Autopro one day this week for some service materials for the ute (oil change, plugs leads etc) and got 3 different sizes of fuel line and a pile of hose clamps. So I got to work plumbing in the fuel tank properly. The biggest headache was the "fuel separator" in the rear quarter panel with 3 different hoses going to it. 3 different manuals had 3 different iterations of this but luckily my 1981 FSM came through with the right diagram for my car. Mine only has a fuel and return line going to the front of the car, all others have a vent line added as well. The return line goes to the separator, with 2 other lines from it plumbed into the fuel tank. So now it looks all schmick and new under there with new hoses and proper stainless hose clamps all round, even in places you can't see
Still no sign of my radius rods
This post got a bit long and rambling...but my resto threads are as much a diary for my own future reference as much as a show and tell for everyone else here
Here's one measly photo of some of my fuel lines...don't suppose anyone knows where I could get some new plastic holding clips??
And the sun came out and caught the back end of the car, couldn't help but take a photo of it

Will it ever end!?
-EA81 TWIN CARB!!!!
-L series 5 speed
-Custom paint job
-2" lift
-Full custom re-wire
-L series front end
-EA81 TWIN CARB!!!!
-L series 5 speed
-Custom paint job
-2" lift
-Full custom re-wire
-L series front end
-
steptoe
- Master Member
- Posts: 11582
- Joined: Thu Oct 06, 2005 10:00 am
- Location: 14 miles outside Gotham City
Lookin' great Sam.Can you include brand names and part numbers of stuff you are stickin' in. Could be handy for some others reading, lurking out there .Is it red mud just out from Adelaide ? Can't see you driving the 'bullet 'cept on fine weather days and tarmacadam terrain
Heyyy...//// That is not a rear suspension adjust access hole bung plug is it ???? Don't think the Brumbies got that !
Heyyy...//// That is not a rear suspension adjust access hole bung plug is it ???? Don't think the Brumbies got that !
Hi SamSilverbullet wrote:..... I've figured out how I'm going to do the L series linkages using the MY range lever and it was alot easier than I thought it would be. Didn't have to cut or weld anything, enlarge any holes and I can still use the original rubber boot as the L series boot is the wrong shape, and I hate the L series range lever setup. Just had to make a little bracket to utilize an un-used stud that is already poking out of the MY tranny tunnel.
.........
I'm extremely interested in how this turns out and how it was done, also re the clutch linkage and box.
I will have to find time to come up and check it all out.
cheers
-
Silverbullet
- Senior Member
- Posts: 2867
- Joined: Mon Aug 23, 2010 6:20 pm
- Location: Adelaide
Sure thing Geoff, you're welcome any time But maybe wait until I've finalized it all just so I know it's going to work the way I think it is ") Also I've still got a P/S bracket belonging to you, still haven't managed to copy it I'm having trouble finding any 4mm steel to make it out of.
Also I've still got a P/S bracket belonging to you, still haven't managed to copy it I'm having trouble finding any 4mm steel to make it out of.
Jonno yes that is an access hole for the torsion bar, under the back seat. Was standard on wagons and I don't understand why they didn't do it with the ute.
Jonno yes that is an access hole for the torsion bar, under the back seat. Was standard on wagons and I don't understand why they didn't do it with the ute.
Will it ever end!?
-EA81 TWIN CARB!!!!
-L series 5 speed
-Custom paint job
-2" lift
-Full custom re-wire
-L series front end
-EA81 TWIN CARB!!!!
-L series 5 speed
-Custom paint job
-2" lift
-Full custom re-wire
-L series front end
-
steptoe
- Master Member
- Posts: 11582
- Joined: Thu Oct 06, 2005 10:00 am
- Location: 14 miles outside Gotham City
just been thinking we should have a poll to see just how many drooling followers you have.
An old workmate did a full blown resto on one of his beasts in record time, to about the same repair level level you are doing the 'Bullet - spied him in the traffic in recent weeks in all its splendour - it really stood out in the crowd, him just cruisin' at lunchtime, not in a hurry to get back to work look about things - drive the 'Bullet with pride won't you Sam !
An old workmate did a full blown resto on one of his beasts in record time, to about the same repair level level you are doing the 'Bullet - spied him in the traffic in recent weeks in all its splendour - it really stood out in the crowd, him just cruisin' at lunchtime, not in a hurry to get back to work look about things - drive the 'Bullet with pride won't you Sam !
-
El_Freddo
- Master Member
- Posts: 12502
- Joined: Tue Oct 04, 2005 10:00 am
- Location: Bridgewater Vic
- Contact:
Yes it is Steptoe, I thought this was old news? And no, the Brumbys didn't get one - unless you add it yourself...steptoe wrote:Heyyy...//// That is not a rear suspension adjust access hole bung plug is it ???? Don't think the Brumbies got that !
I think you just need to see who's posted in here to get a good idea of who's drooling over this build!steptoe wrote:just been thinking we should have a poll to see just how many drooling followers you have.
Sam it's looking great mate! I'll be keen to see the end result with the linkages, I'm betting it'll be a neat setup.
The gearbox, if you can, check out an L series to see how it sits. I'd look at mine but the box is still in pieces
Cheers
Bennie
-
Silverbullet
- Senior Member
- Posts: 2867
- Joined: Mon Aug 23, 2010 6:20 pm
- Location: Adelaide
Bennie, as it sits now the upper right hand side of the rear end on the gearbox is pretty much rubbing the trans tunnel, so it's way over to the right (when viewed from rear) All I need to do is stick my head under Dad's car to have a look how it should be
Update time! This week all my gear shifter and moustache bar bushes arrived. Moustache bar bushes are SuperPro SPF3005K. Annoyingly I had alot on today so didn't get a start on the car until around 4PM. I also now have the fuel tank and vent lines 100% plumbed in, after about 2 dozen hose clamps and all of the 3/16" fuel hose the shop had. I cleaned up and re-painted the original! dealer fitted! 1981! rear diff bash plate. I figure this must have been quite a new concept or even prototype bash plate back in those days, it looks very roughly made! rear holes roughly carved out with an oxy torch, front holes roughly drilled. But it's thick, heavy and does the job so it goes back on after a coat of silver hammer tone. Cleaned up the L series rear diff last week (they're black underneath all that dirt! never even knew it) So today I put the new bushes in the moustache bar and assembled the diff and bash plate off of the car thinking it would be easier to put in this way; the bash plate is a prick of a job to install.
Needed to quickly mod my lift blocks in that area to clear the fuel tank, bolted the mounting brackets up and set myself up with the diff on my stomach, me on the creeper, and all bolts washers and nuts within arms reach. By now it was 8PM and I was working by the worklight underneath and my flood lights above. The dark was the least of my troubles though! with me inbetween the diff and the creeper under the car it was a short shove up to get the front pinion mount into it's mounting point, got the big bolt in no problem. But then I notice the two posts at either end for the moustache bar are way off, nothing lines up all the brackets were round the wrong way so couldn't get anything together. So out with the bolt again, slid out from under the diff now resting on my crotch gets real heavy after a while. Re-positioned the two mounting brackets copying a spare assembled moustache bar I have laying around and tried the whole ordeal again...still no go! Got the two posts in their holes only to see the front pinion mount way off to one side of the mounting point! I gave up at this point, thinking of how I am going to ache in the morning. Probably won't get the diff in tomorrow either as I've got other stuff to do. But I will make an effort to work on the shifter linkages instead.
Story over, time for some pics...
Here's the old bash plate after I hit the rust with a wire wheel. You can see it's earned its keep and done its job in the past!
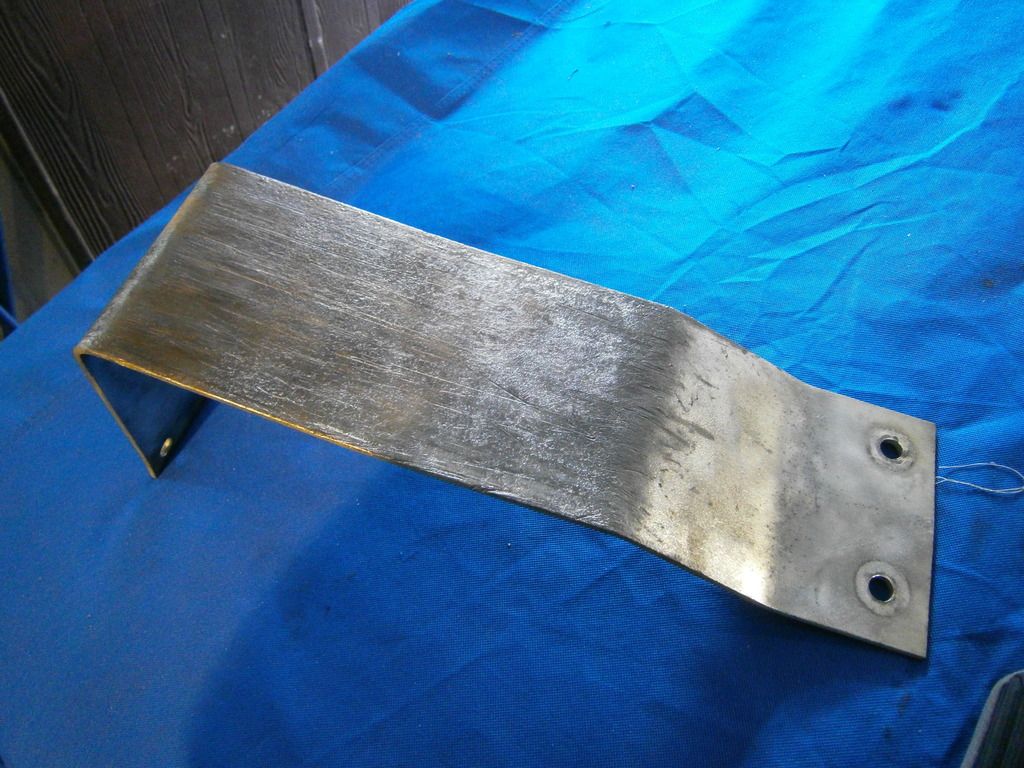
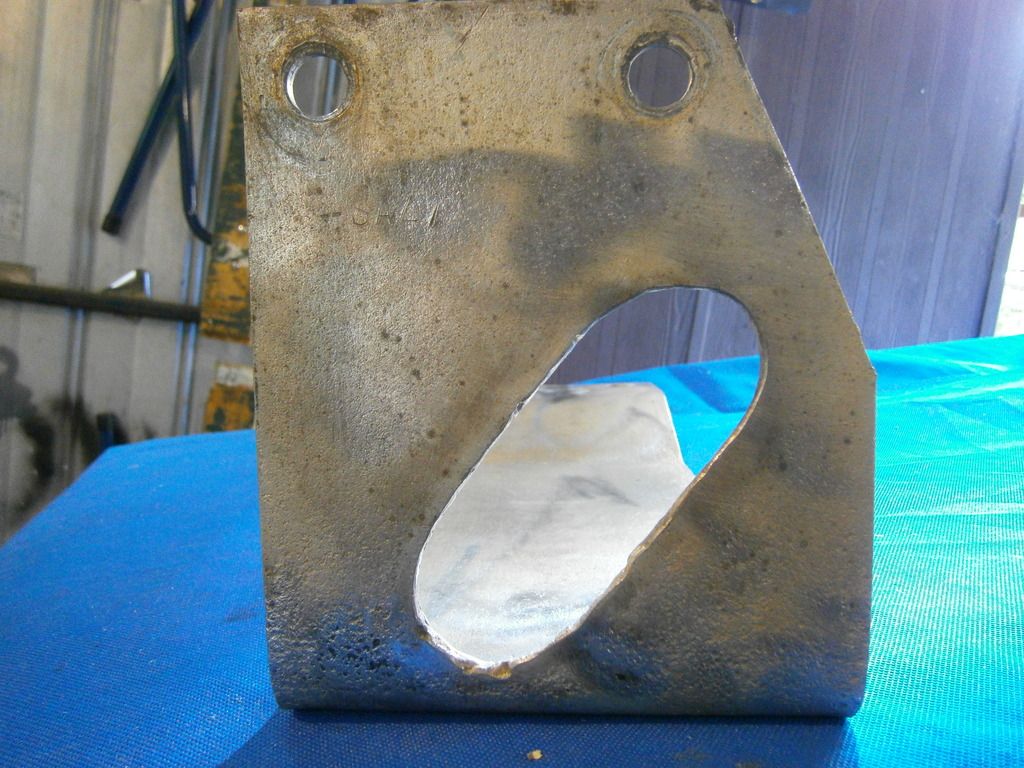
Egg shaped hole hacked out with an oxy torch, can you believe this was dealer fitted when the car was new!
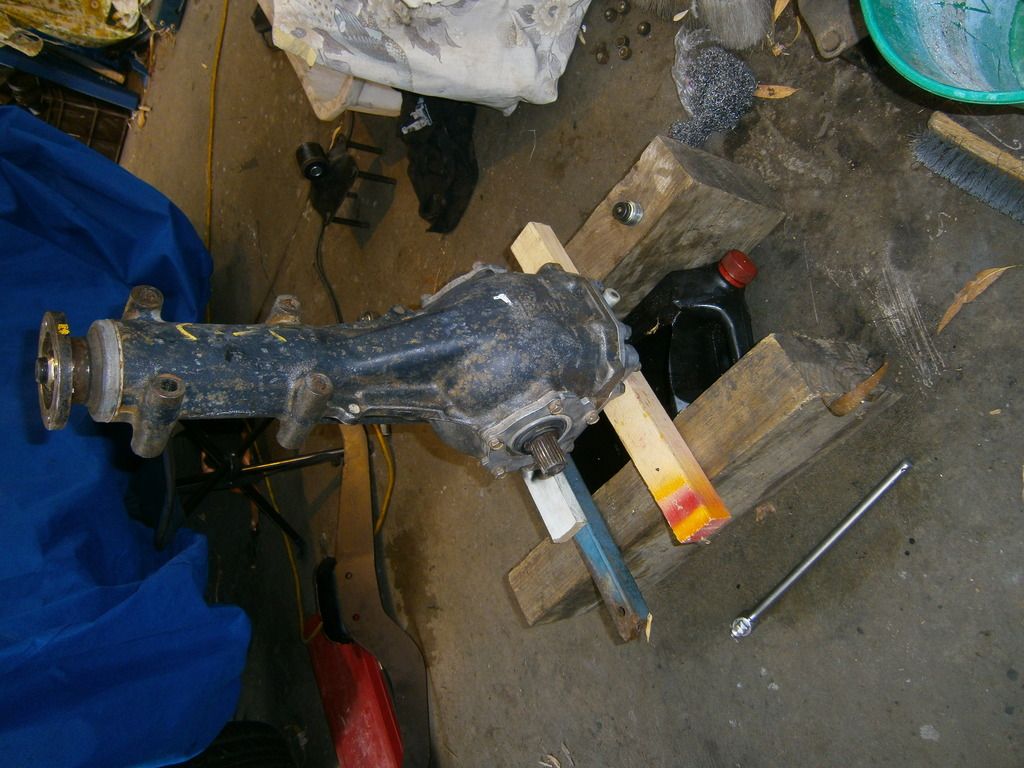
How to drain a diff
Update time! This week all my gear shifter and moustache bar bushes arrived. Moustache bar bushes are SuperPro SPF3005K. Annoyingly I had alot on today so didn't get a start on the car until around 4PM. I also now have the fuel tank and vent lines 100% plumbed in, after about 2 dozen hose clamps and all of the 3/16" fuel hose the shop had. I cleaned up and re-painted the original! dealer fitted! 1981! rear diff bash plate. I figure this must have been quite a new concept or even prototype bash plate back in those days, it looks very roughly made! rear holes roughly carved out with an oxy torch, front holes roughly drilled. But it's thick, heavy and does the job so it goes back on after a coat of silver hammer tone. Cleaned up the L series rear diff last week (they're black underneath all that dirt! never even knew it) So today I put the new bushes in the moustache bar and assembled the diff and bash plate off of the car thinking it would be easier to put in this way; the bash plate is a prick of a job to install.
Needed to quickly mod my lift blocks in that area to clear the fuel tank, bolted the mounting brackets up and set myself up with the diff on my stomach, me on the creeper, and all bolts washers and nuts within arms reach. By now it was 8PM and I was working by the worklight underneath and my flood lights above. The dark was the least of my troubles though! with me inbetween the diff and the creeper under the car it was a short shove up to get the front pinion mount into it's mounting point, got the big bolt in no problem. But then I notice the two posts at either end for the moustache bar are way off, nothing lines up
Story over, time for some pics...
Here's the old bash plate after I hit the rust with a wire wheel. You can see it's earned its keep and done its job in the past!
Egg shaped hole hacked out with an oxy torch, can you believe this was dealer fitted when the car was new!
How to drain a diff
Will it ever end!?
-EA81 TWIN CARB!!!!
-L series 5 speed
-Custom paint job
-2" lift
-Full custom re-wire
-L series front end
-EA81 TWIN CARB!!!!
-L series 5 speed
-Custom paint job
-2" lift
-Full custom re-wire
-L series front end