Page 1 of 3
Impreza swap time (& possible lift?)
Posted: Sun Dec 12, 2010 1:55 pm
by damo666
Hi there,
Just a quick post to (re)introduce myself to Ausubaru...its been about 4 years sine I was here last
.
Im from Canberra, and have finally had enough of driving to work in my very special $500 Hyundai Excel....so am in the process of cobbling together a nice cheap Subaru daily.
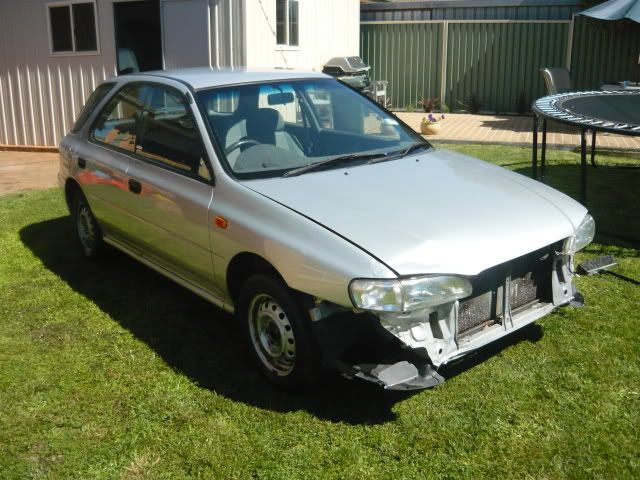
I have recently purchased this from the auctions;


And am in the process of transplanting all the bits into this;
Hopefully I will be able to get myself a nice cheap, comfortable, cheap(!), daily to drive around in, and it shouldnt cost too much more than about $2k all up.
I'm also toying with throwing some Forester suspension in or a mild lift....but will decide on that later after it runs.
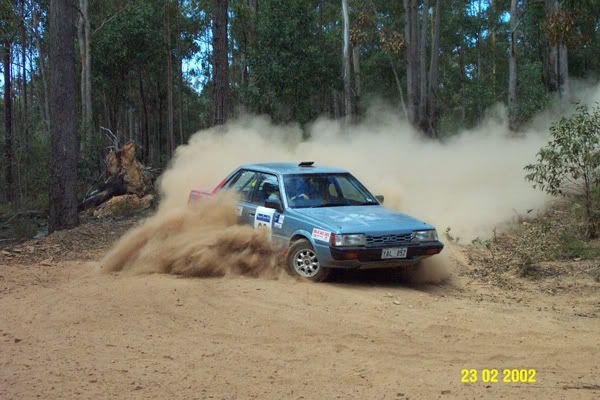
Although I have played with a few Subaru's before (shot of my old RX Turbo rally car below), this is the first time in fiddling with one from the 90's, so I may have lots of stupid questions!!
Ta
Damo
Posted: Sun Dec 12, 2010 2:04 pm
by TOONGA
welcome to the board Damo nice score in both cases and a nice action shot of the sedan
and feel free to ask stupid questions I do all the time

TOONGA
Posted: Sun Dec 12, 2010 4:24 pm
by d_generate
One of the easiest cars to work on, everything fits from model to model, like a big meccano set, they love being lifted too.
You will need to make a couple of minor mods to change the dash over which you should do but it's only to the mounting points, 99 - 00 front looks much better too.
Have fun.
Posted: Sun Dec 12, 2010 6:02 pm
by damo666
Thanks for the welcome guys,
I'll admit looking at your lifted WRX has been a bit of inspiration d-generate...very nice!
I just have to get the RX to the local Subaru dealer - as the blue car came without keys, I need to get the new ones coded, and would rather get it running in this shell in order to sort out any problems, before swapping it all over.
After that is will be transfer time, the wagon shell is stripped and ready to go.
Dash questions will be number one, i'll be back shortly with that question!

Posted: Sun Dec 12, 2010 7:40 pm
by AlpineRaven
Welcome back.. watching this topic!
Cheers
AP
Posted: Mon Dec 13, 2010 12:38 am
by d_generate
I'll put you onto a guy in Perth who has done the dash swap on his 96 n/a to 98 Turbo, he knows all the ins & outs of the dash but it'll probably be pretty obvious once they are both out, just a couple of tabs.
You'll also need to mod the steering column as the firewall mount is a different diameter, I think the parts are interchangeable on each column.
You'd be better off doing a complete wiring harness swap too, not too hard but be prepared to change the rear harness as the plug is different, sedan & wagon are virtually the same.
About the only other thing you'll need to do is swap door cards over but you'll no doubt do that unless you have wind up windows in the hatch, then the dash won't match the shape.......so then you put the electrics in the doors lol
Posted: Sun Jan 02, 2011 5:07 pm
by damo666
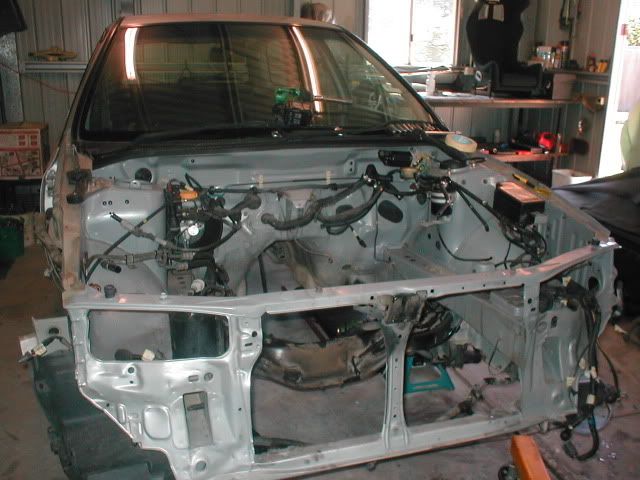
A week or so off over Chrissy, and only a little progress has been made.
The silver car has been stripped down to a bare shell, not many nuts, bolts, or wiring left on her!
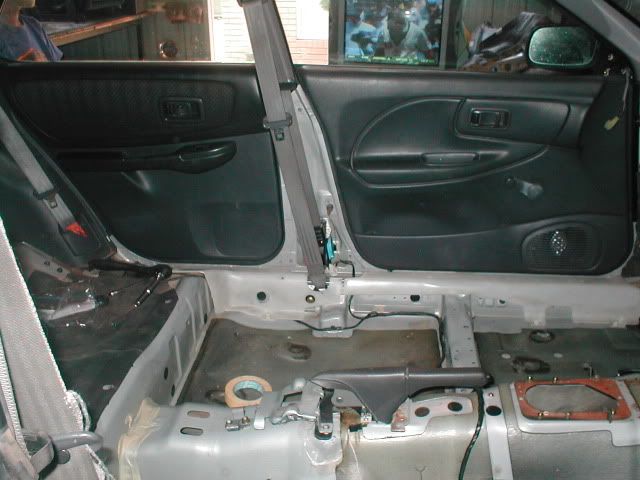
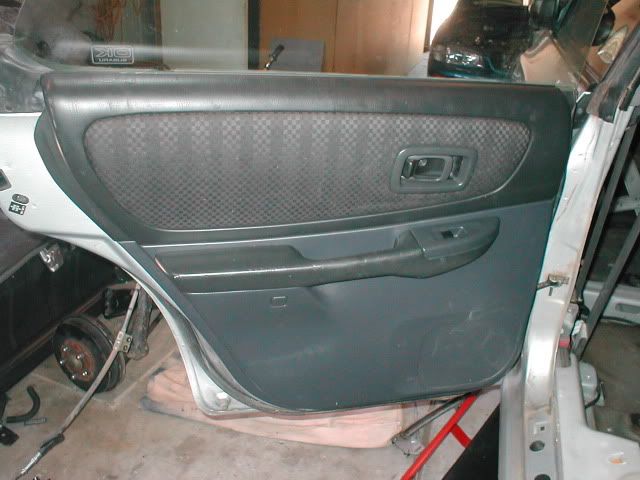
I spent today swapping the power windows, central locking and door locks over to the new car, as the silver one only had manual winders and no central locking, and I will need the newer style door cards when I put the more modern dash in.
Not really very technically hard job, but god I wish I had little Japanese hands.....they would have made quite a fiddly job much easier working inside the door cavity!
It was also interesting getting the power bits out of the two doors that had crash damage, I had to take to them with the grinder and extract everything from the outside.
Interestingly, despite quite a good direct hit on the doors, the components are well placed inside the door, with the internal intrusion bars saving everything.
Shot below of one door completed - rear is with the new power windows, front door is stock manual winders.
Posted: Sun Jan 02, 2011 6:08 pm
by bonzaman
lookin good
Posted: Sun Jan 02, 2011 11:42 pm
by d_generate
Great start, get all the crappy jobs out of the way first, don't forget the rear harness either.
Those intrusion bars are amazing, I bought a wreck that had hit a pole & bent the car in half, the passenger seat was where the console was and 6" wide when I took it out but the intrusion bar was as straight as a die, great steel they use.
Posted: Wed Jan 05, 2011 6:25 pm
by damo666
Ahh poo.
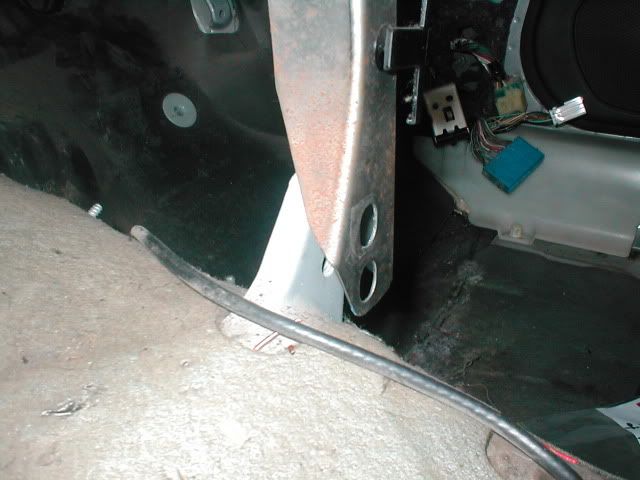
I thought this was going along a bit too easily! I pulled the dash out of the newer car today, and all was going well until I got to this point....
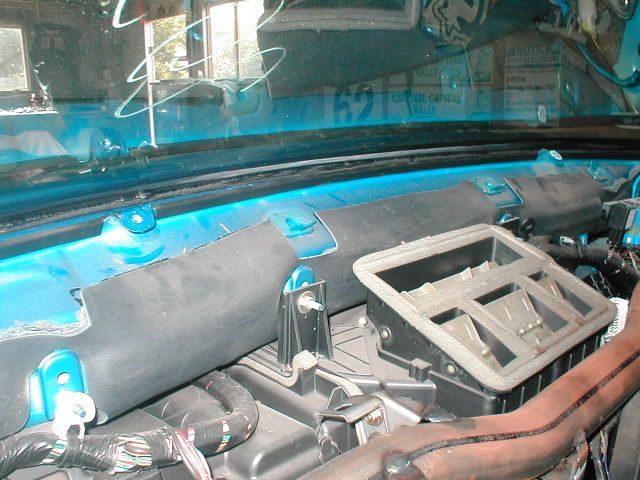
where it appears that the later version of the dash mounts in a very different way to the earlier car. The upper dash mount bolts are in totally different places, as are the 'prongs' that sit on the back of the dash an insert into the little sildes/holes in the firewall.
Whilst I can cut and reweld the captive nuts for the bolts in the correct spot in the older car, I cant do much with the post things/ Do you reckon they carry much of the dash weight?
Posted: Wed Jan 05, 2011 6:25 pm
by damo666
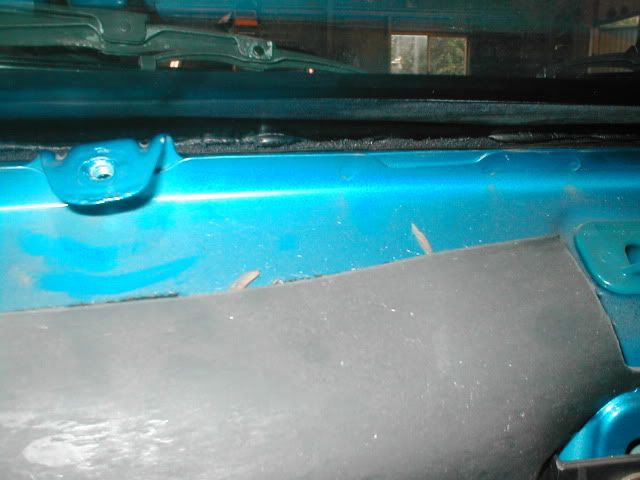
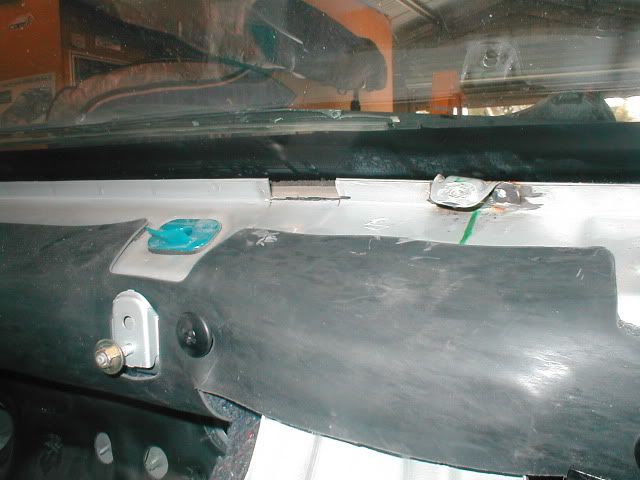
In the shot below you can see the difference in the mounting bolt locations on the newer shell -> the older one has the captive nut where the inner sheet of steel has a cutout in the pic below.
Posted: Thu Jan 06, 2011 2:28 am
by d_generate
PM sent.
Posted: Thu Jan 06, 2011 3:10 pm
by damo666
After throwing a few tools and storming out of the garage last night, I went in and had a closer look at it today. The differences between the new style dash and the older shell are as follows;
1) The newer 'dash bar' bolts in fine, but the lower mounts sit around 20mm off the bolt holes on the trans tunnel.
2) The upper bolts for the dash cover are in the wrong place, each needs to be moved.
3) The prong thingys on the back of the dash are in the wrong place, only one of the four holes on the old shell are in the right spot.
#1 -> is easy, I have just elongated the dash bar lower mounting holes slightly, and will use a spacer to fill the gap when I bolt in in.
#2 -> I broke out the grinder and cut the upper dash mounts off, then welded them back on 100mm further out on each side.
#3 -> The newer style dash has two locating 'prongs' on the back of it. The passenger side one needs to be removed from the dash, and the alignment tabs on the three incorrect ones on the shell need to be popped off.
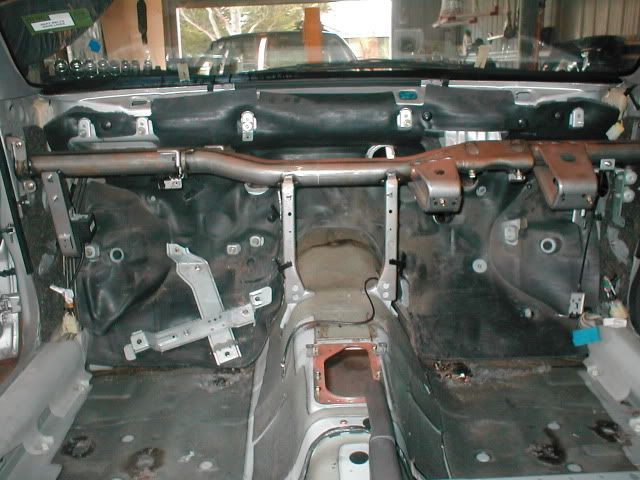
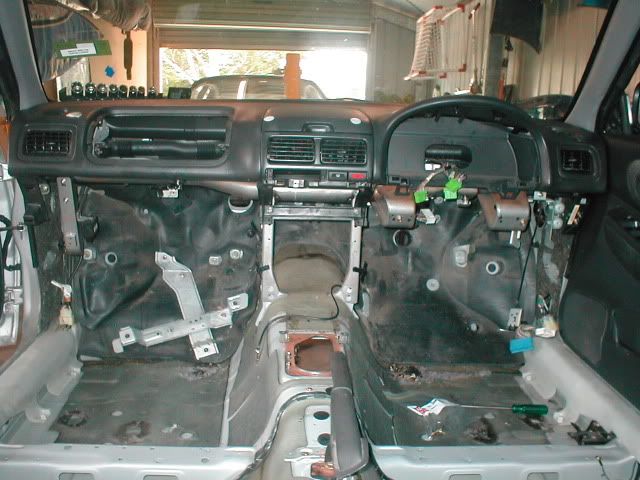
Some pics below. Its all mounted securely now. Happy again!
New dash bar in place;
Dash bar lower mounting feet mis-alignment:
Relocated upper dash skin mount;
Shot of new upper mount now lining up:
New dash is in!!
Posted: Thu Jan 06, 2011 4:35 pm
by d_generate
Sweet, looks like it's all going well, Just the steering column to sort then everything else should just slot into place from now on like a big meccano set.
Posted: Sat Jan 08, 2011 9:35 pm
by El_Freddo
Looks like a great project! Something to keep you on your toes with the dash mounts! Painful now but probably worth the effort in the end.
Considered a H6 conversion?? I'd considered a 3 inch lift, H6 conversion and L series low range in an impreza - just don't have the funds to play at this "level" yet. Plus I still love the L's and have a couple of projects I need to fund, which is always fun.
Keep the pics coming, as they always say - a pic is worth a thousand words

Cheers
Bennie
Posted: Sun Jan 09, 2011 12:46 pm
by damo666
Nan, havent considered the H6, but now that I think of it, I navigate in a friends SVX rallycar (with individual throttle bodies) and that is simply the best sounding car I have ever been in.
Maybe I could build a H6 version. Tempting!
But, in reality its just going to be a simple commuter, and may get the occasional weekend bash. Cheap is good.
You'd be really surprised how cheap and readily available Impreza bits are nowdays. I expect to get this one on the road for less than most decent condition L's are going for.......
Posted: Fri Jan 14, 2011 7:24 pm
by damo666
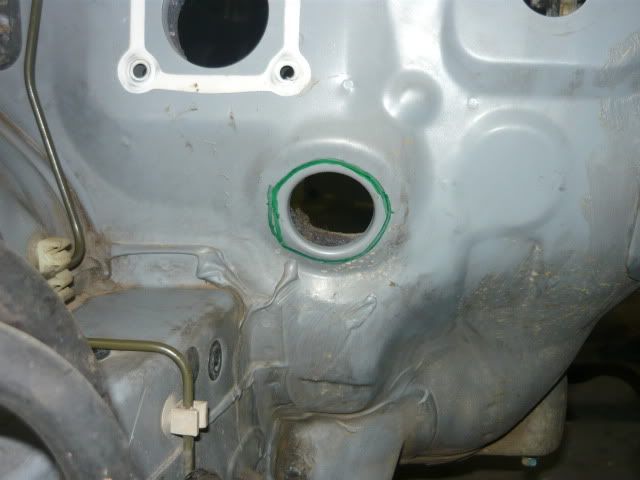
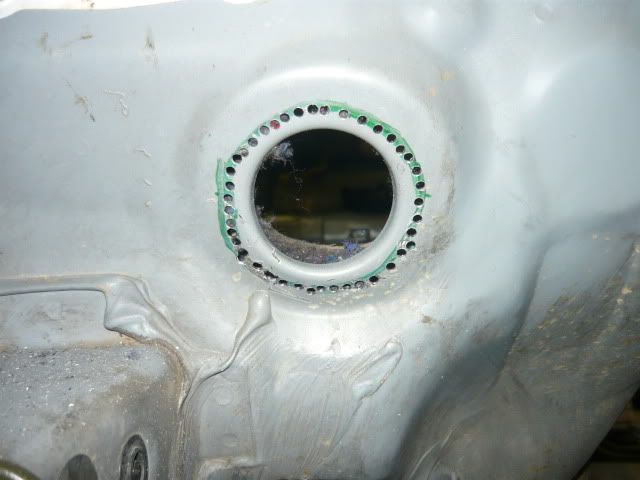
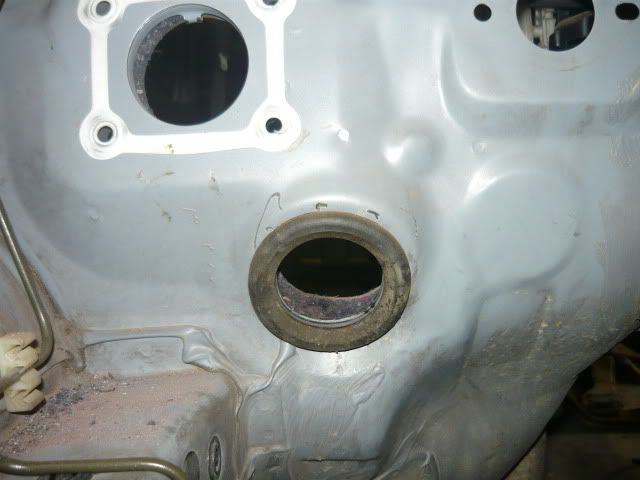
A few more days in the shed an I now have the donor car stripped of everything except the wiring loom, so I have started putting bits back into the wagon. Very exciting! (well, for me at least!). The wagon now has the 4WD tank & rear end in, and I just need to swap over the loom before popping the rest in.
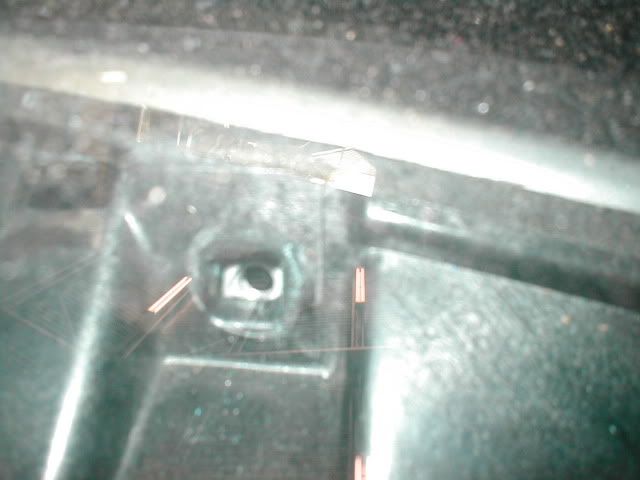
As d-generate mentioned earlier, the hole in the firewall for the steering column on the later car is a different size (45mm hole on the early car, 65mm hole on the later model).
Hole now enlarged, so hopefully that will be the last bit of modifying I will need to do - smooth sailing from here on in.
The green line in the shot below indicates the difference in size;
A bit of drill & cut
All done
Posted: Fri Jan 14, 2011 8:00 pm
by hazzard
Thats a real neat and tidy job great little project
Posted: Fri Jan 14, 2011 8:15 pm
by steptoe
You'd think Damien did this for a living the meticulous way he strips and puts things back together.
Posted: Fri Jan 14, 2011 10:23 pm
by d_generate
Good going, get that wiring loom out then into this one next, lets you plug things in as you fit them, I always found the inner fuse box area the biggest pain.