Page 1 of 1
Poo brown Touring wagon
Posted: Wed Apr 14, 2010 4:10 pm
by Pav
This is my 3rd subaru I've owned so far and definately the best. I bought it as an unfinished project, which had the EJ20, AWD auto box, and 4.11 diff in it as well as factory power steering. I got it for a grand with a few months rego which I reckon was a bargain.
Since then I have given it a general service and checkup, I've installed an aftermarket temp gauge, fitted a custom twin-core radiator, V8 transmission cooler, and custom mounted thermo fans.
So far I have taken this upto Cervantes and Jurien bay for a play in the dunes up there, and it had no problem going everywhere my mates turbo diesel hilux went (I even had higher tyre pressures) on the 13" wheels. The awd auto gearbox surprised me as I thought it would slip heaps and use fwd too much but it was perfect.
Previous MY wagons (blue one was d/r and yellow was s/r with hilux wheels)

The touring wagon (aka the giant turd)


Up at cervantes (bikes are wrf250 and ttr250)

Custom temp gauge setup

Posted: Wed Apr 14, 2010 4:17 pm
by Pav
Here is the custom 2 core radiator and fan setup:
I think it is made up of two MY end tanks and the cores have been recessed into the front of the car for some room between the engine. The fans I'm pretty sure are 10 inch.
For the hoses the top one is from a cut-down 304 v8 hose, where as the bottom one is a 2 piece made from a bit of straight hose and part of a hj75 cruiser rad hose, with a 90 degree joiner in between.


12V fridge

Yokohoma light truck tyres 175/80r13s

Posted: Wed Apr 14, 2010 4:19 pm
by TOONGA
nice rig nothing a 12 pack of fiddly bits paint from bunnings wont solve
do you have picture of the motor in the engine bay?
TOONGA
Posted: Wed Apr 14, 2010 4:24 pm
by Pav
Yeah the engine bay is pretty dirty haha, and wiring is everywhere, I wanna make it pretty before I post it up. Not too worried about the paint at the moment.
Posted: Thu Apr 15, 2010 3:01 pm
by Alex
haha nice one mate.
It does look like a giant turd hahaha.
love the custom gauges and fridge setup.
alex
Posted: Thu Apr 15, 2010 3:15 pm
by someguy
*Patiently waits for pics of the engine bay :P *
Good setup though, I modded the area you have your guages in to permanently fit a navman widescreen GPS so it looks like part of the dash, also got a tacho, vacuum & soon an oil pressure gauge.
Posted: Thu Apr 15, 2010 3:20 pm
by tex
Has anyone else noticed the number plates though; Tan 162 By the way you cant see the colour from the inside, especially at night!
Posted: Thu Apr 15, 2010 5:00 pm
by Pav
Yeah, everything was sorta thrown in together quickly to get the car running, I am probably going to re-do the gauge setup to fit volts and oil pres. as well and generally make it look nicer.
I'll get a pic of the engine as soon as I hide all the excess wiring etc.
Future plans are 3" lift, bullbar w/spotties, 14's (all of which I have already put a deposit down on

and then was thinking of building a custom fan shroud, custom bash plate, custom rear bumper for fuel can and spare wheel etc. But first I gotta fix an oil leak and a blown rear cv haha
Posted: Fri Jan 07, 2011 4:24 pm
by Pav
Well lots of things have happened since I updated this page, I blew both rear CVs as they were originally incorrectly modified for the impreza diff so I fitted a 4.11 liberty diff and l-series shafts (straight fit, cheers Guy). Then I almost stuffed the gearbox as I dented the sump on a log and lost all drive, and finally I blew a headgasket and that's when I decided to re-do most of the engine (water pump, timing belt, seals, gaskets etc.)
Here is the engine before I started, full of grime and dirt from oil and mudding sessions


And after the rebuild

Here it is back in it's rightful place


Posted: Fri Jan 07, 2011 5:11 pm
by guyph_01
Cool, All you need now is some lift and your ready to go:)
You should be able to manufacture some blocks and use the strut tops you have. Since my bro got yellow stickered with his 4inch lift kit i got to do some thinking. His 4inch red brumby is about the same height as my mates 2inch kit white brumby. The only difference is the white brumby has got bigger tyres.
So because of engineers certificates and pits i'm going to make some 2inch blocks but use the three inch surt tops. At least this way its more legal. Hopefully it won't put to much strain on the cv's.
I think since you have to re-make your blocks anyway, you should do that.
Anyway, great work, see you on the tracks in FEB:)
Posted: Fri Jan 07, 2011 5:41 pm
by Pav
Yeah I was thinking the same, that I would re-make the blocks as 2inch and use my 3inch strut tops, mainly because it makes it easier to lengthen shifter and hoses and other stuff.
I need to see some blocks as reference cos the 3inch ones that I have are crap and mixed up etc. And then we need to buy more bolts as well.
For starters I'll see if my 14's will fit without scrubbing...
Posted: Fri Jan 07, 2011 9:55 pm
by El_Freddo
G'day Pav,
Curious as to which Generation EJ22 that engine is as the tensioner on the cam belt is different to my Gen 1's tensioner setup:
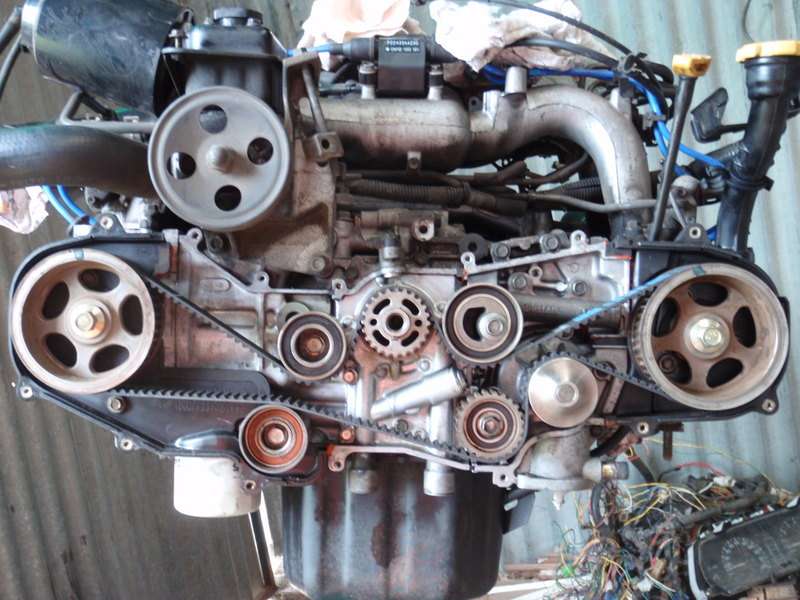
Also - with what Guy is doing with the brumby: By using a set of say 3 inch strut tops from a 3 inch body lift with 2 inch blocks for the body lift you will create a camber problem up front.
You *should* make a set of strut tops with the correct offset for the body block that you're going to use, or just put up with wheels that will look more like \-/ than |-| or /-\
I can see why you call it the turd - no offence, but that is probably the worst paint and pin strip job subaru have produced! Is it covered in mud 90% of the time?
Cheers
Bennie
Posted: Sat Jan 08, 2011 12:16 am
by guyph_01
Don't worry bennie, extended lower arms are part of the plan too:)
Posted: Sat Jan 08, 2011 1:09 am
by RSR 555
El_Freddo wrote:Curious as to which Generation EJ22 that engine is as the tensioner on the cam belt is different to my Gen 1's tensioner setup:
Cheers
Bennie
That's the early tensioner.. first released on the Gen1 Ser1 right up until the Gen3.. the later tensioner was available on the EJ20 SOHC from 97 (Impreza & Forester). The later type can be fitted to the early engines.. you just need the mounting bracket (3x 12mm bolts) all the covers and belts are the same.
Posted: Sat Jan 08, 2011 2:47 pm
by Pav
Yea, the car is usually covered in mud, but nobody can tell anyway
I was thinking a home paint job would even be better as I have spray gun etc. just not sure what would be a good colour... (don't like bright and vibrant colours though)
Anyway with the strut top lift I can see that you would get a positive camber on the wheels, I guess it wouldn't bother me too much but I do like the way the car handles now so the lower arm extension would probably be on the cards...
How much of a job is it anyway, anybody done it before?