cool air duct Brumby pic inside

Get the most out of your ride & how to make enhancements ...
Post Reply
User avatar
steptoe
Master Member
Posts: 11582
Joined: Thu Oct 06, 2005 10:00 am
Location: 14 miles outside Gotham City

cool air duct Brumby pic inside

Post by steptoe » Sun Nov 23, 2014 10:42 am

Image

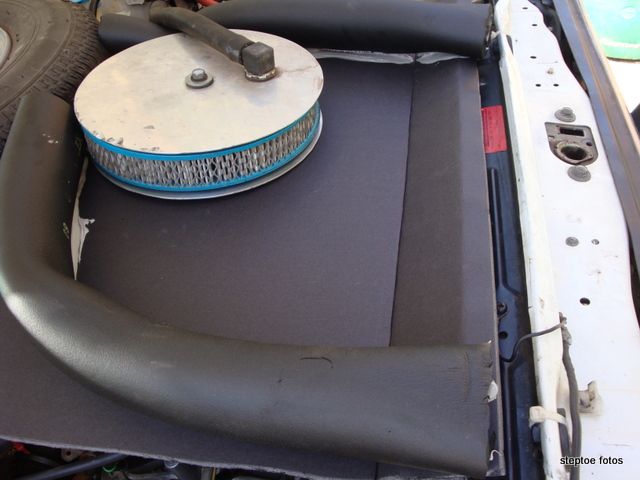
there is the pic as promised.

Rather crude, rather quick to make and for under $20

will suit Weber air filters more so than every other std EA81

I just used the paper cardboard bonded foam core board rather than the PVC bonded board - sign board stuff from newsagents or stationers ~ $12 and about $5 for one length of the pipe insulation and some bastard put grey silicon cartridge back in clear section on shelf !
Is held down by fact smaller hole than air filter housing, so housing holds it down, and just squirtd out silicone where I wanted it, and shut bonnet down to hold all in place to set.

Need reflective foil or alloy sheet below to reflect more heat below.
It is MKII so should look better than MKI

User avatar
Gannon
Senior Member
Posts: 4580
Joined: Sat Nov 05, 2005 10:00 am
Location: Bowraville, Mid Nth Coast, NSW

Post by Gannon » Sun Nov 23, 2014 3:31 pm

Is it flammable?
I imagine it would produce a substantial black smoke cloud once it ingites
Current rides: 2016 Mitsubishi Triton GLS & 2004 Forester X
Ongoing Project/Toy: 1987 RX Turbo EA82T, Speeduino ECU, Coil-pack ignition, 440cc Injectors, KONI adjustale front struts, Hybrid L Series/ Liberty AWD 5sp
Past rides: 92 L series turbo converted wagon, 83 Leone GL Sedan, 2004 Liberty GT Sedan & 2001 Outback
------------------------------------------

User avatar
steptoe
Master Member
Posts: 11582
Joined: Thu Oct 06, 2005 10:00 am
Location: 14 miles outside Gotham City

Post by steptoe » Sun Nov 23, 2014 5:37 pm

everything burns Gannon :)

User avatar
Bantum
General Member
Posts: 1923
Joined: Sun Jul 29, 2012 4:30 pm
Location: Northern Territory + QLD
Contact:

Hood Scoop ...

Post by Bantum » Sun Nov 23, 2014 5:52 pm

Ha - you need to stick one of these through the bonnet ... :p

Image

Found Here : http://www.ebay.com.au/itm/Polished-Alu ... 1586990078

Cheers, Bantum ...

User avatar
tambox
Junior Member
Posts: 661
Joined: Tue Sep 09, 2008 5:06 pm
Location: Clayton again

Post by tambox » Sun Nov 23, 2014 6:05 pm

L serious, still.

User avatar
rtcb65
General Member
Posts: 1354
Joined: Sun Jul 29, 2007 1:07 pm
Location: Gympie
Contact:

Post by rtcb65 » Sun Nov 23, 2014 7:57 pm

This is what i did to mine.
Attachments
PICT0638.jpg
PICT0638.jpg (107.4 KiB) Viewed 1861 times
PICT0630.jpg
PICT0630.jpg (116.25 KiB) Viewed 1859 times
PICT0628.jpg
PICT0628.jpg (102.6 KiB) Viewed 1859 times
PICT0619.jpg
PICT0619.jpg (109.52 KiB) Viewed 1862 times
rtcb65
------------------
Redneck Rick.

1997 Gen 3 outback. GT forester wheels . Hopefully more changes to come. Proud Supporter And User of -----------C R O S S B R E D --- P E R F O R M A N C E ---- Products


[SIGPIC][/SIGPIC]

User avatar
Bantum
General Member
Posts: 1923
Joined: Sun Jul 29, 2012 4:30 pm
Location: Northern Territory + QLD
Contact:

Post by Bantum » Sun Nov 23, 2014 11:45 pm

Very neat Rick ... :like:

Tambox - yeah I know - 'postal boxes' are exempted for the purpose of this exercise ... :p

You could do a snorkel though ... ;)

Cheers, Bantum ...

Post Reply

Return to “Conversions, Modifications and Performance Upgrades”