
wow thats creative hehe... thanks maxxair i'll keep that in mind lol...i remember seeing those control arms on a thread here about scoring an MY for cheap that was used for rally???
may reconsider radius rods as i may be able to use the rest of the hilux diff rod to make a stronger easier to adjust rod...
stay tuned pics soon...
4x4 coupe conversion + extras
-
subybrumby

- Junior Member
- Posts: 870
- Joined: Thu Jun 28, 2007 5:03 pm
- Location: Toowoomba
Mate, was interested in the pics you had of the modified control arms. I experimented with this a while back but couldn't get it to work. I have an 89 brumby (MY) with an EA82T on board. I bought the vehicle with MY control arms, and MY axles but with L series hubs installed to hold the larger brakes. The car had a bad case of over positive camber and looked like a bow legged old man. I went with the L series control arms and axles to correct this but as you found out, the wheel is pushed forward and looks a bit goofy. I then had a pair of L series control arms cut and shut to bring the angle of the axle back into the centre of the wheel well but still giving it that length I needed for negative camber. The cut and weld was done by a friend of mine who does specialist welding and the job was perfect and he plated the underneath making it stronger than the original plus hiding the job. It worked great but couldn't get an axle to fit. An L series axle wouldn't fit but a brumby one might have but the stress on the Cv joint was too much I thought.
Anyway after a lot of stuffing about I went back to the brumby setup and found thanks to Phizinza that the L series and MY hubs look the same but are not. The angle of the Strut entry and ball joint on the longitudinal are different causing the L series hub to reach in further for the MY lower control arm thus causing excessive positive camber.
So I set the car up in its original configuration but this means that it has front brumby brakes rather than the larger L series brakes that probably should be there for that engine. The attachment point for the caliper backing plate is different for both hubs meaning that the brakes are not interchangeable.
Hope some of this helps. My thread and posts will still be on this site relating to all this but the photos have been removed.
1989 Subaru Brumby - EA82T 5speed box. 4wheel disc, electric Windows plus other goodies.
Future Plans- Seat upgrade and Possible EJ20T implant.
Daily Driver Stock 1991 Brumby.[SIGPIC][/SIGPIC]
Future Plans- Seat upgrade and Possible EJ20T implant.
Daily Driver Stock 1991 Brumby.[SIGPIC][/SIGPIC]
-
brumbyrunner

- General Member
- Posts: 1743
- Joined: Mon Apr 10, 2006 10:00 am
- Location: SEQ
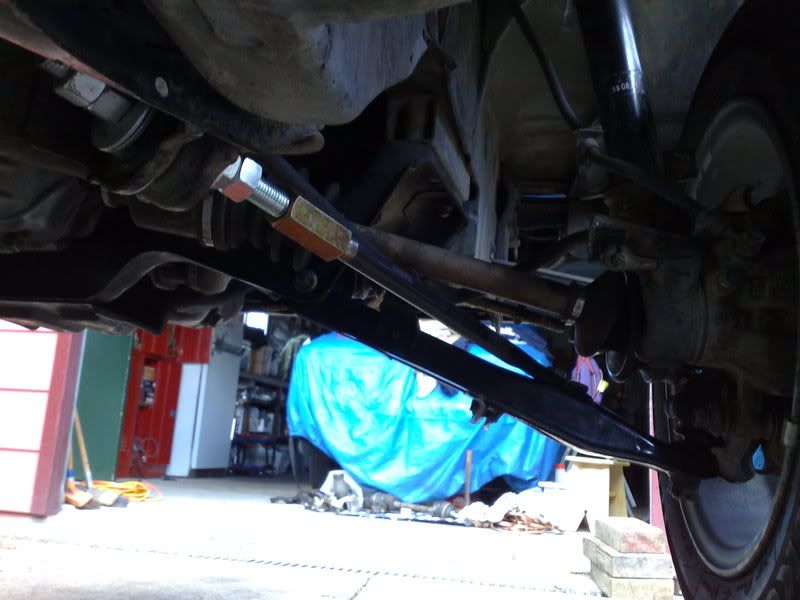
attempt number 1... see if i can get some more pics soon...
(as i explained, the nuckle end is bent up a few degrees and welded, the angle of the whole arm is set half way between L and MY, coupling tube welded in and thread tapped, entire arm rewelded and thickened, bush screwed in and bobs ur uncle...)

cheers
(as i explained, the nuckle end is bent up a few degrees and welded, the angle of the whole arm is set half way between L and MY, coupling tube welded in and thread tapped, entire arm rewelded and thickened, bush screwed in and bobs ur uncle...)
cheers
I LIKE THEM PRETTY YET TOUGH...LOL
[SIGPIC][/SIGPIC]
[SIGPIC][/SIGPIC]

Centre console fan/ac control mod...
miles away from what i am up to but started this ages ago to see how it would turn out... anybody tried this???

cheers
cheers
I LIKE THEM PRETTY YET TOUGH...LOL
[SIGPIC][/SIGPIC]
[SIGPIC][/SIGPIC]
also thanks to lucky67 for buying my alloys i have a few spare dollars to put into the coupe if need be...
just sorting out the shocks and some larger nuts and bolts for the arms this w/end then probly have the arms, rods and shocks in on monday, then just have to sort out the longer cv's (have on L one already so probly just need another) and repack wheel bearings while at it...
cheers
just sorting out the shocks and some larger nuts and bolts for the arms this w/end then probly have the arms, rods and shocks in on monday, then just have to sort out the longer cv's (have on L one already so probly just need another) and repack wheel bearings while at it...
cheers
I LIKE THEM PRETTY YET TOUGH...LOL
[SIGPIC][/SIGPIC]
[SIGPIC][/SIGPIC]
so been awhile since update, forgot to take pictures of progress  but anyway, arms a bolted in at shortest adjustment for now, temporary adjustable radius rods are in, and modified adjustable shocks, and 27's bolted on... and sitting at lowest adjustment...

front guards cut and folded to the smoothest curve i could work out... painted in primer for now...


then hacked at the rear guards.
before... drivers side

after... passenger side

and just a quick pic of king coil on modified shock...

front guards cut and folded to the smoothest curve i could work out... painted in primer for now...
then hacked at the rear guards.
before... drivers side
after... passenger side
and just a quick pic of king coil on modified shock...
I LIKE THEM PRETTY YET TOUGH...LOL
[SIGPIC][/SIGPIC]
[SIGPIC][/SIGPIC]


-
khanacross
- Junior Member
- Posts: 87
- Joined: Tue Mar 16, 2010 5:28 pm
- Location: newcastle

hi guys ,coupes looking great ,,hows the ej conversion coming along? i live at toronto and currently doing ej into brumby (almost finished) ,if you need any help or advice give me a call ,i also have a template of the ej to ea gearbox adapter if you want to borrow or copy it ,,might save you some work ,,,khanacross
lol i wish i had the time... plus it needs a wheel alignment once i get the longer cv's in and push the camber out and push the suspension up another few inches, then i will test offroad...El_Freddo wrote:^ That's one sick looking coupe! You should be proud!!! Had it offroad yet?
Cheers
Bennie
still really want to tackle the rear trailing arms for camber too... maybe longer cv's and push em out a bit more...
ANYONE WITH IDEAS OF HOW TO DO THE REAR CHEAP, (I CAN WELD ALRIGHT AND MY DAD IS A WELDING ENGINEER)...
may well have to do that mate if i cant get an EJ box cheap, EJ wires marked out, that about it, no time or funds to do the rest really, pretty sad, i hate half finished crap... was hoping to get an EJ box soon so i can get the engine + box + longer shafts in all at once...hi guys ,coupes looking great ,,hows the ej conversion coming along? i live at toronto and currently doing ej into brumby (almost finished) ,if you need any help or advice give me a call ,i also have a template of the ej to ea gearbox adapter if you want to borrow or copy it ,,might save you some work ,,,khanacross
more pics to come, any advice is welcome, or known cheap parts for the engine/gearbox....
cheers
I LIKE THEM PRETTY YET TOUGH...LOL
[SIGPIC][/SIGPIC]
[SIGPIC][/SIGPIC]
to be honest im afraid to see that offroad.
it just looks so beautiful, a street car.
it just looks so beautiful, a street car.
if im needed for anything [email protected] and ill try and get back to you.
pickstock racing fabrication
pickstock racing photography
GETDIRTYCLOTHING
track day classics and customs
pickstock racing fabrication
pickstock racing photography
GETDIRTYCLOTHING
track day classics and customs
well went on stocko beach the other night, went ok, tyres too chunky for sand, but worst problem was front vs rear track width, because the front is so wide when it pushes the sand inwards the rear wheels sit on the raised soft sand and make for extra load on the motor, not floating like it should.... also being light truck tyres and, even at 10psi i get like 5mm of bulging rubber and thats it, not heavy enough to make us of them...
apart from that my weber shit itself, split the fuel pressure diaphragm so leaky fuel on hot motor = ooooooooooo cr#pper....
and i had the suspension raised up... and it looked savage, more diff clearance than needed, would make a hilux with 35's shake in its boots...
will post a pic soon...
apart from that my weber shit itself, split the fuel pressure diaphragm so leaky fuel on hot motor = ooooooooooo cr#pper....
and i had the suspension raised up... and it looked savage, more diff clearance than needed, would make a hilux with 35's shake in its boots...
will post a pic soon...
I LIKE THEM PRETTY YET TOUGH...LOL
[SIGPIC][/SIGPIC]
[SIGPIC][/SIGPIC]
rebuilt the weber, runs better than ever, just need to make up a switch for the thermo and a/c fans so i can run them constantly if needed...
next step, get out the 13" alloys and get large road rubber fitted... 25 or 26" maybe
then, expand rear track width and increase negative camber at the same time...
cheers
next step, get out the 13" alloys and get large road rubber fitted... 25 or 26" maybe
then, expand rear track width and increase negative camber at the same time...
cheers
I LIKE THEM PRETTY YET TOUGH...LOL
[SIGPIC][/SIGPIC]
[SIGPIC][/SIGPIC]
so is this the gold coupe?
or a different one??
or a different one??
if im needed for anything [email protected] and ill try and get back to you.
pickstock racing fabrication
pickstock racing photography
GETDIRTYCLOTHING
track day classics and customs
pickstock racing fabrication
pickstock racing photography
GETDIRTYCLOTHING
track day classics and customs
The rear camber is adjusted by moving the trailing arm mount point. You can use some Kmac bolts or something similiar to make it adjustable. I am using the Kmac bolts with great sucess running around 0 degrees camber.
"Bianca"
'86 Brumby - Dual Port Heads, 5 Speed Dual Range, Custom Cam, Tuned Weber, Tuned Suspension, 2" Body Lift Kit, LSD, 14" rims, 2.25" Exhaust, Snorkel, Dual Batteries, DVD Player, UHF, VHF, etc. Offically now part of the 350, 000 km Club! And still pulling like a freight train.

"Claudia"
82 MY Wagon - EA81T, RS Liberty WIAC, 5 Speed Dual Range, Tuned Suspension, 14" Rims 27" Tyres, 2" Body Lift Kit, Apline Head unit, UHF, Roof Console, L Series seats, Soon to have New Paint, snorkel, Dual batteries, etc

'86 Brumby - Dual Port Heads, 5 Speed Dual Range, Custom Cam, Tuned Weber, Tuned Suspension, 2" Body Lift Kit, LSD, 14" rims, 2.25" Exhaust, Snorkel, Dual Batteries, DVD Player, UHF, VHF, etc. Offically now part of the 350, 000 km Club!

"Claudia"
82 MY Wagon - EA81T, RS Liberty WIAC, 5 Speed Dual Range, Tuned Suspension, 14" Rims 27" Tyres, 2" Body Lift Kit, Apline Head unit, UHF, Roof Console, L Series seats, Soon to have New Paint, snorkel, Dual batteries, etc

I run Desert Rats on the front from Speedy Wheels (-14 Offset) and Coyotes on the rear from All Wheels (-20 Offset). This fixed the track width difference for me. Each rim costs about $60
They're 14" rims. Also I've been using Corsa brand mud tyres. They're pretty aggressive 27" tyres for about $80 each.
It's a pretty cheap offroad setup!
They're 14" rims. Also I've been using Corsa brand mud tyres. They're pretty aggressive 27" tyres for about $80 each.
It's a pretty cheap offroad setup!