Page 1 of 3
LED Conversions ...
Posted: Sat Sep 01, 2012 4:36 pm
by Bantum
Thinking of converting your interior lights to LED's ? ...
Thought I'd give a look into something that is easily done, and doesn't cost a lot ...

Here are some off the shelf products that I used ... And corresponding patients ...
 Notes : There are a multitude of suitable product's available on the net ... make sure you get ones that have similar rating ( in W ) to your old one ...
Link : http://www.allcarstuff.com.au/lighting/ ... -kit-l-e-d
Notes : There are a multitude of suitable product's available on the net ... make sure you get ones that have similar rating ( in W ) to your old one ...
Link : http://www.allcarstuff.com.au/lighting/ ... -kit-l-e-d
P.S - This was done for my Brumby, but I'm Sure it could be happily applied to just about any light ...
Add : A summary of this thread can be found here :
LED Conversions ...
Cheers, Bantum ...
Posted: Sat Sep 01, 2012 5:01 pm
by Johnny T
they look pretty good, could you get us a photo of what it looks like when its in your car?
Posted: Sat Sep 01, 2012 5:35 pm
by Brumby Kid
Nice, what are the two lights on the left for?
Cam
Posted: Sat Sep 01, 2012 5:58 pm
by Silverbullet
I'm keen to see what you do with the round main interior light as it only has that little window for the light to pass through and the square bank of LED's doesn't comply with the existing mounts for the original bulb. I've got a square patch of LED's just floating around in there at the moment, I just spin the round thing around until there's enough showing through that little window
")
Posted: Sat Sep 01, 2012 6:06 pm
by Gannon
what are the two lights on the left for?
Puddle lights in the door Im guessing.
LED interior light upgrade
I did it in my Outback a few years ago, but discovered that some LED panels are designed for 12V and dont last very long on 13.8V when the car is running.
I have since converted to 1x3W Cree LED that is driven by a constant current driver so voltage fluctuations dont affect it
I'll get some photos if I can find then
Posted: Sat Sep 01, 2012 6:20 pm
by revmax
SB . The interior light out of an L series works great in a MY and screw straight in. The reading lights from the L are very easily adapted to the MY. You just have to cut a rectangle hole in the roof lining and use the clip nuts that come with speakers to screw into.
Bantum. as Cam said, what are those lights for and where did they come from.
Photos please.
Posted: Sun Sep 02, 2012 8:22 am
by steptoe
Carl - you ripper ! I've only got to the hoard and contemplate stage for the map lights from an L into Brumby head liner - for five years or more

. pinch power from the centre light me thinks. Probably only takes five minutes too !
Yeah, the L centre light is the way to go - a five minute job if that for MY or Brumby. I've thrown a few Brumby light fittings to the shtouse.
Me too is curious as to the other lights - footwell?
Man, just a timed On switch from the dash would be excellent in L and Brumby eh??
Posted: Sun Sep 02, 2012 8:51 am
by revmax
Steptoe yer pinch power form the rear light, this took the longest for me.
run some speaker cable down the roof lining it will go easily.
I have the wedge type LED's in the map light and extra LED strip in the L interior light.
Hint when you use the clip nut thingeys for the map open the clip up slightly so they will go over the lining without dameging it, find screws that go in to the nut easily otherwise the card lining is likley to get damaged if the nut twists


Posted: Sun Sep 02, 2012 9:43 am
by steptoe
Carl, you work at lightning speed, pics included already. Can see this is gonna be a popular conversion now the secret is out
Overhead light ...
Posted: Sun Sep 02, 2012 2:48 pm
by Bantum
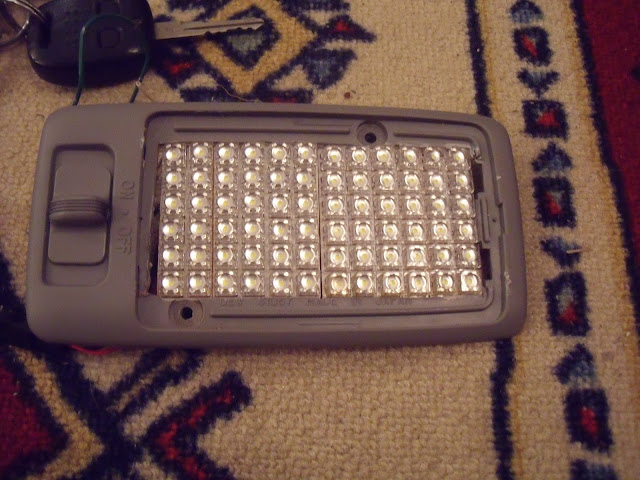
Ok - for the first lot, here is what come's in the kit :
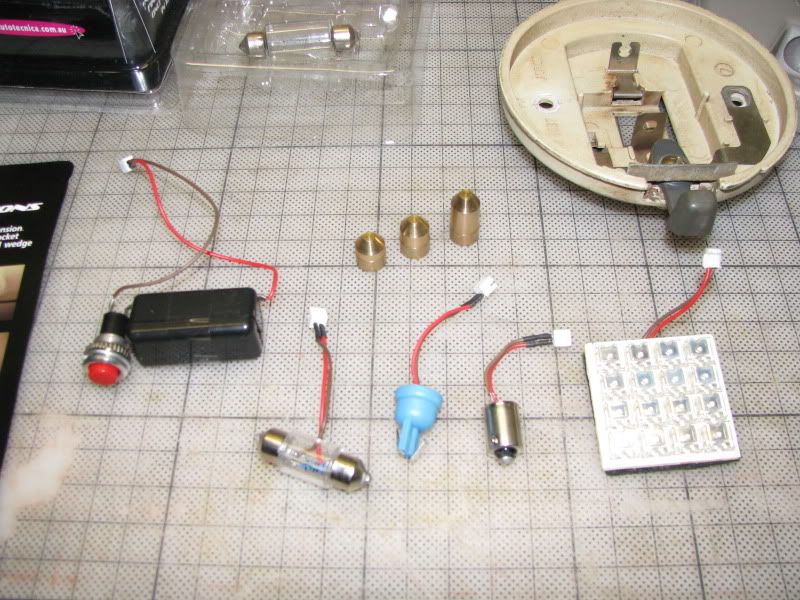 Note : As there are various adaptors & connectors for the light, chose one that best suits ...
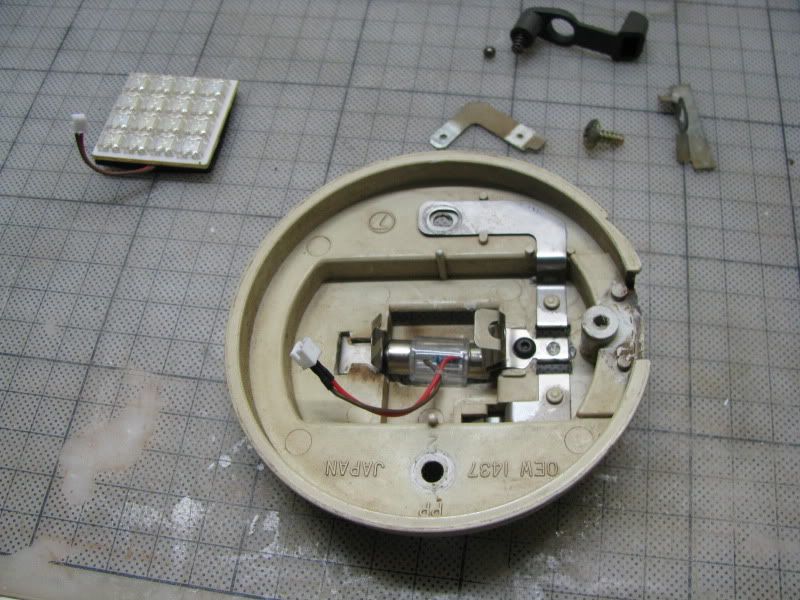
Firstly carefully take apart the light
( Watch out for the spring loaded ball bearing ! ) then put the adaptor in ...
Add : Also take the opportunity while you have it apart to clean-up & fix any binding / broken bits.
 Notes : I've cut out a bit from the back to make it fit as it can be a bit fiddly trying to get it in.
Also the adaptor has a resistor inside to maintain correct amps ... 
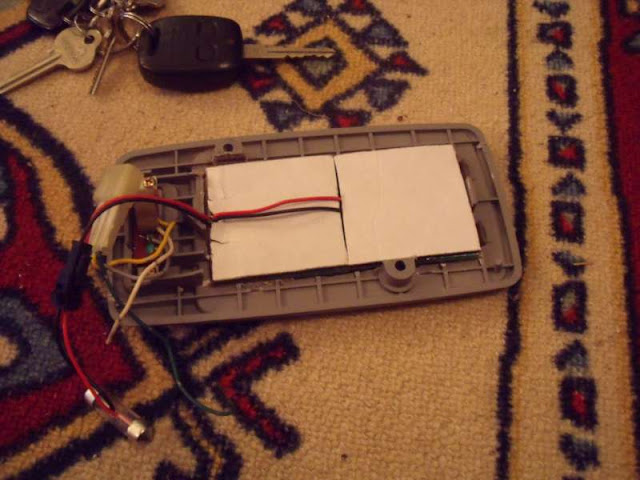
Then Install the light istelf ...
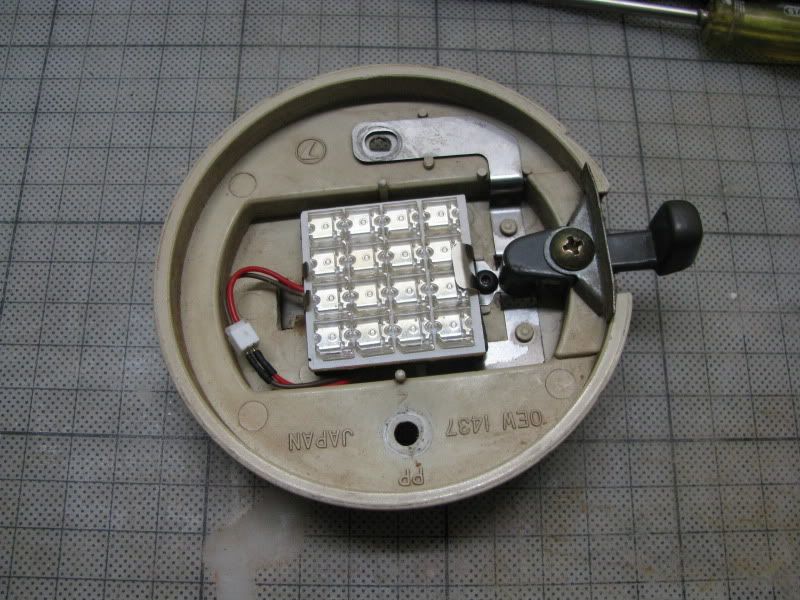 Note : I've used the existing holder, just bent it a bit to make sure it holds ...
Then hook it up to existing ...
 Note : Testing here to make sure it all works + also make sure that the screw fixing completes earth circuit ...
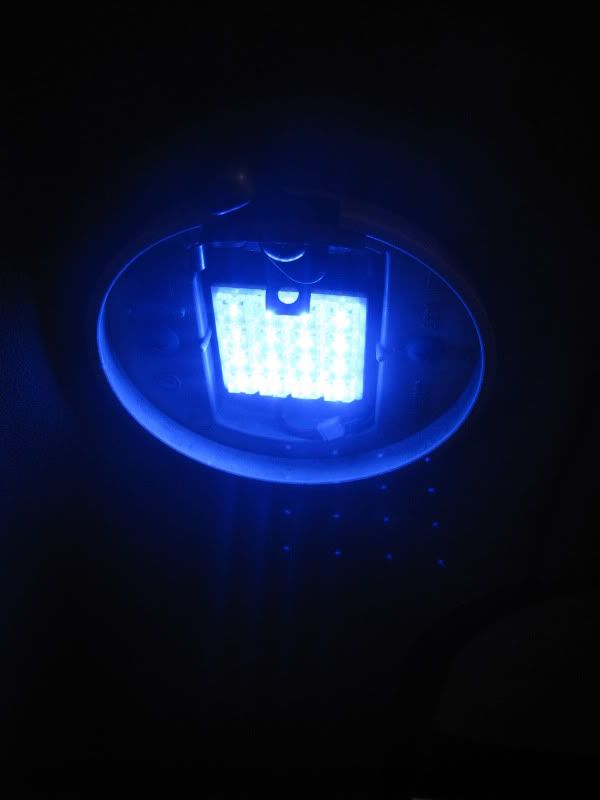
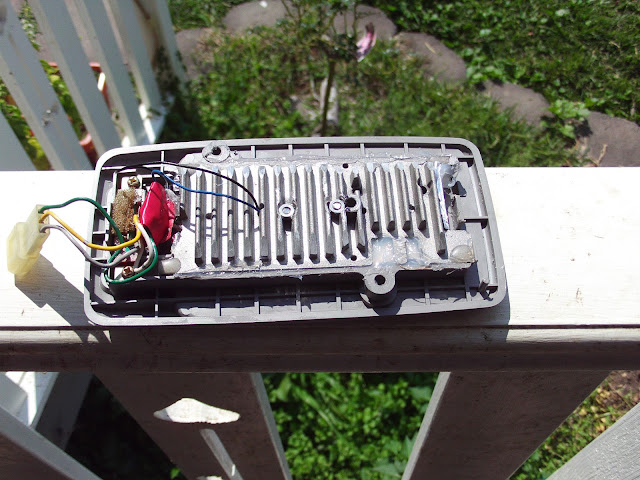
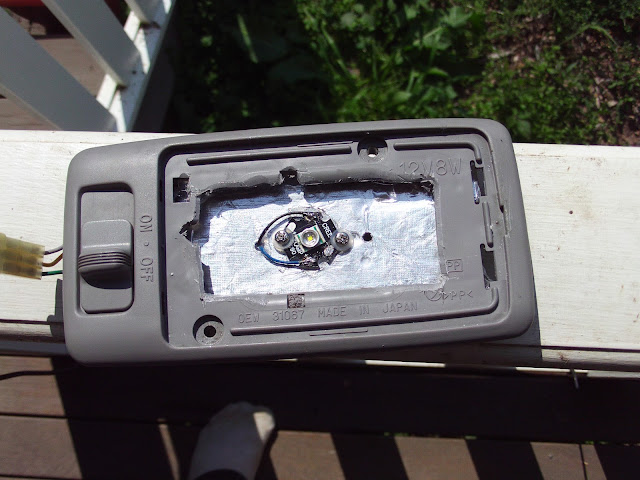
Finally put the light cover back on ...
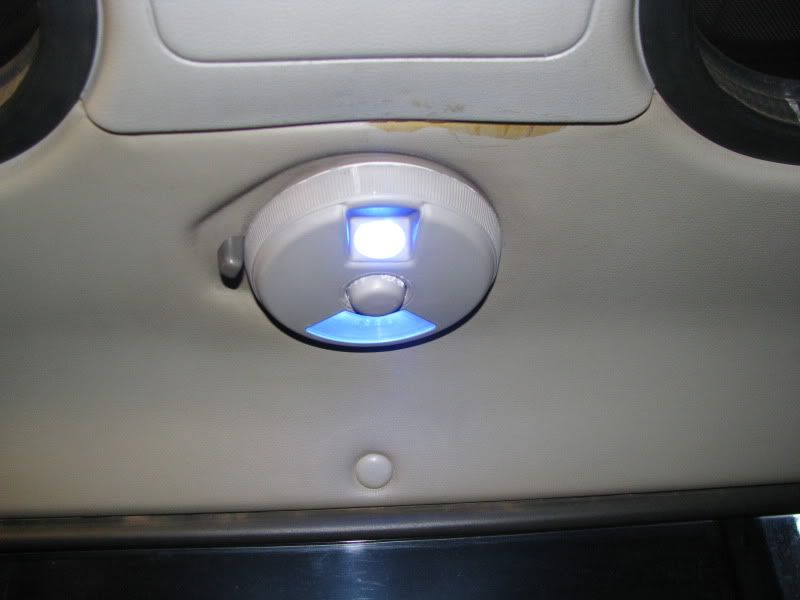
& Presto - Done ...
What is it ? ...
Posted: Sun Sep 02, 2012 3:16 pm
by Bantum
Gannon wrote: ... Puddle lights in the door Im guessing ...
Correct ...

... Will post some more pics ...
Sorry if I've doubled up on yours, as I did do a 'search' before posting this thread, but didn't find anything...

Gannon wrote: ... but discovered that some LED panels are designed for 12V and dont last very long on 13.8V ...
Do tell us more ...

Brumby Kid wrote:Nice, what are the two lights on the left for?
See my next post ...
revmax wrote: ... The interior light out of an L series works great in a MY and screw straight in. The reading lights from the L are very easily adapted to the MY. You just have to cut a rectangle hole in the roof lining and use the clip nuts that come with speakers to screw into...
Yeah that's what I'm going to do next ...

revmax wrote: Bantum, as Cam said, what are those lights for and where did they come from. Photos please.
See my next post ...

Pocket lights ...
Posted: Sun Sep 02, 2012 3:31 pm
by Bantum
Ok - For the next lot :

Note : I got these lights for the door pockets, the're from a early Liberty ...
Installing the light ...
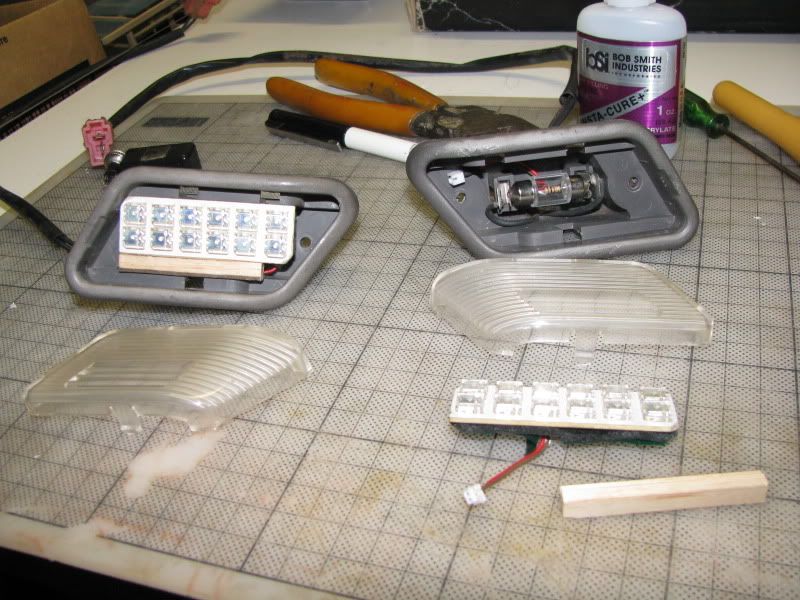
Notes : The adaptor fits in pretty much easily, however the light istself requires a bit of triming and a bit of support glued on the side to stop it from moving, I've used a bit of balsa but you could use plastic or what ever you have laying around.
P.S. - It may not be clear from the shot above, but I had to trim a bit ( filed off ) from both ends of light to make it fit inside the lens - Be carefull not to take to much off though, or you will cut into the circuit ...
Nearly intalled ...
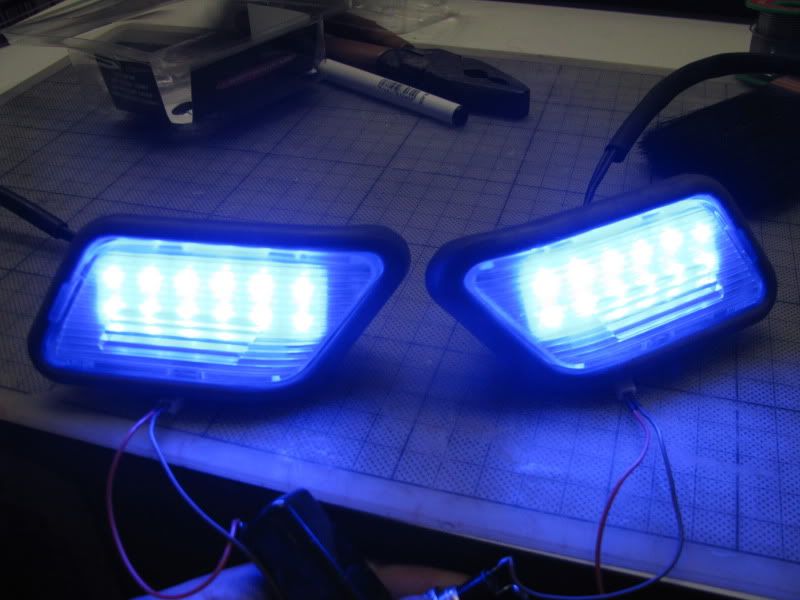
Testing Fitting ...
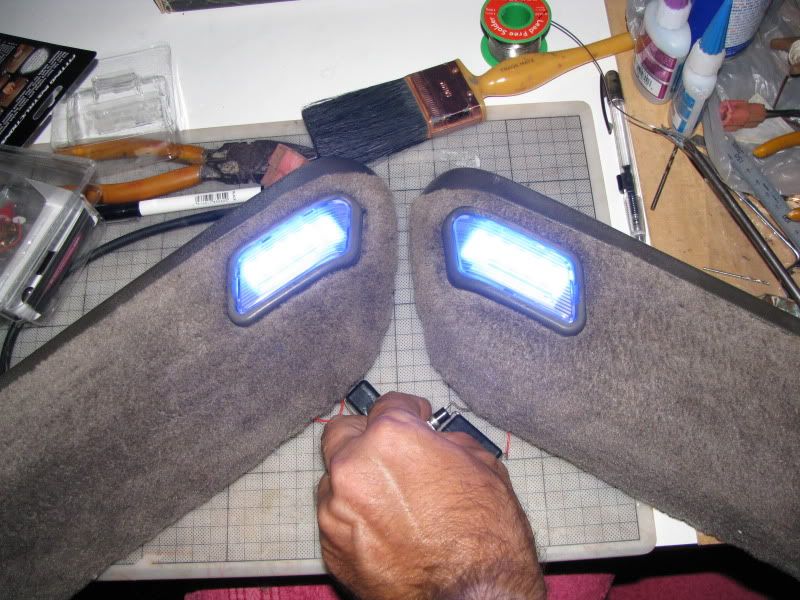
However, this is as far as I got, so you will have to wait untill the next installment ...
Posted: Sun Sep 02, 2012 5:45 pm
by steptoe
Nice touch. I was thinking of footwell lights mounted on my centre radio console.
That Monza packaging with the demo button and little battery pack. I bought their trailer/caravan lights to find they are not ADR ( now they say they never claimed they were - WTF call them suit caravan etc ??) the lenses have faded to opaque from clear in six months outside
Posted: Sun Sep 02, 2012 6:13 pm
by sven '2'
Nice work
Do you have a link for the LED kits please?
Kits ...
Posted: Mon Sep 03, 2012 3:13 pm
by Bantum
I got mine from Repco, but you can also look them up here :
http://www.allcarstuff.com.au/lighting/ ... -kit-l-e-d
Cheers ...
Posted: Mon Sep 03, 2012 4:21 pm
by yarney
Great post bantum
Jan
Posted: Mon Sep 03, 2012 5:01 pm
by El_Freddo
This looks much better than the way I did the brumby's interior light - huge round fluro! Makes night into day.
If anyone is going to upgrade their interior light do it this way!
Cheers
Bennie
Posted: Mon Sep 03, 2012 6:21 pm
by Gannon
Bantum wrote:
Do tell us more ...
Well I started out with this
Which worked too well and was like having a highbay light in the car and was way too bright.

The issue was that after about a month, individual dies (the LED chips) started to flicker and die. On closer inspection, the normally yellow centre had turned brown and this is because they were driven with too much current and they had burnt out. I put this down to poor design as the current limiting resistors were 47 ohms which gives 50ma at 12v, but it should have been 100 ohm resistors for the normal 14v car voltage.
So I went in another direction....
I got a 3W Cree star emitter and a constant current driver, which keeps the current at a constant 350mA irrespective of the supply voltage.

Being a large 3W device it needed some means of dissipating heat, so I grafted a aftermarket cd player heatsink into the interior light and the result was...
I also put one in the boot light and made a heatsink using some alloy angle

I'll go get a shot of it in the car after I've fed the boy
Posted: Tue Sep 04, 2012 8:10 am
by steptoe
Aha, I've had a few LEDs turn brown in a 12V downlight fitting dirct from HK, fed it directly from a std downlight tranny of 50 or 60W. Have since rad some trannys don't like too low a demand on them like 10W, that one may have been.
Matching Ratings ...
Posted: Tue Sep 04, 2012 6:30 pm
by Bantum
steptoe wrote:... Aha, I've had a few LEDs turn brown ...
Yeah, I've come across a few of those too ! ( also some that don't meet expectations ) I suppose it's all about matching your existing light with an equivilent in L.E.D. & try not to over do it ...

One thing I did find with the dome light & brightness was with the choice of colour, a White light would be fine, but I chose Blue to match a theme I'm trying to develop for my Brumby. So it ended up being a bit 'duller' than the White, but if I take off the shroud - It Still give's off plenty of light ...