new aluminium radiator for MY Touring wagon

Get the most out of your Engine / Gearbox with these handy hints ...
Post Reply
User avatar
henpecked
Junior Member
Posts: 443
Joined: Fri Dec 05, 2008 7:20 pm
Location: South Oz

new aluminium radiator for MY Touring wagon

Post by henpecked » Wed Dec 31, 2014 6:48 pm

Have an Auto MY touring wagon with A/c - so it has two electric fans - which really needed a new radiator- after all its over 30 years old now. It was leaking a little fluid and seems to have had a previous repair;
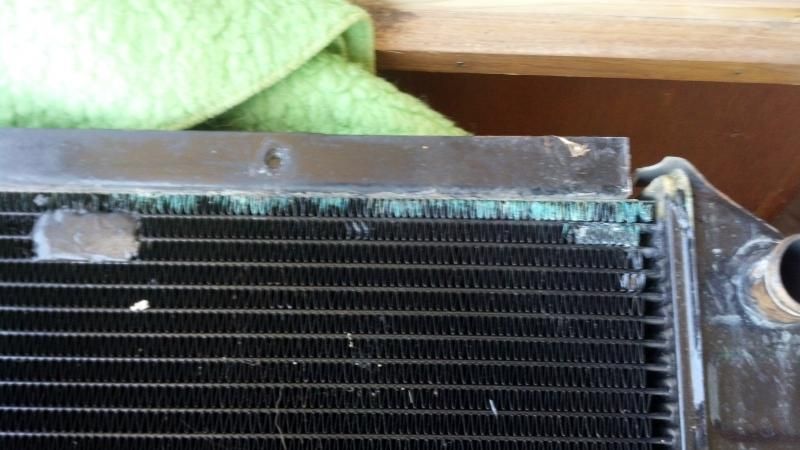
here it is removed with leakage now visible and some freaky epoxy like blob presumably forming a seal over a hole.

Image

I got a new radiator from here

http://www.ebay.com.au/itm/311183517034 ... 1439.l2649

if you have a electric fan instead of the engine mechanically driven one then there are a few things to note:

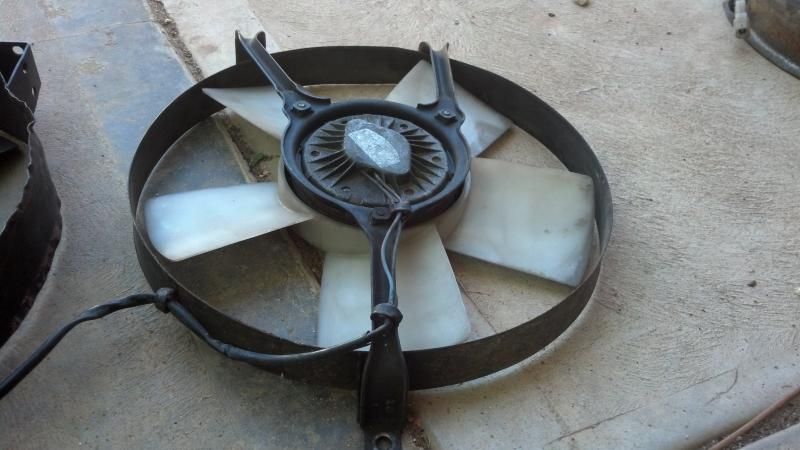
this Radiator has a thicker fin/core depth so IF you have one of these fans

Image

there will be tears

as that fan is fine for the original radiator as it fits such that the fan and shroud actually locates below ( inserts further towards the core) than the fan mounting points on the radiator flange/frame. On the new radiator the shroud and the fan will score against the core.

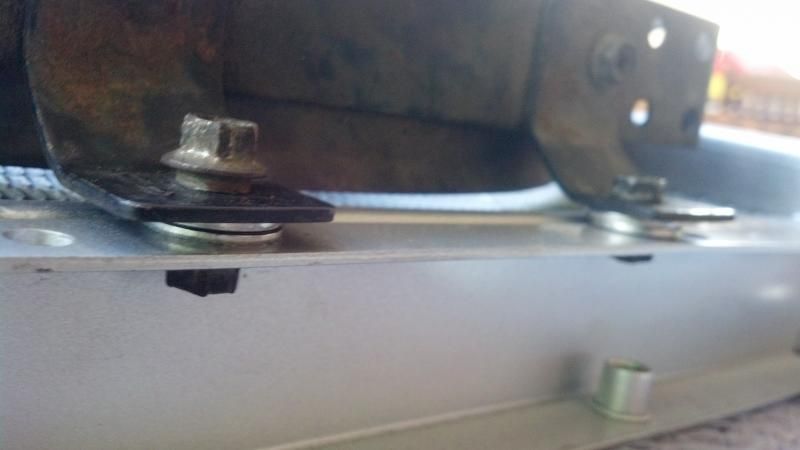
this shows the rebate that exists with the original radiator that WIC's thermo fan lowered its "face" into.

Image

this new aluminum radiator does not have such a large rebate difference is probably the original 10mm moving to only 2mm:

so you will need to get one of these

Image

off another MY

OR get a davies craig 12" fan and fit it to the radiator after fitting the A/C fan and BEFORE inserting the new radiator. The DC fans attach with bolts actually pushed through the core - and you can't do that with the radiator in place. The DC catalog gives the 10" normal as the proper replacement - this is not necessarily true as the 10" is actually thicker than the 12" and I think will foul on the pulleys - , and even the thin 10" is only 1mm thinner than the 12", and also the "factory" thermo fans are 12" so moving down to a 10" may not be the best thing either.

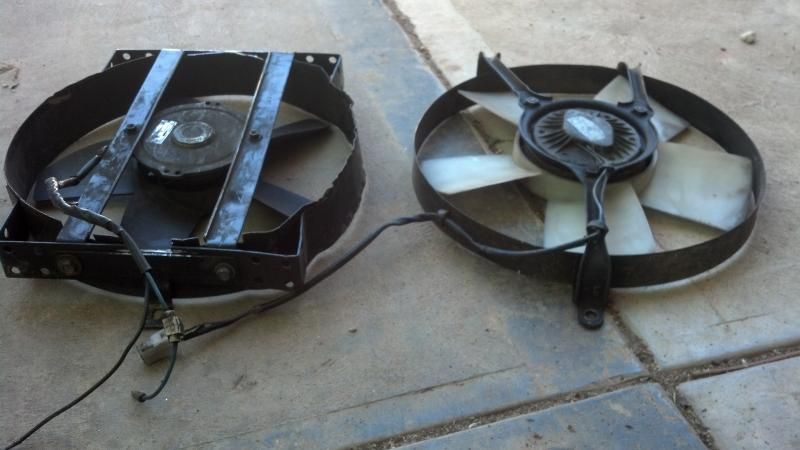
this shows the difference in depth between the "factory" fan wic (MY Touring Wagon) had on the left , and the "Factory" fan in BOTH the Brumby and in the parts wagon I had on the right - which was not a touring wagon but which did have A/C.

Image

if you try to pack the old fan out like this

Image

it will now clear the core, but will foul the engine pulleys.

So - to the steps

1) removing water hoses and disconnecting the two fan electrical connections and the thermo sensor wire was simple - however I found it useful to put some duct tape on the top Auto fluid hose so I knew which one was to go where, and I found that by cutting a zip tie before loosening the worm drive clamps and detaching the hoses , I could pull the Auto fluid hoses off the radiator and underneath the A/C compressor and pullthem up high enough that there was essentially no leaking of the fluid. This meant when I re-attached them to the new radiator I found that the auto fluid level had not changed - bonus !

So - I then simply

2) removed the old radiator with both the fans attached;

3) then fitted only the the A/C fan and shroud to the new radiator

4) Then relocated the temperature sensor from the old radiator to the new one ( simple screw in)

5) as its auto I need to fit the two pipes that were supplied in the radiator box to the inlet and outlet of the new radiator for the auto fluid. I used a permanent gasket goo from permatex just to make sure the connection was solid for the tubes, make sure you have them in the correct positions and pointing downward so the hoses can reach properly.

6) then fitted the radiator

7) then fitted the new/old electric fan - making sure I did the left top mounting point first with the original nut and bolt ( loose) then did the bottom mounting point ( captive nut ) before doing the second top bolt and nut, and then tightening all three up.

8 ) connected all 4 hoses back up and the two electrical connections for the fans

9) connected the temp sensor wire

10) put water in the radiator. ( after the thermostat has opened and the fan started and stopped - that is AFTER the temp gauge has shown 5 bars then moved back down to 3 with the thermo fan starting up - working- and then shutting off , turn off the engine, let it cool down totally , and then add more water ( do this whole sequense twice) - which will / should avoid air chambers in the block and radiator.


it now works fine.


for those with the digi dash here is the order of action at start up and idle

1) temp gets to 4 bars
2) thermostat opens and temp goes to three bars with the cold radiator water making its way into the block
3) temp rises to 5 bars and stays there for a minute or so before the thermo switch kicks in and starts the fan and takes it back down to three bars, and then turns off.
4) repeats to 1 above.

1) so far the A/C fan only comes on with the A/C on, but if you turn it on at 4 bars the temp soon drops to 3 bars before it starts climbing again. - I don't know it it ever hits 4 bars or not, or even if it gets to 5 for the other fan to start up.

User avatar
TOONGA
Elder Member
Posts: 5335
Joined: Sat May 30, 2009 10:15 am
Location: Australind closer to where they divided by zero
Contact:

Post by TOONGA » Thu Jan 01, 2015 9:39 am

That is a good looking radiator, a few more pictures of it in place showing how it fits in relation to the motor would be nice.

Do they make one for the "L"?

TOONGA
Image
PJ Gone but not forgotten
JETCAR AKA the sandwedge Rusted in pieces

User avatar
henpecked
Junior Member
Posts: 443
Joined: Fri Dec 05, 2008 7:20 pm
Location: South Oz

Post by henpecked » Thu Jan 01, 2015 9:56 am

car is now away for few days , so no more pictures until it gets back, but the radiator was in exactly the same frame dimensions as the original, except for the 7 - 10mm thicker core (at least that much - as that is the only the depth of the front rebate that disappeared - don't know if there was more beef inserted on the other side.) .

So no discernible differences, even the "old" fan would have fit - except that having to shim it's face away from the core made it impossible to get the old fan to clear the crankshaft end. The old fan was a good 62mm deep , the "new" old fan was about 51mm, which is the same depth as the DC standard 12" fam.

The radiator sat in the same rubberized attachment points , and had the same captive nuts and other bolt holes, and threaded holes for the temp sensor , drain plugs and auto cooler ports.

Could not be happier with it.

I'm thiking of getting one more for the brumby, even though the brumby appears to have a replacement brass radiator already.

they don't advertise any L series, there seems to be three plastic tanked ones on ebay - one here
http://www.ebay.com.au/itm/HDuty-Alloy- ... 35c1f0b201

User avatar
Nubaru
Junior Member
Posts: 165
Joined: Fri Jan 10, 2014 8:02 am
Location: within the girth

Post by Nubaru » Thu Dec 17, 2015 6:46 am

hmmm, may have helped if I had seen this post ...there was another more recent with a link to possibly same seller. I got one for 145 plus 15 postage and have two electric AC fans in to deal with when time comes to fit. Also got a twist to the radiator and a tell tale orbital sander gouge in the side of one tank. But, given the price of a 'service' of an old radiator being close, this will have to do. Like henpecked, I will come back with an update if I can find post at the time :)
member since 10january2014 #6191

User avatar
Cliff R
General Member
Posts: 1061
Joined: Sat Feb 07, 2009 11:07 am
Location: Muswellbrook/NSW

Post by Cliff R » Sun Dec 27, 2015 8:19 am

Very timely post this, thanks for that.
I am looking at replacing the radiator in the 82 MY Touring wagon which has the 2 x electric fans.
Will look at the fan depth measurements.

User avatar
steptoe
Master Member
Posts: 11582
Joined: Thu Oct 06, 2005 10:00 am
Location: 14 miles outside Gotham City

Post by steptoe » Tue Dec 29, 2015 10:18 am

must be about the time to do these old girls - odd hot flushes happening :) :slap:

think mine is beyond a rodding and reseal so went with a China ebay seller from Melbs. My fans cleared (from the looks) just had to make some extra holes beyond what they supply and this may be due to I think I am running L Series cooling fans. Glad I have a nutsert tool kit, won't be droppng my nuts. So, no packer washers required as mentioned above.

The core looks to be an extra 7mm wider (or a 7mm wider gap between the twin cores) am guessing this is the unique thing they claim to have on the ebay site $160 delivered people.

User avatar
Cliff R
General Member
Posts: 1061
Joined: Sat Feb 07, 2009 11:07 am
Location: Muswellbrook/NSW

Post by Cliff R » Sat Jan 30, 2016 4:31 pm

Henpecked
Just wondering, do you know if this new alloy radiator off ebay a twin core ?

User avatar
Silverbullet
Senior Member
Posts: 2867
Joined: Mon Aug 23, 2010 6:20 pm
Location: Adelaide

Post by Silverbullet » Sun Feb 21, 2016 2:30 pm

Just getting round to fitting my ebay special to the wagon now, having a few problems :( Not so simple as just dropping it in where the old one went. Seems they have a very loose assembly jig when they weld the brackets on where the mounting holes go, or very open tolerances on where the holes should be. The bottom locating pin holes are in the right place roughly, just spaced way too far away from the rad so I end up with the situation in pic below. Originally I couldn't even get the top of the rad under the lip in the bodywork inside the engine bay, had to grind 5mm off the top for it to fit under while squashing the rubbers down below.

I'm thinking I will just cut a big square piece out of the rad to remove these riv nuts, weld a thicker blank piece of ally over the gap and drill my own holes.

And I'm just now realizing my wagon doesn't have any mounting points for the A/C condenser either! :-o

Image
Attachments
20160221_142751.jpg
20160221_142751.jpg (116.06 KiB) Viewed 2305 times
Will it ever end!?
-EA81 TWIN CARB!!!!
-L series 5 speed
-Custom paint job
-2" lift
-Full custom re-wire
-L series front end
Image

Post Reply

Return to “Engine, Gearbox and Diff”