EA81 into trike VW automatic

For those that have a 2 wheel affliction, share away here !
User avatar
Tweety
General Member
Posts: 1253
Joined: Mon Jul 04, 2011 9:45 am
Location: ea81 powered trike Victoria

Post by Tweety » Fri Aug 19, 2011 10:42 am

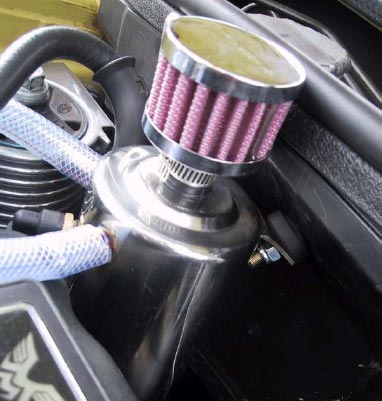
Ok found my pcv valve and I'd taken it off.

relocated it and re routed the hoses. hose from cylinder number one side to intake. other hose to pcv valve.

cant help thinking it isnt fully correct. I say that cause the origianl air cleaner has a port on the alt side for the valve cover hose ofr that side. maybe there is a 'T' section somewhere? here is the pics

Image

Image

User avatar
TOONGA
Elder Member
Posts: 5339
Joined: Sat May 30, 2009 10:15 am
Location: Mandurah where they divided by zero
Contact:

Post by TOONGA » Fri Aug 19, 2011 10:49 am

Tweety wrote:Dug up this thread

http://70.85.249.34/~byb555/forum/showthread.php?t=6433

Seems to me if I am correctly understanding.... that the breather hose from the valve cover on the dizzy side has to suck air from the air cleaner. The alt side valve cover hose goes to the pcv valve.?
yes thats correct

Image

the black arrows show direction of air flow and I added the dizzy and a black rectangle for the altenator.

If you don't want to plumb the piping to the air cleaner, a small aftermarket air cleaner can be used on the Distributor side of the engine to allow air in.

this type would work fine
Image

EDIT: you made another post while i was adding bits to the picture:)

the other pipe mixes fresh air into the PCV gases so it isn't all oily gas going into the manifold.

a T piece and one of the little air cleaners pictured above would help out

TOONGA
Image
PJ Gone but not forgotten
JETCAR AKA the sandwedge Rusted in pieces

User avatar
Tweety
General Member
Posts: 1253
Joined: Mon Jul 04, 2011 9:45 am
Location: ea81 powered trike Victoria

Post by Tweety » Fri Aug 19, 2011 1:58 pm

Great mate. Easy now.

I've got a "T" peice I used to connect those two hoses near the top of the adapter that I'll use and source out a small air filter.

I am concerned that the sucking side is now mounted on top of the carbie rather than the beginning of the original air filter. At the original location it would suck in clean air as it enters the beginning of the air filter but where it is there would be vacuum there and therefore the engine could be sucking air from the valve cover rather than allowing air to enter it.

Am I correct and if so I'll need to blank that hole off and get a second mini air filter for that hose.

User avatar
TOONGA
Elder Member
Posts: 5339
Joined: Sat May 30, 2009 10:15 am
Location: Mandurah where they divided by zero
Contact:

Post by TOONGA » Fri Aug 19, 2011 3:48 pm

in theory it can do that, but remember that the air is being purged from the crankcase via the PCV valve.

the mini air filter option will work, if you are worried that the carby will create too much opposing force.

TOONGA
Image
PJ Gone but not forgotten
JETCAR AKA the sandwedge Rusted in pieces

User avatar
Tweety
General Member
Posts: 1253
Joined: Mon Jul 04, 2011 9:45 am
Location: ea81 powered trike Victoria

Post by Tweety » Fri Aug 19, 2011 6:17 pm

cheap as chips.

http://www.ebay.com.au/itm/MINI-AIR-CRA ... 3a65b0cc19

will get two. Blank off the top carbie hole. place one on a "T" on its way from RHS hose to PCV. The other at end of hose near top of adapter.

Very clear now Toonga. thankyou very much.

User avatar
TOONGA
Elder Member
Posts: 5339
Joined: Sat May 30, 2009 10:15 am
Location: Mandurah where they divided by zero
Contact:

Post by TOONGA » Fri Aug 19, 2011 7:07 pm

not a problem Im hoping it all works for you

TOONGA
Image
PJ Gone but not forgotten
JETCAR AKA the sandwedge Rusted in pieces

User avatar
Tweety
General Member
Posts: 1253
Joined: Mon Jul 04, 2011 9:45 am
Location: ea81 powered trike Victoria

Post by Tweety » Sun Aug 21, 2011 9:50 pm

EA81 ignition query...

The old emchanic that previously owned my ea81 told me the ignition timing was set at 6 degrees BTDC. give or take one degree as he installed the new electronic dizzy.

I have read that the ignition timing marks are on the flywheel. but I've taken that off and this week will replace that with the auto flex plate from Shermans.

How do I time my engine? the crankcase pully has a notch but no markings.

User avatar
TOONGA
Elder Member
Posts: 5339
Joined: Sat May 30, 2009 10:15 am
Location: Mandurah where they divided by zero
Contact:

Post by TOONGA » Mon Aug 22, 2011 11:08 am

DANG I forgot all about that sorry Ratcamper had the same problem and he has had to make a scale up.

If I had remembered I could have told you to mark a scale on the front using the marks from the original flywheel.

I cant remember which of his threads it is in sorry

you may be able to get a memeber to do it for you from their motor

TOONGA
Image
PJ Gone but not forgotten
JETCAR AKA the sandwedge Rusted in pieces

User avatar
Tweety
General Member
Posts: 1253
Joined: Mon Jul 04, 2011 9:45 am
Location: ea81 powered trike Victoria

Post by Tweety » Mon Aug 22, 2011 1:50 pm

After reading up so much on the topic I get it now. that rear flywheel eh...has the markings.

Its ok. will seek out a friendly brumby owner or such. Or be inventive and make up a mark at 6 degrees BTDC. Although my mechanic mate reckons 6 and I read everywhere its 8 (?) BTDC

I imagine the crankcase pulley turns anti clockwise as you look at it. So a mark at one fifteenth of 90 degrees would be 6 degrees. I'll make up a circle the same size as the crank pulley, on the drawing mark 90 degrees, divide that by 15 and that would be 6.

Away from home for 2 days so cant measure it but say the pully is 6 inches diameter, circumference = 2 py r. 2x3.1412x3 inches =18.85" divided by 4 =4.712" divided by 15 = .3141" for 6 degrees. about 5/16ths ".

Double checking calculations. 5/16ths x 15 = 75/16ths = 4.69" = yep close enough.

can make up a gauge.

BUT, this is for a pully 6" diameter and a guide only. When I do the full calculation I'll place them here.

So a formula would be.....

Circumference (C) of pully = 2 x (Py) 3.1412 x radius

C divided by 4 makes length of one quarter of the pully circle (QC).

Desired degree of BTDC distance form TDC (assuming its all at the centre of engine halves and on the notch of the pully) depends on the amount you divide this QC figure.

10 degrees BTDC would be QC divided by 9
8 degrees BTDC would be QC divided by 11.2
6 degrees BTDC would be QC divided by 15


My only problem now is will this be using that sole notch on the pully (assuming it is a TDC point) and the line between where the two engine halves are joined???? as the TDC master point?

Sticky one eh Toonga?

User avatar
TOONGA
Elder Member
Posts: 5339
Joined: Sat May 30, 2009 10:15 am
Location: Mandurah where they divided by zero
Contact:

Post by TOONGA » Mon Aug 22, 2011 4:01 pm

Ok I read this went and had lunch came back and read it again.

Depending on who you talk to the brumby motor runs at 6 degrees BTDC others will say 8 degrees BTDC and if you run it on Premium 98 10-12 degrees BTDC

mine says 6 degrees BTDC on the bonnet sticker

now for the math part ... I'm an art teacher :) but it is a sound theory. I would still be checking it against a motor with a subaru flywheel attached.

You need to find top dead centre on number one. then where ever the mark on the pulley is that is theoretically top dead centre.

TOONGA
Image
PJ Gone but not forgotten
JETCAR AKA the sandwedge Rusted in pieces

User avatar
Tweety
General Member
Posts: 1253
Joined: Mon Jul 04, 2011 9:45 am
Location: ea81 powered trike Victoria

Post by Tweety » Tue Aug 23, 2011 7:47 am

all good Toonga...its not something that cant be overcome. So will put that on the backburner till its started.
I will be getting my seals and other bits this week. Have decided to buy a jeep radiator and willlook around for a brass one 2-3 core and it will be mounted at the rear of the trike. Usually this location is a little - well not attractive, but it will only be 270mm high and not that noticable.

Art teacher eh? off topic for a moment but my 22 year old daughter finishes uni this year to be an Art and maths teacher. Here are two of her drawings/painting done when she was 17-18y.o.

Image

Image

User avatar
steptoe
Master Member
Posts: 11582
Joined: Thu Oct 06, 2005 10:00 am
Location: 14 miles outside Gotham City

Post by steptoe » Tue Aug 23, 2011 9:06 am

Nice work. I recall being stunned to see what a 15 year painted when I was at school - same standard as above. She had come a long way since we were in y5 and 6 throwing balls at each other in the dark sports store room one lunchtime - when a rattle at the door as the Principal opened up with his master key :D . Luckily that event did not affect her skills later in life. I have trouble line drawing a square!!

On the timing, your ike (EDIT, sorry, trike, ike has one wheel) is so light surely a degree or three advance is not going to hurt - more benefit things? Tune the baby to ear, or have you seen the marker plate bolted to the water pump of EA82TS (S for spider inlet manifold) you could make similar bracket, markings on it and crank pulley for later tunes

User avatar
Tweety
General Member
Posts: 1253
Joined: Mon Jul 04, 2011 9:45 am
Location: ea81 powered trike Victoria

Post by Tweety » Tue Aug 23, 2011 4:41 pm

those were the days eh Steptoe.....a girl in a dark sports room..mmmm pity I went to an all boys school!

I'll have a look at that ea82TS water pump marker. sounds good.

Till then this is what I've done.

Found number 1 TDC like toonga said. That notch on the outer crank pulley lined up with the centre of the join of the block halves. Too coincidental I reckon...must be TDC.

Had a look at the original flywheel and checked out its timing marks (hadnt seen them before). Drew pencil lines from the centre of the flywheel to the 6 degree mark and 10 degree mark. the notch on the crankcase pulley outer (for aircon belt) was marked on the inner ALT pully to give it its own notch. This smaller pulley is 4.5 inches diameter.

Went back to the flywheel and measured 2.5 inches from centre then measured between the marks. a quarter of an inch for 6 degrees, 3/8ths for 10 degrees.

I agree with the concept of tuning by ear. Subaru's are new to me and I'm falling in love again.... but a few decades ago when I rebuilt a few Lotus engines (twin cams seen in Escorts, lotus cortina's, elans etc) the foolproof way was to advance it until when driving uphill in a high gear the pinking began (probably not telling you guys anything you already know but for other novices!) then back it off 2 degrees or until the pinking disappeared. So although the mechanic owner said 6 degrees and obviously, being an older guy that cared for his machines he left it there, I will try a couple of degrees advanced to test the acceleration and towing effects.

User avatar
Tweety
General Member
Posts: 1253
Joined: Mon Jul 04, 2011 9:45 am
Location: ea81 powered trike Victoria

Post by Tweety » Sat Aug 27, 2011 8:25 pm

Ready to strart up in the morning only for a few seconds as I havent got a radiator yet.
Electric fuel pump hooked up (safety cut off switch to come), all electrics at this point seem ok (labelled most things) Exhaust is to get me to the exhaust shop only. roo deterant

Image

I had made a small pulley arrangement for the throttl BUT too much friction. ended up making this set up witha cable that doesnt snake and a lever that is simple.

Image

I have swapped ideas on radiator location mant times. finally I am to order a custom one that will fit vertically over the transaxle. even though I reversed the oil filler it is still too far to the front so will get my engineer to alter it to angle rearward clear of that radiator. Radiator to be about 850mm wide, 260mm high and up to 40mm 3 core thick. plenty of wind from the sides available. two small thermo fans maybe 3 or 4.

Image

Bit nervous starting it up. I'm no mechanic, in fact I'm a poor back yarder too. When younger I owned a Lotus powered car. It needed head work. I ended up pulling that head off 4 times before I got it to run. 1/ forgot to install a oil drain tube that sandwiches between head and block 2/ chain driven twin OH camshafts and chain had a split link...dropped it as I tried to connect it and down to the sump it went 3/ didnt syncronise the cams and bent all 4 inlet valves on the pistons 4 forgot to cut out the S/steel off the cheaper headgasket that would have coroded the alloy head. was an expensice excercise. hope I have success in the morning...

User avatar
El_Freddo
Master Member
Posts: 12637
Joined: Tue Oct 04, 2005 10:00 am
Location: Bridgewater Vic
Contact:

Post by El_Freddo » Sat Aug 27, 2011 8:39 pm

Tweety wrote: Image
You couldn't dig up two cheap cannons at the very least could you?? :p

Cheers

Bennie
"The lounge room is not a workshop..."
Image
El Freddo's Pics - El_Freddo's youtube

User avatar
TOONGA
Elder Member
Posts: 5339
Joined: Sat May 30, 2009 10:15 am
Location: Mandurah where they divided by zero
Contact:

Post by TOONGA » Sat Aug 27, 2011 8:56 pm

not only will that be loud (should sound like a Harley on elephant steroids) it will probably throw flames when you decelerate.

nice to see it all coming together, any chance of a video when you start it?

TOONGA
Image
PJ Gone but not forgotten
JETCAR AKA the sandwedge Rusted in pieces

User avatar
FROG
General Member
Posts: 1409
Joined: Fri Feb 23, 2007 12:41 pm
Location: UNDER THE SOUTHERN CROSS GRIFFITH NSW
Contact:

Post by FROG » Sat Aug 27, 2011 9:34 pm

TOONGA wrote:not only will that be loud (should sound like a Harley on elephant steroids) it will probably throw flames when you decelerate.

nice to see it all coming together, any chance of a video when you start it?

TOONGA
I ran my ej22 with just engine pipes on in a tin shed :D:D it was deafening :cool:

and yes please video of start up Tweety
ImageImageImageImageImage
GRAB THE VIN FROM DONOR VEHICLES
AUSubaru member specials
Brumby EA81 Oil Pump kit (4 x 'o'rings + gasket) posted Australia wide $22!
Brumby sloppy shifter bush kit $44 posted
email me
http://www.domsmotors.com.au
NOW DISTRIBUTING FOR SUBAXTREME BASH PLATES, NUDGE AND BULLBARS

User avatar
Tweety
General Member
Posts: 1253
Joined: Mon Jul 04, 2011 9:45 am
Location: ea81 powered trike Victoria

Post by Tweety » Sat Aug 27, 2011 10:02 pm

have been thinking about that. ones that I can reuse on the new system...

yep...video. have never uploaded one but there's always a first time!

User avatar
Silverbullet
Senior Member
Posts: 2921
Joined: Mon Aug 23, 2010 6:20 pm
Location: Adelaide

Post by Silverbullet » Sun Aug 28, 2011 12:04 am

Tweety wrote:Bit nervous starting it up. I'm no mechanic, in fact I'm a poor back yarder too. When younger I owned a Lotus powered car. It needed head work. I ended up pulling that head off 4 times before I got it to run. 1/ forgot to install a oil drain tube that sandwiches between head and block 2/ chain driven twin OH camshafts and chain had a split link...dropped it as I tried to connect it and down to the sump it went 3/ didnt syncronise the cams and bent all 4 inlet valves on the pistons 4 forgot to cut out the S/steel off the cheaper headgasket that would have coroded the alloy head. was an expensive excercise. hope I have success in the morning...
Sounds a bit like my experiences :mrgreen:

Been waiting on an update to this thread, it looks great! can't wait to see it going. Video is easy, if you don't already have one make a youtube account, click upload and post the link here when it's done. Don't even have to bother writing a description or tags if you don't want.
Will it ever end!?
-EA81 TWIN CARB!!!!
-L series 5 speed
-Custom paint job
-2" lift
-Full custom re-wire
-L series front end
Image

User avatar
Tweety
General Member
Posts: 1253
Joined: Mon Jul 04, 2011 9:45 am
Location: ea81 powered trike Victoria

Post by Tweety » Sun Aug 28, 2011 2:00 pm

doesnt kick. no spark. took spark plug out and rested it on the engine and turned it over. got plenty of fuel plugs are wet.

got power to the electronic dizzy. the cap off, button off, and the yellow and black wires BOTH have power. mmmmmhope thats how its suppose to be.

coil- black wire to positive, yellow to negative. turns over ok, plenty of compression.


ok. coil checked --has two wires from electrinic dizzy (yellow and black) black to +ve and yellow to -ve as per this pic.

+ve on right hand side.

Image

This connector is the main loom connector to the front of the trike- wire wires

Image

- main alt wire thicker than others direct from battery to alternator (checked)
- one wire to oil sneder (checked)
- one wire to +ve of coil (although I had this to the -ve of the coil initially so better go out and check if I blew a fuse)
-two wires to negative (labelled -ve but dont know if that is negative to coil or earth) tried both no change.
- small alt wire for dash light.

The two wires hanging down are the temp gauge and second small alternator wire.

am at a loss....

Post Reply

Return to “Bike Projects”