Page 1 of 1
Bonnet adjustment MY series ?
Posted: Sun Dec 28, 2014 5:32 pm
by henpecked
the bonnet began to catch on the forward edge of the grill panel ( scuttle) in front of the windscreen, only on the way up.
checked the FSM's and took the scuttle panel off and checked the bonnet hinges - not adjustable , but loosened them off and used a hammer and a block of wood to make sure they were as forward as possible - then tightened back up
replaced the scuttle , making sure it was into the tabs under the windscreen and screwed down tight
- the bonnet still caught on the way up
took the bonnet off and discovered that there seem to be NO adjustment at the bonnet end of the hinges, as the nuts are all captive on the bonnet flange side, and the holes in the bonnet hinges are NOT elongated.
So how to fix other than by drilling elongated holes in the bonnet end of the hinges ?
and if so - in what direction to elongate ? front one only down on both arms ( to lift the rear edge of the bonnet ) or BOTH forward ( to move whole bonnet away from the windscreen)
anything that I am missing here ?
Posted: Sun Dec 28, 2014 7:19 pm
by Silverbullet
The forward/rearward and up/down position of the bonnet should be adjustable, just loosening the 4 bolts slightly and shifting the bonnet by hand you should get enough to clear the scuttle/cowl panel. The holes aren't elongated but on mine at least the hole in the hinge piece is quite a bit bigger than the bolt, gives enough movement to shift it around.
There is no sideways adjustment which really bothered me; when I got my wagon back from the paint shop the bonnet clipped the front of one fender even with the fender adjusted as far over as it would go

Posted: Sun Dec 28, 2014 8:02 pm
by henpecked
Silverbullet wrote:The holes aren't elongated but on mine at least the hole in the hinge piece is quite a bit bigger than the bolt, gives enough movement to shift it around.
Hmm not on this bonnet - the bolts fill the bracket holes 98% ( or at least the forward hole on each arm, the rear hole on each - closest to the windscreen IS elongated laterally by about 2mm )- when just inserted through the bracket holes there is no "wiggle" up and down aand only 1-2mm horizontally ONLY on the one hole per arm, when I try them by hand, which is pointless when ALL the holes on the bonnet side are welded -on captive nuts.
The part ( 4mm band) of thread that is exposed on the bolt within the bracket hole is very slightly damaged from some crushing from moving very slightly ( .3mm) within that hole.
perhaps I'll have to try to grind that 5mm wide band down 2mm to get some wriggle.
Bent Hinge ...
Posted: Sun Dec 28, 2014 8:07 pm
by Bantum
I'd check where the hinge is mounted ( they can be rusted out ) & tweak it up / sideways ( with bonnet removed ) ...

 Note :
 Should apply to up or down & side to side movement with a bent hinge ...
 Add :
Add : tweaking = panel beat ...
Cheers, Bantum ...
Posted: Sun Dec 28, 2014 8:32 pm
by henpecked
Bantum wrote:I'd check where the hinge is mounted ( they can be rusted out ) & tweak it up / sideways ( with bonnet removed ) ...
Note : Should apply to up or down & side to side movement with a bent hinge ...
Cheers, Bantum ...
thanks for that- but I thought I tried that - I loosened the bolts - no discernible movement of the bonnet - so i left them loose and used a hammer and a block of wood on the bolts ends to try to move them forward - and then retightened - there was no discernible change -
are you saying that these hinge attachemnts are supposed to move / be adjustable ?
henpecked wrote:I took the scuttle panel off and checked the bonnet hinges - not adjustable , but loosened them off and used a hammer and a block of wood to make sure they were as forward as possible - then tightened back up
Posted: Sun Dec 28, 2014 8:39 pm
by Bantum
No - But what its bolted to is pretty flimsy & can be easily bent, so just be careful how you do it ( as it can come loose as in the example shown ) with bit of judicious panel beating ( tweaking ) on the hinge mount ...
 Add :
Add : If has come loose, you may have to weld in back on ...
Cheers, Bantum ...
Posted: Mon Dec 29, 2014 11:14 am
by henpecked
Thanks Bantum - that all makes sense - but unfortunately ( !!??) the body panels where that hinge is attached to all seem rust free and non deformed - which makes me wonder here this pareticular problem comes from ???
I may have to elongate the holes at the arm end, unless some-one else also has some thing useful to say..
Bent Bonnet ...
Posted: Mon Dec 29, 2014 10:17 pm
by Bantum
The only other thing I can think of is if someone has walked over / sat on the bonnet and in the process it has 'bent' down ...
To check, you would need to run a ruler across the top & see how much deflection there is ...
Have you got some photo's of the area to share ? As it might help if we can see something you may have missed from them ...
Cheers, Bantum ...
Posted: Wed Dec 31, 2014 5:58 pm
by henpecked
Fixed: - Bantum was right
This is a version of a "shaggy dog " story
How to fix
1) remove grill in front of windscreen
2) drop one S/S screw down into bay and wonder why your magnetic extendable tool won't pick it up.
3) hope to find some deformation on hinge panel that explains scraping of hood.
4) Find none
3) loosen the bolt and attempt to find some adjustment slots for the hinge
4) use a 2x4 and a hammer to try to force the nut and bolt further forward.
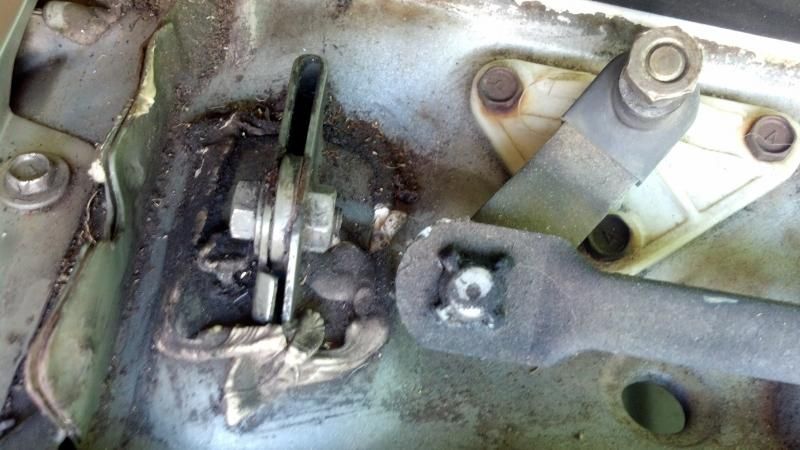
5) discover that (in the photo) the 12mm bolt head on the left runs through a single non-elongated hole into a captive 13mm nut on the right ( almost invisibly welded to the flange that encapsulates the hinge arm).
6) loosen off the four bolts ( two per side) that hold the hood/bonnet to the other end of the hinge arms.
7) try to move the hood forward.

fail
9) remove the hood completely and discover that all four bolts go into captive nuts welded to the flange on the hood/bonnet ( although one hole in each arm is slightly elongated ) .
10) Refit everything and find its still bad.
11) repeat steps 1-9
12) attempt to deform sill down by careful application of deforming force using 2x4 and hammer on the sill
13) repeat step 10
14) repeat step 11
15) surgically apply 120KGS of downward deformation force on sill by walking on it while swearing.
16) repeat step 13
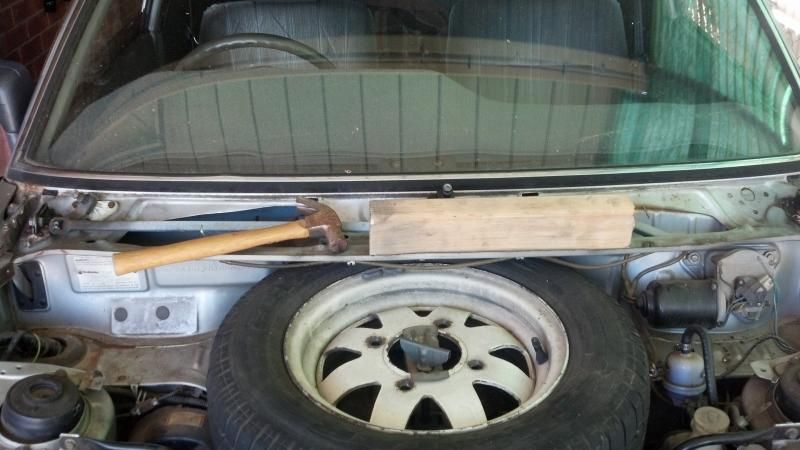
17) elevate problem toV serious and institute Australian emergency repair level 2 ( use two 2x4s)

18) repeat step 16
19) lower hood/bonnet onto wood and press down with extreme prejudice
20) remove BOTH 2x4s
21) IT NO LONGER SCAPES.
22) repeat step 16
23) discover you have covered the washer spray jets
24) repeat step 14
25) adjust washer spray jets
26) repeat step 20
27) replace wiper arms but drop one nut through sill hole.
28) repeat step 1
29) recover nut
30) repeat step 24
all fixed.
time elapsed: 2 hours 24 mins
or you could have just done step 17 and 19 ( & 20) and skipped everything else.
estimated time elapsed: 3 minutes
Posted: Wed Dec 31, 2014 7:02 pm
by Proton mouse
PMSL... very well written!! Glad you had a win in the end ��
Posted: Wed Dec 31, 2014 7:04 pm
by Silverbullet
Sounds like a complete nightmare

Wonder why it started scraping to begin with...did someone jump on your car in the night for fun or what?

Posted: Wed Dec 31, 2014 8:27 pm
by d_generate
Well done, why were you so against elongating the holes? first thing I would have done coz I'm a lazy bastard.
Posted: Wed Dec 31, 2014 9:19 pm
by Bantum
+1
Thanks for the update - Good to see you worked out ...
You must have bloody big tom cats sleeping on your car ...

Cheers, Bantum ...
Posted: Wed Dec 31, 2014 9:57 pm
by henpecked
d_generate wrote:Well done, why were you so against elongating the holes? first thing I would have done coz I'm a lazy bastard.
there would be 2-4 hole to elongate, in a very solid 5-7mm piece of steel - and I did not know in which direction to elongate or how many of the holes eg the two forward ones could just go "down" which would lift the back, or do all 4 "forward" -
as it happened using two bits of 2x4 and smashing the bonnet down on them worked fine. - Who knew ???
Posted: Thu Jan 01, 2015 8:59 pm
by d_generate
Fiary muff.
Posted: Fri Jan 02, 2015 7:06 am
by steptoe
for the next person doing this, add some anti squeak to the wiper pivots, they get a bit dry after thirty years. Is 2b4 a Soth Ozzie measure for an east coast 4b2 ?
Posted: Fri Jan 02, 2015 8:04 am
by henpecked
steptoe wrote:. Is 2b4 a Soth Ozzie measure for an east coast 4b2 ?
- Something like that , has to do with free settler immigration who paid their own way versus convicted and transported criminal infestations, similar to the Lib's Lifter vs Leaner philosophy - but its OK, we joined up to the commonwealth anyway.

NB: " So
uth " - try not to lose those vowels
)
Posted: Fri Jan 02, 2015 11:43 am
by Proton mouse
d_generate Fiary muff....
I knew a girl like that...
Is 2b4 a Soth Ozzie measure for an east coast 4b2 ?
2b4 is over square and is lighter but stronger, so can be cut into much longer or shorter lengths than 4b2
Something like that , has to do with free settler immigration who paid their own way versus convicted and transported criminal infestations, similar to the Lib's Lifter vs Leaner philosophy - but its OK, we joined up to the commonwealth anyway.
I thought the imperialistic empire surveyed Sth Oz for suitable penal colony sites, but it was deemed even too harsh for convicts??
")
NB A penal colony is not an all male nudist camp....
Posted: Fri Jan 02, 2015 7:58 pm
by steptoe
and then there were those that were paid to come out here