Help identifying Hitachi carb EA81

General Subaru Talk - Media / News / Stories ...
User avatar
David D
Junior Member
Posts: 209
Joined: Sat Dec 11, 2010 4:54 pm
Location: Adelaide, SA

Help identifying Hitachi carb EA81

Post by David D » Sun Jun 02, 2013 9:10 pm

Hi Everyone

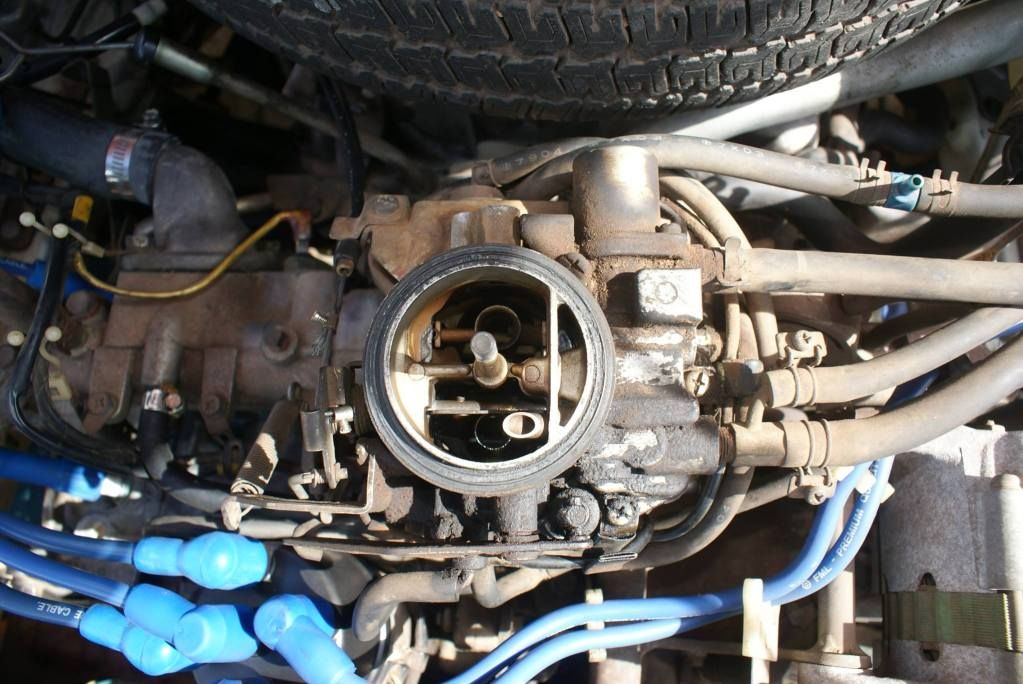
I'm hoping to rebuild my carburettor at some point (when I get time....) but I'm having trouble finding and identification number on it. I want to be sure I get the right rebuild kit. Can anyone help to identify it from these pics? It's a 1987 Brumby, Manual choke with auto cut off, blue rocker covers, manual gearbox, DR 4wd. Thanks

Image

Image

Image

Cheers

David D

User avatar
Silverbullet
Senior Member
Posts: 2921
Joined: Mon Aug 23, 2010 6:20 pm
Location: Adelaide

Post by Silverbullet » Sun Jun 02, 2013 10:07 pm

I had the same carb on the old engine that was in my ute, the ID number should be on a small flat area directly under the vent solenoid on the back of the carb (circled in red below) or maybe on a flat area on the side (circled in blue) Beware though; the number isn't stamped with number punches it's sort of printed on, very hard to make out while it's on the car and if there's any crud buildup on there you won't be able to see it at all. I could give you the number from my carb since it's the same but not today.

In any case, there is a universal rebuild kit labelled "Fuel Miser" I think that's the brand, it's the one I've used twice (from FROG our local parts guy here on the forum) and it comes with a few options parts wise to match all the carbies they had over the years.

Have a look at my rebuild thread, the one I rebuilt is different to yours but the process is the same, and they look pretty similar inside anyway. showthread.php?t=23367&highlight=rebuilding+hitachi


Image
Will it ever end!?
-EA81 TWIN CARB!!!!
-L series 5 speed
-Custom paint job
-2" lift
-Full custom re-wire
-L series front end
Image

User avatar
tambox
Junior Member
Posts: 661
Joined: Tue Sep 09, 2008 5:06 pm
Location: Clayton again

Post by tambox » Mon Jun 03, 2013 7:56 am

There are two Fuel Miser kits that are available for that carb.
The HT425 is the one that is listed for Brumby 82 on.
It also lists the the HT421A for ealier models.
The main difference in the kit is the top gasket.
If you cant see the model number, you can match your top gasket with the one in the book, that your Fuel Miser supplier will have.
The top gaskets are similar between the kits, match carefully.
L serious, still.

User avatar
steptoe
Master Member
Posts: 11582
Joined: Thu Oct 06, 2005 10:00 am
Location: 14 miles outside Gotham City

Post by steptoe » Mon Jun 03, 2013 8:03 am

HT425 rings a bell as the kit that also does the twin Hitachis > I get Davids point asking now before he dismantles carb rendering vehicle undriveable just to get the carbs ID marks

User avatar
David D
Junior Member
Posts: 209
Joined: Sat Dec 11, 2010 4:54 pm
Location: Adelaide, SA

Post by David D » Mon Jun 03, 2013 4:48 pm

Thanks for the help guys. I did have a look for numbers on the carb a while back but I'll check again now I know the location(s). I tried to give it a rough clean back then so hopefully I didn't scrub them off!
I have read through your thread a few times, Silverbullet, and it is very helpful. I also read your original Hitachi rebuild thread so I know to be careful with rags...

Cheers

David D

User avatar
tambox
Junior Member
Posts: 661
Joined: Tue Sep 09, 2008 5:06 pm
Location: Clayton again

Post by tambox » Mon Jun 03, 2013 4:55 pm

It should be the HT425, depending on where you get it, get both and return the unused one.
L serious, still.

User avatar
NachaLuva
General Member
Posts: 1930
Joined: Wed Aug 31, 2011 5:05 pm
Location: SE Melbourne

Post by NachaLuva » Mon Jun 03, 2013 7:01 pm

tambox wrote:depending on where you get it, get both and return the unused one.
Good idea, just check 1st you can return the unused one & make sure you keep the receipt lol ;)
[SIGPIC][/SIGPIC]
Owner SubieLiftOz, lift kits for Subarus :twisted:

'97 Forester: EJ22E; 4" Custom Body Lift; JDM STi plated LSD; 20mm WRX RSB; Snorkel; Kings

User avatar
David D
Junior Member
Posts: 209
Joined: Sat Dec 11, 2010 4:54 pm
Location: Adelaide, SA

Post by David D » Fri Jun 07, 2013 7:05 pm

Just been to my local parts place and the only kit they had listed was the HT421A which covers '82 - '94 according to their listings. Hopefully it will be OK. Now I just have to get myself mentally prepared before I pull the thing apart. There sure are a lot of little bits in that bag....:shock:.

I notice in the Gregory's manual, it says to drain some coolant before removing the carby. Is that necessary or does in only apply to EA82? My manual covers both engines.

Thanks again

David

User avatar
Silverbullet
Senior Member
Posts: 2921
Joined: Mon Aug 23, 2010 6:20 pm
Location: Adelaide

Post by Silverbullet » Fri Jun 07, 2013 7:20 pm

Ignore the number of bits in the bag, there are many of the same part in different sizes to cover the different models. You won't use every part. Would be a good idea to lower the coolant level a little since there's a coolant channel at the base of the carb, coolant would leak out when you unbolt it.

Good luck! it may look daunting but it's not nearly as hard as it looks. Just make sure every jet and air bleed goes back exactly where it came from, and you can never have too much carby cleaner.
Will it ever end!?
-EA81 TWIN CARB!!!!
-L series 5 speed
-Custom paint job
-2" lift
-Full custom re-wire
-L series front end
Image

User avatar
David D
Junior Member
Posts: 209
Joined: Sat Dec 11, 2010 4:54 pm
Location: Adelaide, SA

Post by David D » Fri Jun 07, 2013 7:27 pm

Thanks for that, I thought there'd be extra bits and I guess I only have to use what I feel is necessary. I'll try and leave a day free for it as soon as I can. I have a thermo switch for the fan to replace so I may drop the coolant and do that while I'm in the engine bay.

I'll keep you guys updated...

David

User avatar
NachaLuva
General Member
Posts: 1930
Joined: Wed Aug 31, 2011 5:05 pm
Location: SE Melbourne

Post by NachaLuva » Fri Jun 07, 2013 10:32 pm

Silverbullet wrote:Just make sure every jet and air bleed goes back exactly where it came from
Have a system, tag each item as you remove it & record where it came from. Also a good idea to take a few photos as you dismantle, shows angles as well as position ;)
[SIGPIC][/SIGPIC]
Owner SubieLiftOz, lift kits for Subarus :twisted:

'97 Forester: EJ22E; 4" Custom Body Lift; JDM STi plated LSD; 20mm WRX RSB; Snorkel; Kings

User avatar
El_Freddo
Master Member
Posts: 12637
Joined: Tue Oct 04, 2005 10:00 am
Location: Bridgewater Vic
Contact:

Post by El_Freddo » Sat Jun 08, 2013 11:47 pm

NachaLuva wrote:Have a system, tag each item as you remove it & record where it came from. Also a good idea to take a few photos as you dismantle, shows angles as well as position ;)
Yep, this is where a texta and a big piece of cardboard come in very handy for organisation - put the parts into the cardboard (or polystyrene) and label them - you can number as the order it came out too - can make it easier when putting it back together ;)

Carbs - they aren't that hard to deal with unless you miss something falling out when disassembling!

Cheers

Bennie
"The lounge room is not a workshop..."
Image
El Freddo's Pics - El_Freddo's youtube

User avatar
David D
Junior Member
Posts: 209
Joined: Sat Dec 11, 2010 4:54 pm
Location: Adelaide, SA

Post by David D » Wed Jun 19, 2013 12:03 pm

Things are not going well....

I have the carb off the car and so far out of the three top gaskets, none of them match exactly what I took off. I reckon I could slightly modify on but not sure if that's OK. Also the manifold gaskets are different too - the new ones have a shorter distance between the bolt holes. HT421A seems to be the only kit listed here in Mackay which is what I bought. Just to worry me further, I found no weighted pin and no ball under the spring in the main body.

Can't really rebuild as the old gaskets are pretty wrecked so I'm still trying to get hold of HT425.:(

David

User avatar
David D
Junior Member
Posts: 209
Joined: Sat Dec 11, 2010 4:54 pm
Location: Adelaide, SA

Post by David D » Wed Jun 19, 2013 12:08 pm

I'm trying to post some pics but my laptop won't recognise my phone:mad:

User avatar
David D
Junior Member
Posts: 209
Joined: Sat Dec 11, 2010 4:54 pm
Location: Adelaide, SA

Post by David D » Wed Jun 19, 2013 2:55 pm

Okay, I found the weighted pin and the ball - they wouldn't fall out when I turned it upside down. Bet they would have if I wasn't expecting it!
I managed to order HT425 but won't get it until Friday so I kept cleaning in the meantime, then things got a bit worse.
I was trying to remove the power valve (?) from inside the bowl and it was reeeaaally tight. I somehow managed to slip with the screwdriver and snap off this little pin that was sticking out the middle.

Image

Still can't get it undone but I don't know what to do now. Am I likely to get a replacement one of these or should I look for another carb?
I can't get the needle unscrewed from the top plate either but I'm not brave enough to force it now. Gutted :(

User avatar
Silverbullet
Senior Member
Posts: 2921
Joined: Mon Aug 23, 2010 6:20 pm
Location: Adelaide

Post by Silverbullet » Wed Jun 19, 2013 5:32 pm

Argh blasted dissimilar metals strike again :( Forgot to mention some of these little screws and jets can be almost seized in, requiring a strong force before they crack open. I think that little pin that broke off is spring loaded, can't remember what it actually does though. I also couldn't crack loose the small jet in the top plate of mine so I left it alone. Would be best to start looking for another cheap carb even if just to replace the power jet, I don't know how readily available a part like that could be.
Will it ever end!?
-EA81 TWIN CARB!!!!
-L series 5 speed
-Custom paint job
-2" lift
-Full custom re-wire
-L series front end
Image

User avatar
David D
Junior Member
Posts: 209
Joined: Sat Dec 11, 2010 4:54 pm
Location: Adelaide, SA

Post by David D » Wed Jun 19, 2013 6:11 pm

Yeah I left another one of the smaller jets in place as I could tell I was damaging it.
The pin is spring loaded but it's hard to say what it does. I was wondering if I could find something of similar dimensions that would sit in place but that might be pushing it a bit. I was thinking a second hand carb would be the answer but then I would have the same issue removing the power jet. Plus I've still gotta get mine out yet.
Just out of interest I called in to Subaru this afternoon and they said the part might be available from Japan but would take 3 - 4 weeks and is around $35. Trouble is there a 2 variations and I still can't find the ID stamp on the carb. I really can't wait that long either so I'll take my chances with a used carb.

Pretty poor result today.

David

User avatar
tambox
Junior Member
Posts: 661
Joined: Tue Sep 09, 2008 5:06 pm
Location: Clayton again

Post by tambox » Wed Jun 19, 2013 9:51 pm

Getting carbs to bits can be hard at times.
As a lot of the carb internals are soft brass, you need really good edges on your screwdrivers. Rounded edges on flat blades will not bite, causing damage when they slip.
On some jets you need the right lenght and thickess flat blade, or else you can easily bur them.
I have a screwdriver with a little slot cut out of the centre of the blade, for undoing power jets. They also vary in jet size, so you need the matching one.
Complete carby may be the simplest option, but will you need to reco it?
L serious, still.

User avatar
steptoe
Master Member
Posts: 11582
Joined: Thu Oct 06, 2005 10:00 am
Location: 14 miles outside Gotham City

Post by steptoe » Thu Jun 20, 2013 8:10 am

tambox is showing some real talent isn't he ? Take a leaf out of his book of experience, find a screwdriver that is a nice fit and cut a slot down the middle of the blade to clear the brass pin. Notice it is in the near bottom of a 'bath' ? CRC556 in a spray can works wonders, more wonders than wd40 in my experience, infact Subaru think its so good , there is a part number with CRC556 in it in the manuals! Try bathing that power valve in it until you get the new one or another carby. Think you will find a shaft with a coil spring in the top cover that corresponds with power valve pin.
Also, with your new tool, tap a short blow to handle to 'crack' any tight grip the threads may have on one another. Yet another tip is use a screwdriver with square or hex drive somewhere ,that you can apply a twist with while pushing down on handle...

Someone should have a carb for parts salvage. I have thrown a few, but will have a look...

User avatar
555Ron
Junior Member
Posts: 189
Joined: Tue Jul 14, 2009 6:54 pm
Location: Newcastle, NSW

Post by 555Ron » Thu Jun 20, 2013 8:48 am

I have a carb here from an '87 Brumby. I believe it had a manual choke though which went with the car to a better place. But it may have the part you require? If you want it, let me know. I can probably get it to you by the weekend if you are quick...
- Rhys
91 Brumby

Post Reply

Return to “Subaru Chat”