Page 1 of 2
How does rolling the front guards sound?
Posted: Tue Jun 19, 2012 6:27 pm
by 2nd Hand Yank
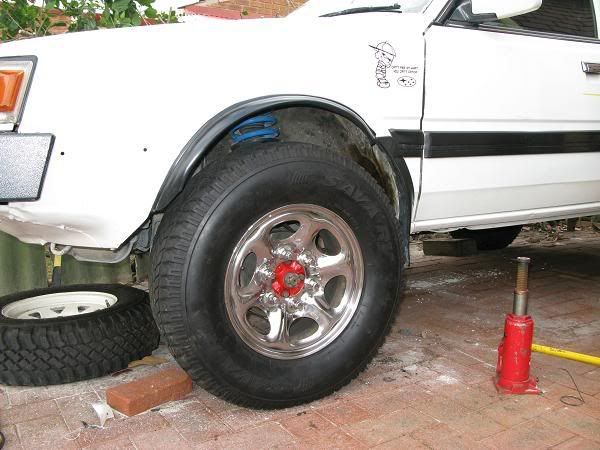
Last time I measured up big tyres in my L Series with my previous oversize spare, I found I had 1 cm minimum clearance at the rear part of the front guard while the wheel was turned. When I removed the passenger front guard last time and plastic inner guard I noticed there's nothing behind it, just empty space.
So...
I'm thinking I'd like to try rolling back the front and rear corners of the front guards, starting with my newest beige coloured guard since it does not yet have a mud flap or a fender flare, and I will need a fender flare to pass pit inspection in NSW.
Does anyone think this is a bad idea?

I've never been impressed with the factory front arches, pinching inwards towards the bottom of the guard.
I saw it in a car magazine years ago and have been looking at videos on youtube.
If I do this, I'll need a heat gun, a plastic faced hammer, a ball peen hammer, a hacksaw to open up areas for metal working and perhaps a small piece of wood if I want to reform the inner lips where the mudflap attaches.
So yeah, I now have only 1 cm clearance for tyres of 25" diameter.
I would like to roll the bottom corners back 1.5-2" so that it would easily accept 27.5" tyres; about the biggest tyres I might be interested in atm.
Posted: Tue Jun 19, 2012 6:52 pm
by thunder039
seen it done, dont see an issue with it as long as you dont fold the guard completely
Posted: Tue Jun 19, 2012 8:35 pm
by 2nd Hand Yank
thunder039 wrote:seen it done, dont see an issue with it as long as you dont fold the guard completely
fold the guard completely?
Do you mean like obvious body damage or disfigurement?
The heat gun I hear is so the paint doesn't crack and flake off.
Posted: Tue Jun 19, 2012 8:59 pm
by El_Freddo
IMO get it done professionally, it'll be worth the money and the quality of the finish.
But if you're good with this sort of thing go for it! Take loads of pics!
Cheers
Bennie
Posted: Tue Jun 19, 2012 10:48 pm
by username
Baseball bat between the wheel and the guard, spin wheel, profit
Posted: Tue Jun 19, 2012 11:40 pm
by sven '2'
In DIY mode, for the amount of metal you need to move, a jigsaw is the way to go, covered up by some cut down flares. Or the baseball bat.
I have also seen a mallee stump used with great success (not pretty but)
Heat gun + guard roller good for 10-15mm tops
Either way it will not end well cosmetically if you care about such things, but on a old L, why not?
Posted: Wed Jun 20, 2012 8:55 am
by TOONGA
you need experience and these
tools plus the gas torch, mallets and hammers to do the job correctly. As well you would need to bog primer paint and polish the finished job.
TOONGA
Posted: Wed Jun 20, 2012 5:59 pm
by 2nd Hand Yank
El_Freddo wrote:IMO get it done professionally, it'll be worth the money and the quality of the finish.
But if you're good with this sort of thing go for it! Take loads of pics!
Cheers
Bennie
What do you think a panel beater would charge?
I want to expand the opening of the bottom half of the arch,
with the most expansion towards the bottom... say 20-50mm?
If i'm going to professional route, perhaps a bit of bulging above the wheel arch would also be good.
Posted: Wed Jun 20, 2012 8:47 pm
by sven '2'
I would suggest around $2K
Would be a prick of a job + would require painting (hence the high cost)
Posted: Wed Jun 20, 2012 9:24 pm
by El_Freddo
2nd Hand Yank wrote:What do you think a panel beater would charge?
Dunno, best you ask a panel beater. You might find that there's a waiting list for work to be done - maybe.
Cheers
Bennie
Posted: Fri Jun 22, 2012 10:36 pm
by 2nd Hand Yank
I think I might go buy a panel beating dolly or two and try on the spare beige guard.
If I muck it up, no worries it already doesn't match.
If I don't I can use that skill to make the other side match.

I'll probably do a DIY paint job to make the beige panel to match my dark red once finished.
Probably invest in a good sander.
I think it's better than just taking a sawzall and chewing out the guard, leaving a sharp edge.
I understand panel beating is like an art, but I'm pretty good at attention to detail.
Posted: Fri Jun 22, 2012 11:00 pm
by Alex
So not worth spending big dollars on. Angle grinder, hammer and wheel flares is all I used and it looked really good.
Sent from my HTC Velocity 4G using Tapatalk 2
Posted: Mon Jun 25, 2012 4:34 pm
by 2nd Hand Yank
Alex wrote:So not worth spending big dollars on. Angle grinder, hammer and wheel flares is all I used and it looked really good.
Sent from my HTC Velocity 4G using Tapatalk 2
How about a bit of both?

If I make a cut along the bottom of the guard I can hammer back the original bend area the bottom of the mudflap attaches to. (making a new bent area about 20-50mm back to afix a mudflap) Or is that what you meant?
Posted: Mon Jun 25, 2012 4:46 pm
by Alex
this is what mine looked like with a fair bit of cutting. Its amazing what the mudflap and wheel arch flares can cover
alex
Posted: Mon Jun 25, 2012 6:49 pm
by alang
if you are going to use a angle grinder to cut the guards with get some stainless steel cutting disc's nice and thin easy to use
Posted: Mon Jun 25, 2012 9:18 pm
by Mitchhsj
I have just got myself a new wagon ( 91 l series) stock as a rock, I got rid on the 13s and put my 14 inch sunrasiers with 27 inch mud tiers in it. Looks cool low with the big wheels bit they were rubbing a bit. I left my mud guards on the front but had to trim up the inside in them for turning...
Posted: Mon Jun 25, 2012 10:04 pm
by 2nd Hand Yank
Alex wrote:this is what mine looked like with a fair bit of cutting. Its amazing what the mudflap and wheel arch flares can cover
alex
Nice pic.

How did you attach the fender flares after chopping?
Or the flares only attach where the original inner lip was untouched?
Your L is so high, that bottle jack looks useless now.
Posted: Mon Jun 25, 2012 10:27 pm
by Alex
I cut the whole arch out. As said, use a very thin disc in your grinder, cut slots and bend it up 90 degrees. This will allow the flares to still be attached.
Happy days!
Sent from my HTC Velocity 4G using Tapatalk 2
Posted: Tue Jun 26, 2012 5:57 pm
by 2nd Hand Yank
Alex wrote:I cut the whole arch out. As said, use a very thin disc in your grinder, cut slots and bend it up 90 degrees. This will allow the flares to still be attached.
Happy days!
Sent from my HTC Velocity 4G using Tapatalk 2
thanks mate
Posted: Fri Jun 29, 2012 1:09 pm
by 2nd Hand Yank
Alex wrote:I cut the whole arch out. As said, use a very thin disc in your grinder, cut slots and bend it up 90 degrees. This will allow the flares to still be attached.
Happy days!
Sent from my HTC Velocity 4G using Tapatalk 2
I'm getting a strong urge to do a combination of angle grinding and panel beating.
The bottom front corner of the guard tucks in a lot, leaving a lot of tyre exposed when viewed from the front.
I'm thinking I can open the wheel well up when viewed from the side,
simultaneously flaring it out a little when viewed from the front...
Then hiding the edge behind a 35mm fender flare,
but this way I'll have more guard coverage when viewed from the front.
The paint probably won't look factory,
but I'm already planning a repaint of my new front guard anyway
so that will give me plenty of practice before I try my good, factory colour guard.