Hi guys,
recently obtained a 2" inch lift for the brumby from a forum member, just wondering what exactly the kit is.
From what I have worked out the kit has
1. Blocks for the front crossmember
2. Blocks for under the transmission
3. Blocks for where the moustache bar mounts to the body
4. a mount for the rear shocks
5. Strut top mounts
so the strut tops straight away made me think it was a suspension lift, but I thought the other blocks were more like a body lift.
I know the consequences of lifts have been discussed a thousand times (yes I did try and search) but I was just wondering what exactly this kit is and what to expect.
cheers again
James
Identifying a 2" lift kit
-
Backyard_Brumby

- Junior Member
- Posts: 259
- Joined: Wed Dec 01, 2010 10:47 am
- Location: Brisbane
- Contact:
Identifying a 2" lift kit
[SIGPIC][/SIGPIC]James 
Post up a pic of the kit mate So its easier to see and let you know what it is.
The project, EJ22 --->>> EJ25 Quad CAM:D touring wagon

Thinking of going on holidays on a little paradise island, Check out http://www.dodolidays.com

Thinking of going on holidays on a little paradise island, Check out http://www.dodolidays.com
-
Backyard_Brumby
- Junior Member
- Posts: 259
- Joined: Wed Dec 01, 2010 10:47 am
- Location: Brisbane
- Contact:
-
El_Freddo

- Master Member
- Posts: 12699
- Joined: Tue Oct 04, 2005 10:00 am
- Location: Bridgewater Vic
- Contact:
You should have:
2 strut top lift blocks.
6 single hole blocks for the radius rod/sway bar mounting plate
2 engine crossmember blocks
2 moustache bar blocks
I think 4 rear K frame blocks
And the shock absorber blocks x2.
I unfortunately don't have a pic of Subaruby's lift blocks on the net before we installed them
Hope this was of some help though
Cheers
Bennie

-
spidersubaru

- Junior Member
- Posts: 24
- Joined: Wed Feb 17, 2010 6:46 pm
- Location: brisbane

A suspension lift increases the length of the suspension, usually by aftermarket longer/stiffer springs or modified shock absorbers/struts. You can also increase the length of the suspension by using a "strut top only body lift", which separates the suspension from the body with extension blocks.
A full body lift separates the suspension, plus all the other bits like crossmembers, K frames, diff mounts etc from the body by however many inches.
Kit should also include an extended engine stay-rod.
A full body lift separates the suspension, plus all the other bits like crossmembers, K frames, diff mounts etc from the body by however many inches.
Kit should also include an extended engine stay-rod.
EZ30 L series - Monsterwagon
https://www.ausubaru.com.au/viewtopic.php?f=71&t=26163
https://www.ausubaru.com.au/viewtopic.php?f=71&t=26163


-
El_Freddo
- Master Member
- Posts: 12699
- Joined: Tue Oct 04, 2005 10:00 am
- Location: Bridgewater Vic
- Contact:
Ah that's what I forgot! I knew I left a piece out...spidersubaru wrote:You should have all those blocks as freddo said and also if you have power steering a steering linkage extension have pics at home of kit before install so will put up pics when I get home if you want mate
Thanks for picking that up!
Cheers
Benine
-
Backyard_Brumby
- Junior Member
- Posts: 259
- Joined: Wed Dec 01, 2010 10:47 am
- Location: Brisbane
- Contact:
So still working on the photos, combination of work and being lazy haha.
thanks for all the advice guys,
this kit actually came off an ex gymkhana brumby (yes a gymkhana brumby, I had to doubletake)
instead of the six separate blocks for radius rod swaybar etc it has one plate, looks like the stock but obviously with a 2" lift. It makes it a nice neat way of doing it.
I did the two front crossmember mounts by just dropping the crossmember putting the blocks back and doing it all up. With the other mounts is it appropriate to do them the same way or should I be putting the car on stands and undoing while the stands are supporting the body?
Cheers again
[SIGPIC][/SIGPIC]James

I did the two front crossmember mounts by just dropping the crossmember putting the blocks back and doing it all up. With the other mounts is it appropriate to do them the same way or should I be putting the car on stands and undoing while the stands are supporting the body?
Cheers again[/QUOTE]
Lets just say that whenever working under any vehicle or anything that is solid, you should always ensure that it or anything else will not come down and pin a hand, head, leg, or any other part of your body between it and a hard place thuse causing severe anguish, pain or even a lack of breath resulting in death.
Therefore jack, brace, support and play safe.
Hylton:twisted:
-
Backyard_Brumby
- Junior Member
- Posts: 259
- Joined: Wed Dec 01, 2010 10:47 am
- Location: Brisbane
- Contact:
Sounds like the wise words from experience. now I am going to cop it as the old man gave me the same talk yesterday.Lets just say that whenever working under any vehicle or anything that is solid, you should always ensure that it or anything else will not come down and pin a hand, head, leg, or any other part of your body between it and a hard place thuse causing severe anguish, pain or even a lack of breath resulting in death.
Therefore jack, brace, support and play safe.
Hylton:twisted:
Cheers for that hylton
[SIGPIC][/SIGPIC]James
-
El_Freddo
- Master Member
- Posts: 12699
- Joined: Tue Oct 04, 2005 10:00 am
- Location: Bridgewater Vic
- Contact:
yep, two sets of jack stands are a great help in the fitting of a lift kit 
I also used the trick of removing one of the bolts and replacing it with one of the lift bolts, dropping the said suspension/drivetrain component down with the bolt as a guide then fitting the blocks and other bolts near it until these bolts take up the slack. A jack can also be used to support the lowered component to allow you to place the block as it should be in the case of blocks with two bolt holes...
Cheers
Bennie
-
Backyard_Brumby
- Junior Member
- Posts: 259
- Joined: Wed Dec 01, 2010 10:47 am
- Location: Brisbane
- Contact:

Uploaded with ImageShack.us
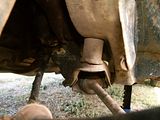
The lift kit, minus the front two that are already sitting on top of the crossmember

Uploaded with ImageShack.us
[SIGPIC][/SIGPIC]James

-
Backyard_Brumby
- Junior Member
- Posts: 259
- Joined: Wed Dec 01, 2010 10:47 am
- Location: Brisbane
- Contact:
Great findBackyard_Brumby wrote:
Uploaded with ImageShack.us
The lift kit, minus the front two that are already sitting on top of the crossmember
Uploaded with ImageShack.us
Love the Safety Boots ehehehh what did your dad tell you????
Hylton:twisted:
Very happy with it, i did have a weld start to fail on the radius rod bracket, but the L series' i was offroading with where ripping there captive nuts out in that area.Backyard_Brumby wrote: How did you find the kit?
[url=<a href="http://s235.photobucket.com/albums/ee23 ... CT0032.jpg" target="_blank"><img src="http://i235.photobucket.com/albums/ee23 ... CT0032.jpg" border="0" alt="Photobucket"></a>]
 [/url]
Daza.
[SIGPIC][/SIGPIC]
-
Backyard_Brumby
- Junior Member
- Posts: 259
- Joined: Wed Dec 01, 2010 10:47 am
- Location: Brisbane
- Contact:
Haha it was a late night after work better get some photos done. In every photo I took for the write up I managed to get my ugly hoof in the photo hahaGreat find
Love the Safety Boots ehehehh what did your dad tell you????
Hylton
And that sounds good Daza, it seems to be a nice solid simple set up.
[SIGPIC][/SIGPIC]James